Welcome
We are Expanding Sales Channels for Our Clients
Our platform enables you to launch new telecom products and expand your market reach. Here, you can:
- Set up and manage your own eSIM Store
- Offer pre-paid telecom products
- Transition pre-paid services into subscription-based products
This flexibility allows you to enter new markets and grow your customer base.
Streamlined Operations and Finance
We reduce the time needed to manage multiple operators and financial tasks. Our platform automates invoicing and simplifies financial processes, making operations more efficient, especially when handling a large number of customers.
Unified Platform for Global Telecom Management
The platform connects multiple telecom services worldwide, managed from a single interface.
Key Features:
- Multi-Tenant:
Here you can have a personalized dashboard with real-time data on usage, traffic, and SIM card status, helping them manage telecom services effectively. - Multi-White-Label:
Customize the platform with your brand, applying logos, colors, and other elements for a cohesive user experience. - Data Security:
Our platform ensures data protection and compliance with global standards, providing analytics to optimize telecom strategies while keeping your data secure.
Jump right in




I have a client who is interested in using your platform
We have multiple referral programs. Please contact us.Mandatory settings
1. Integrate your Telecoms
Complete the following steps:
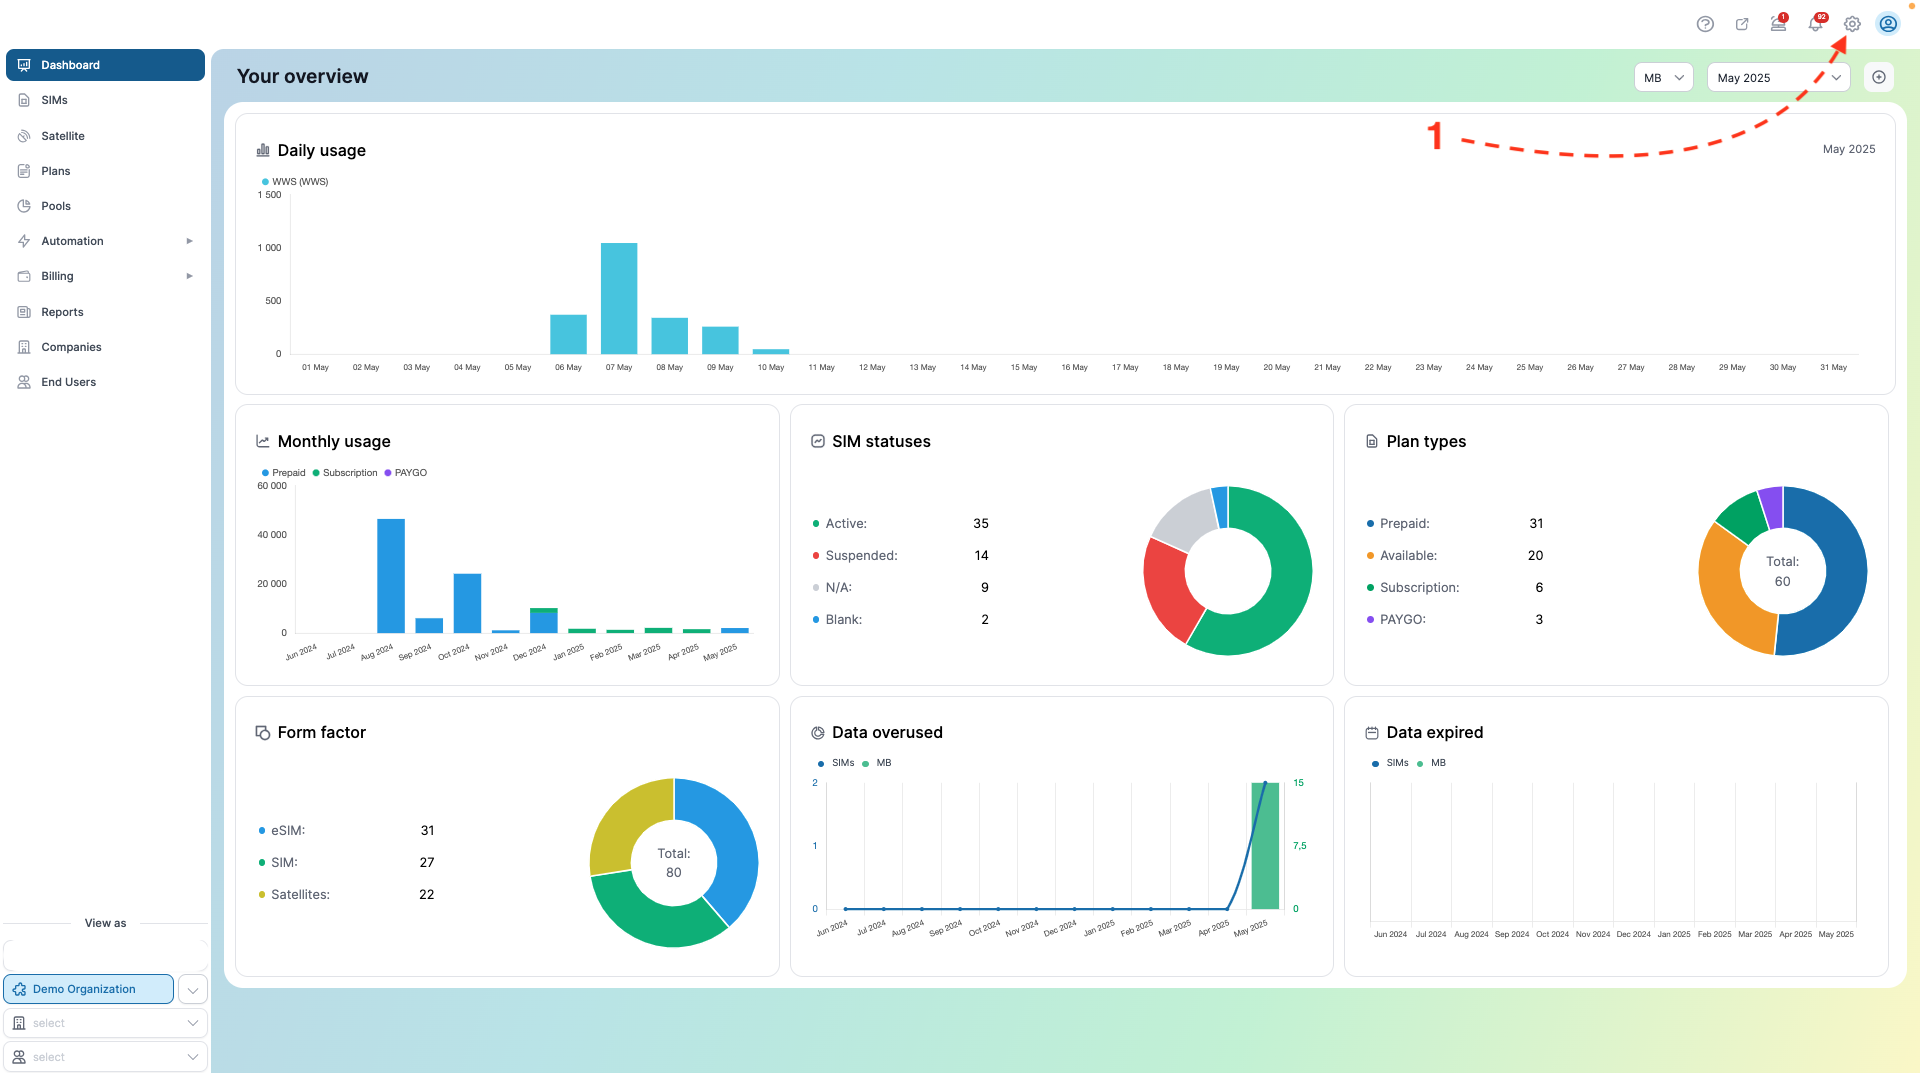
- Go to Settings.
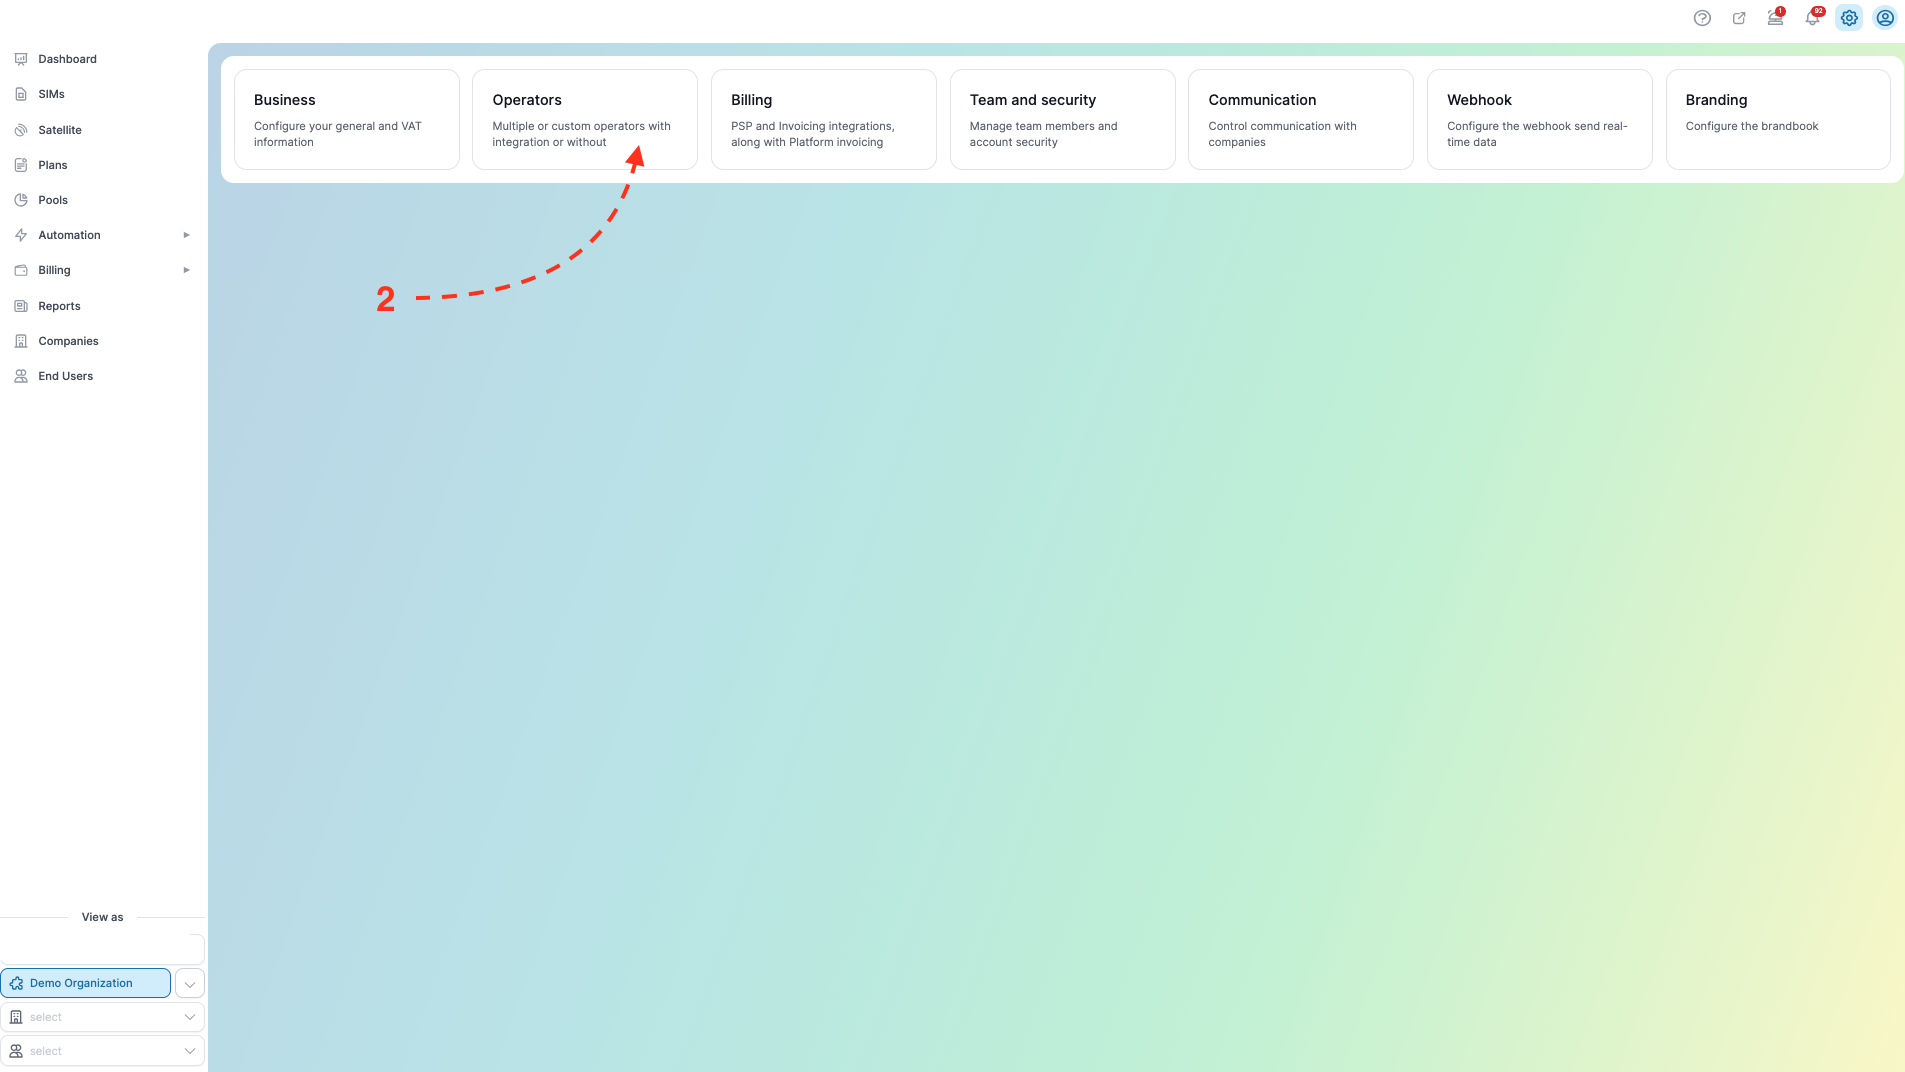
- Select "Operators."
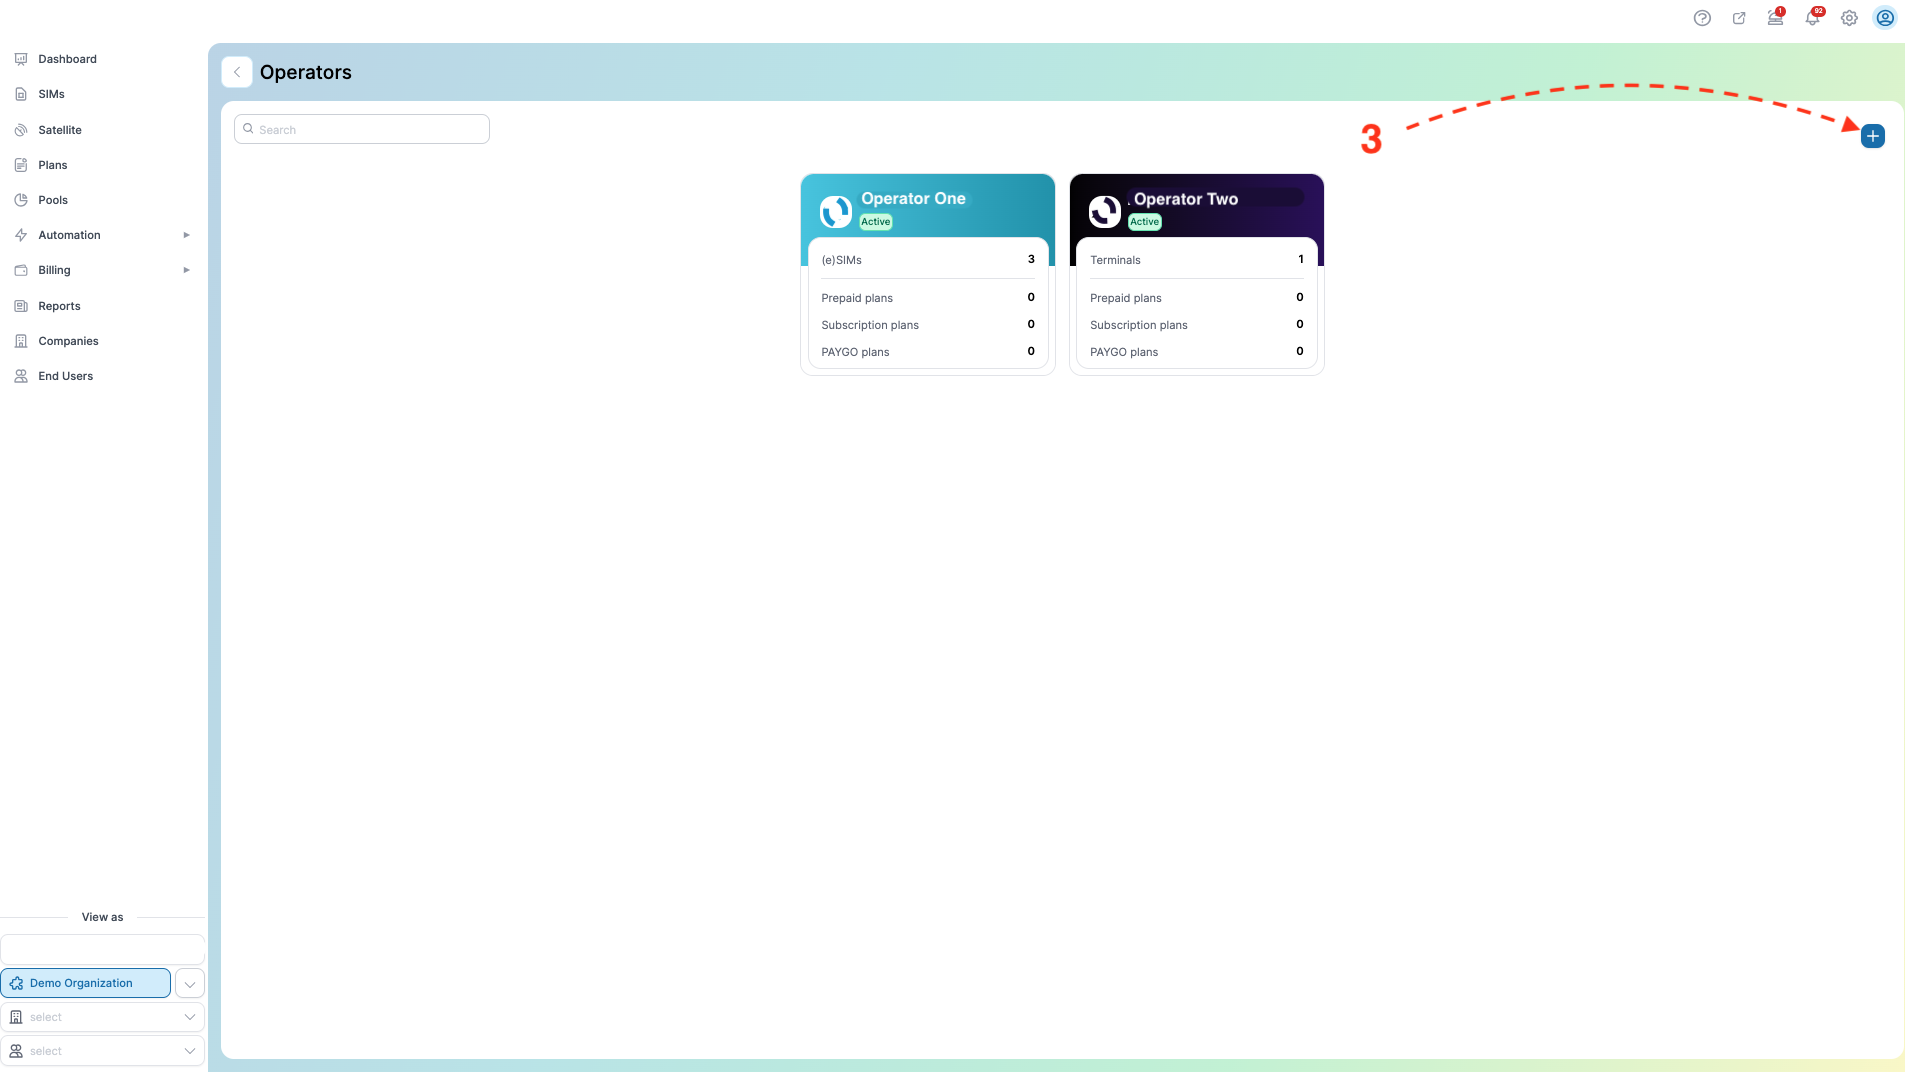
- The "Operator" page will open —> click the plus (+) button on the right.
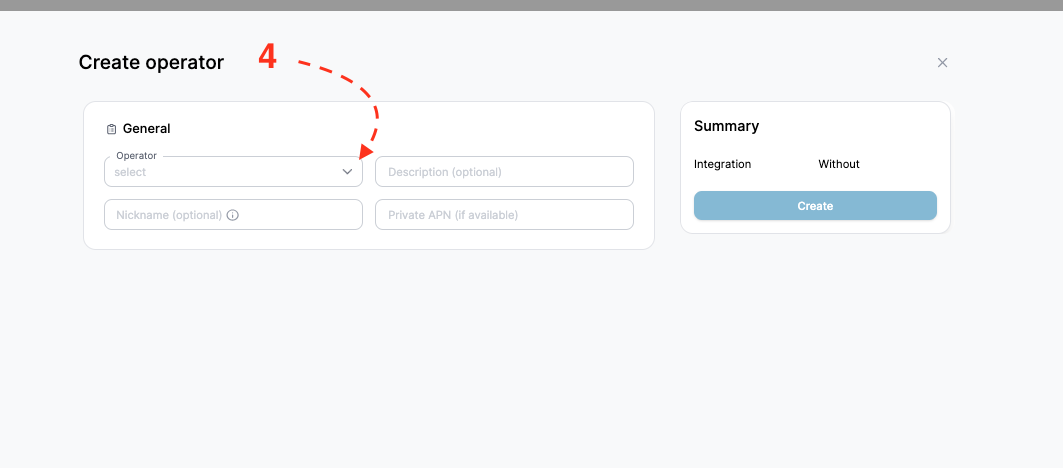
- A page will open where you can choose the operator from the drop-down list.
-
Once you've selected the operator, depending on the integration type, you'll need to fill in the details.
-
Note that you, as an Organization, have the option to use the Nickname field for operators.
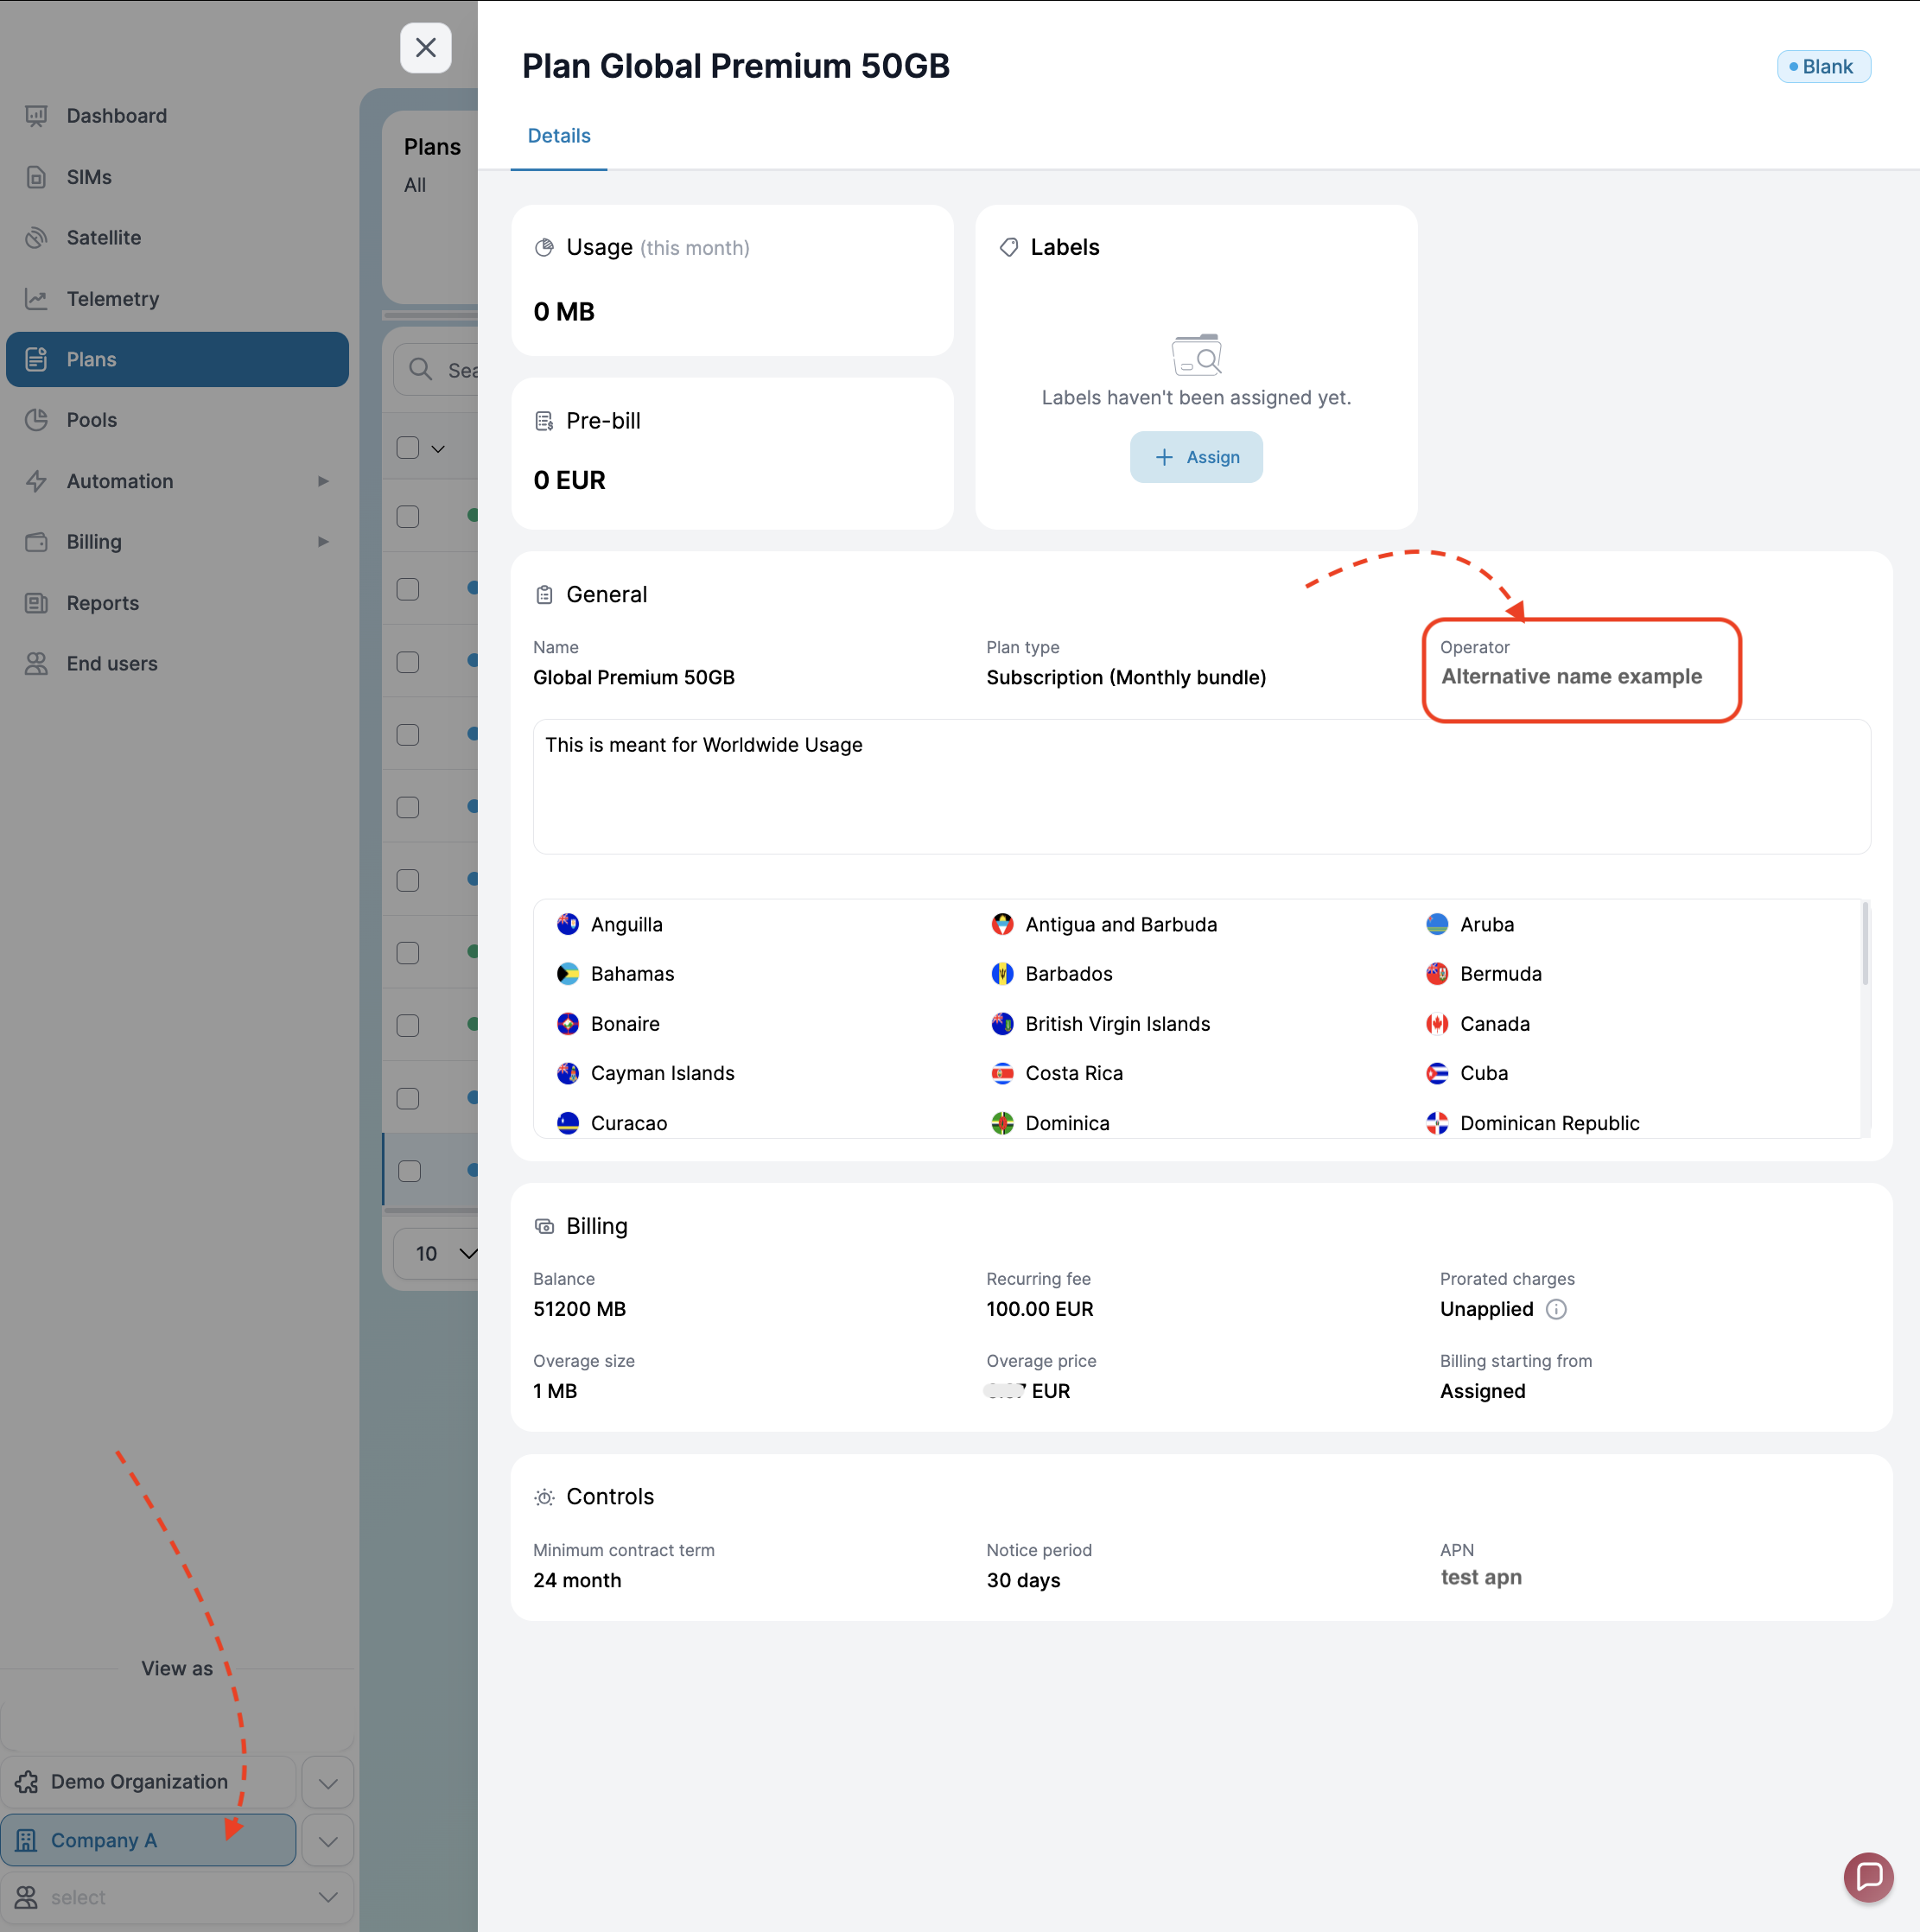
A Nickname is an optional alternative name that your Companies and End Users will see instead of the main operator name.
- If you fill it in, the system will display this nickname in the interface
- If left empty, the main operator name will be shown.
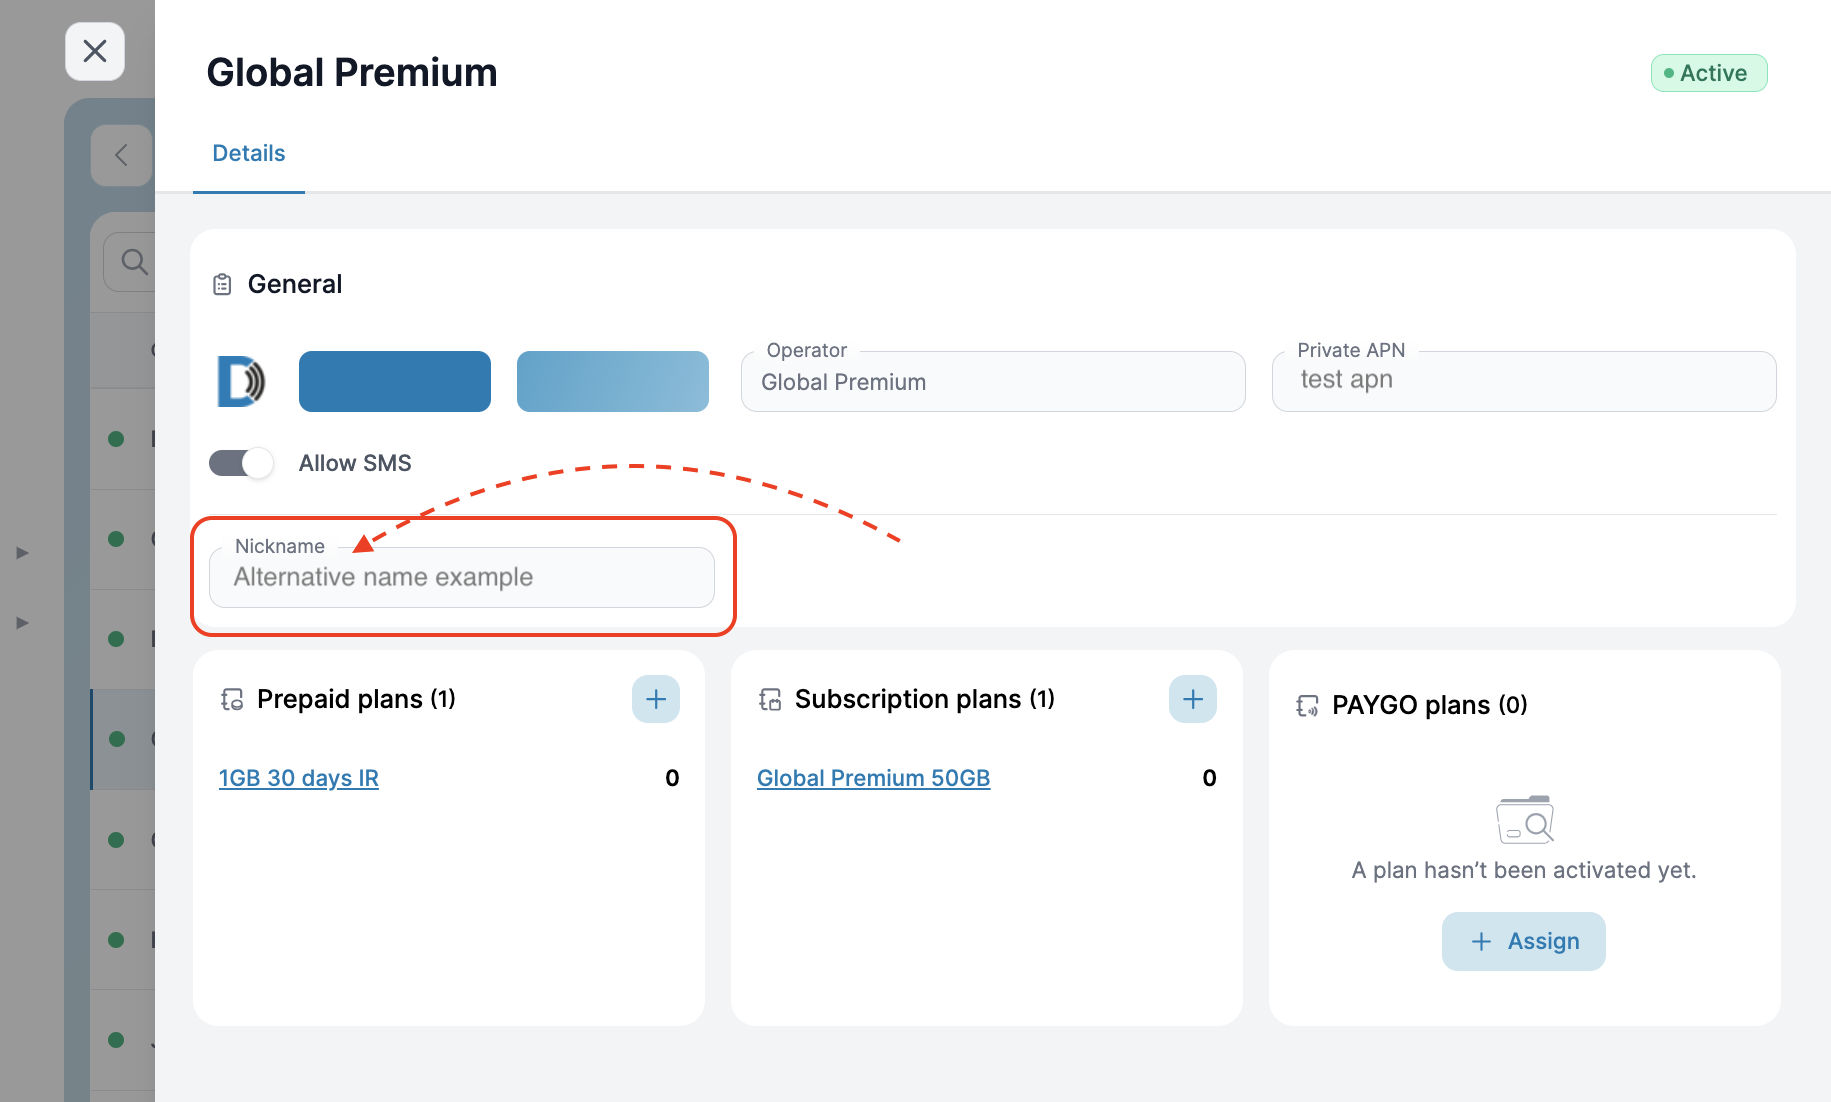
- To change the nickname, click on the field in the edit form.
- Enter the new nickname and save changes.
Here’s how it appears at the Company level:
Couldn't find the right operator after checking the whole list?
- Option 1 – You don't have integration with the Operator
This means you can add and manage SIMs, but you won’t be able to access real-time data usage information.
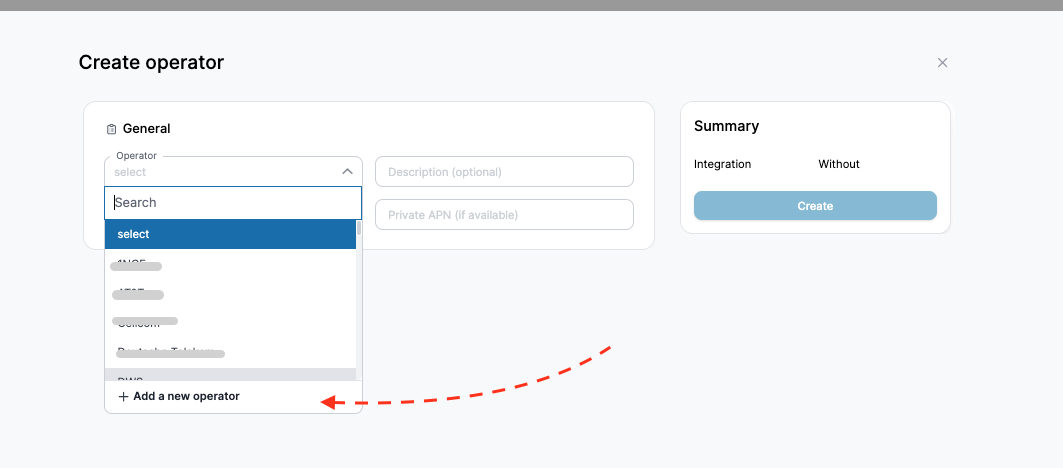
Option 2 – There is an integration with the operator you would like to add.
For the integration, the following credentials are required:
- API Documentation
- License key
- API prefix or login, and password
- etc
Credentials can vary based on the integration. For some, a CERT file might be needed, or other information could be required.
If an operator is not on the list, please provide us with the API documentation and credentials for integration.
Timeline: That can take us up to 2 weeks to integrate
2. Create Company
Complete the following steps:
- Go to the “Companies” button on your left side of the Side navigation menu
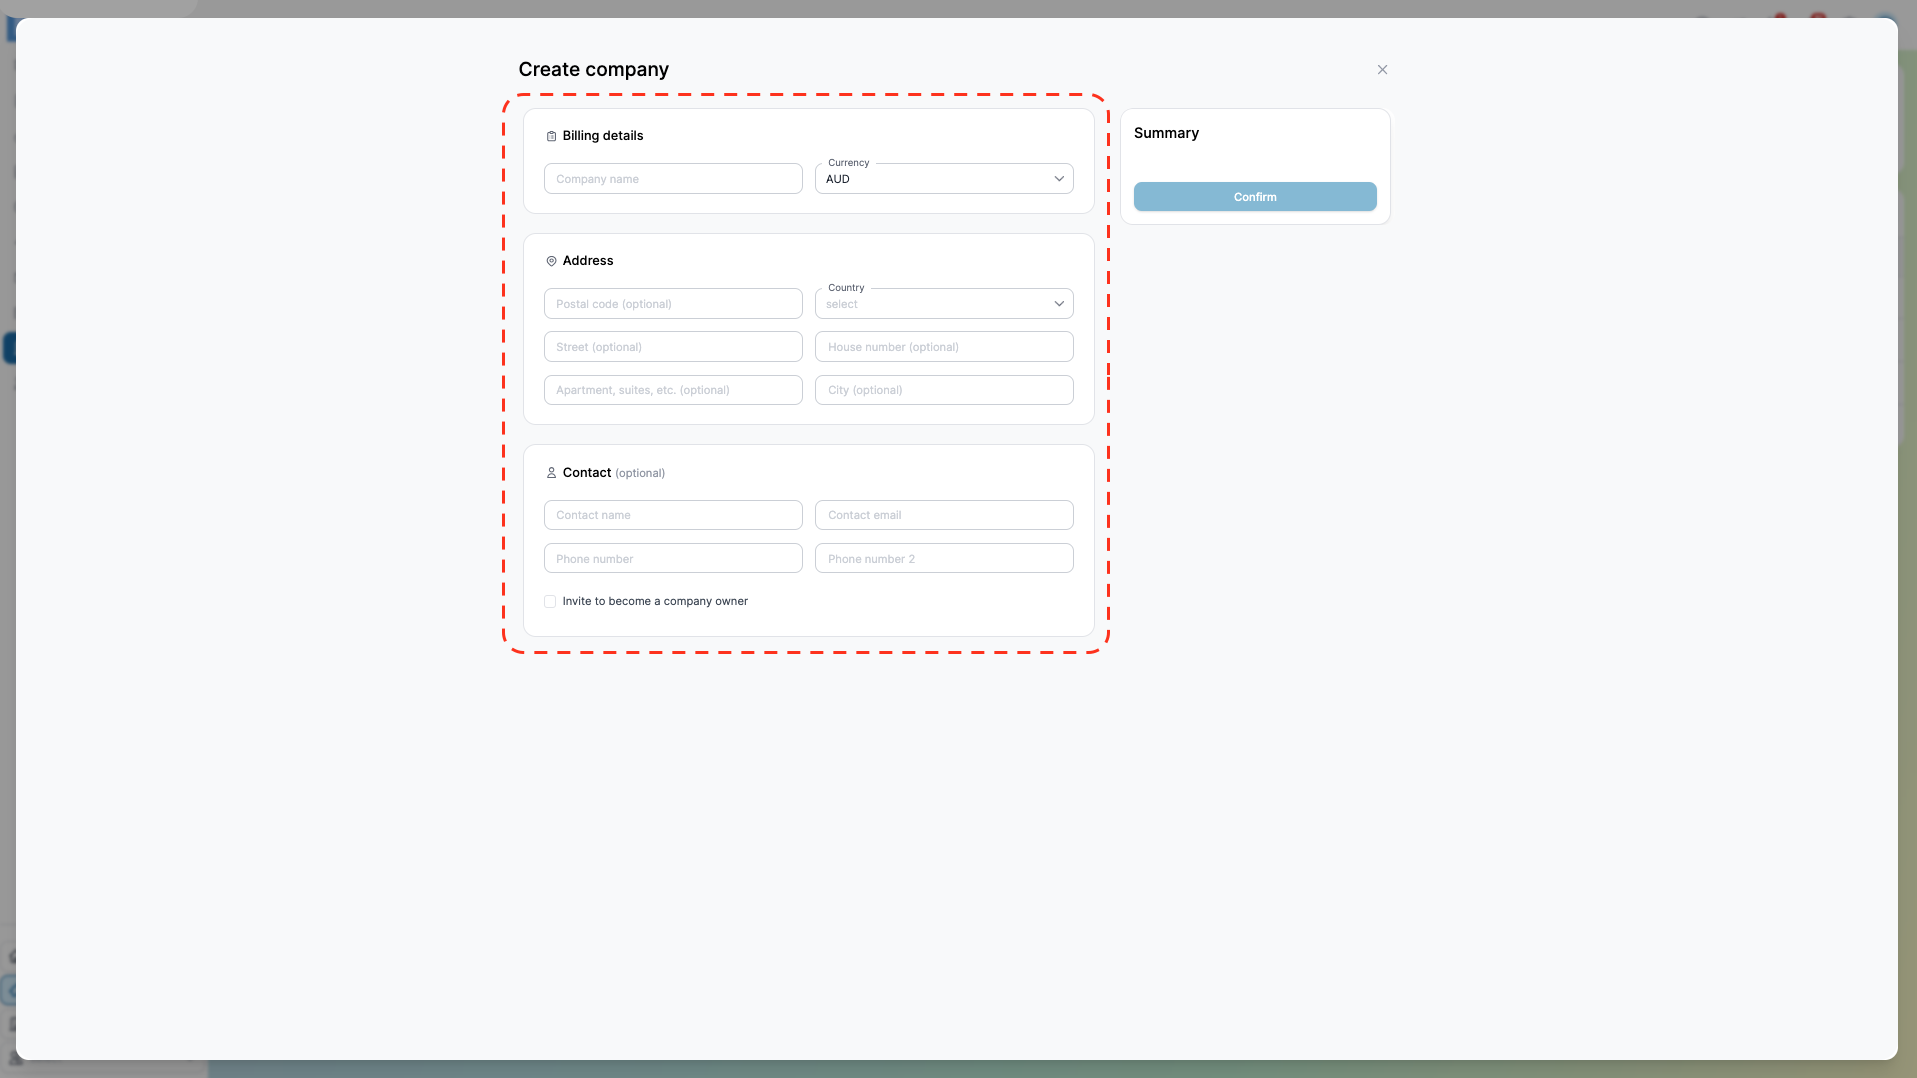
- On your right, press the “plus” button to create a company
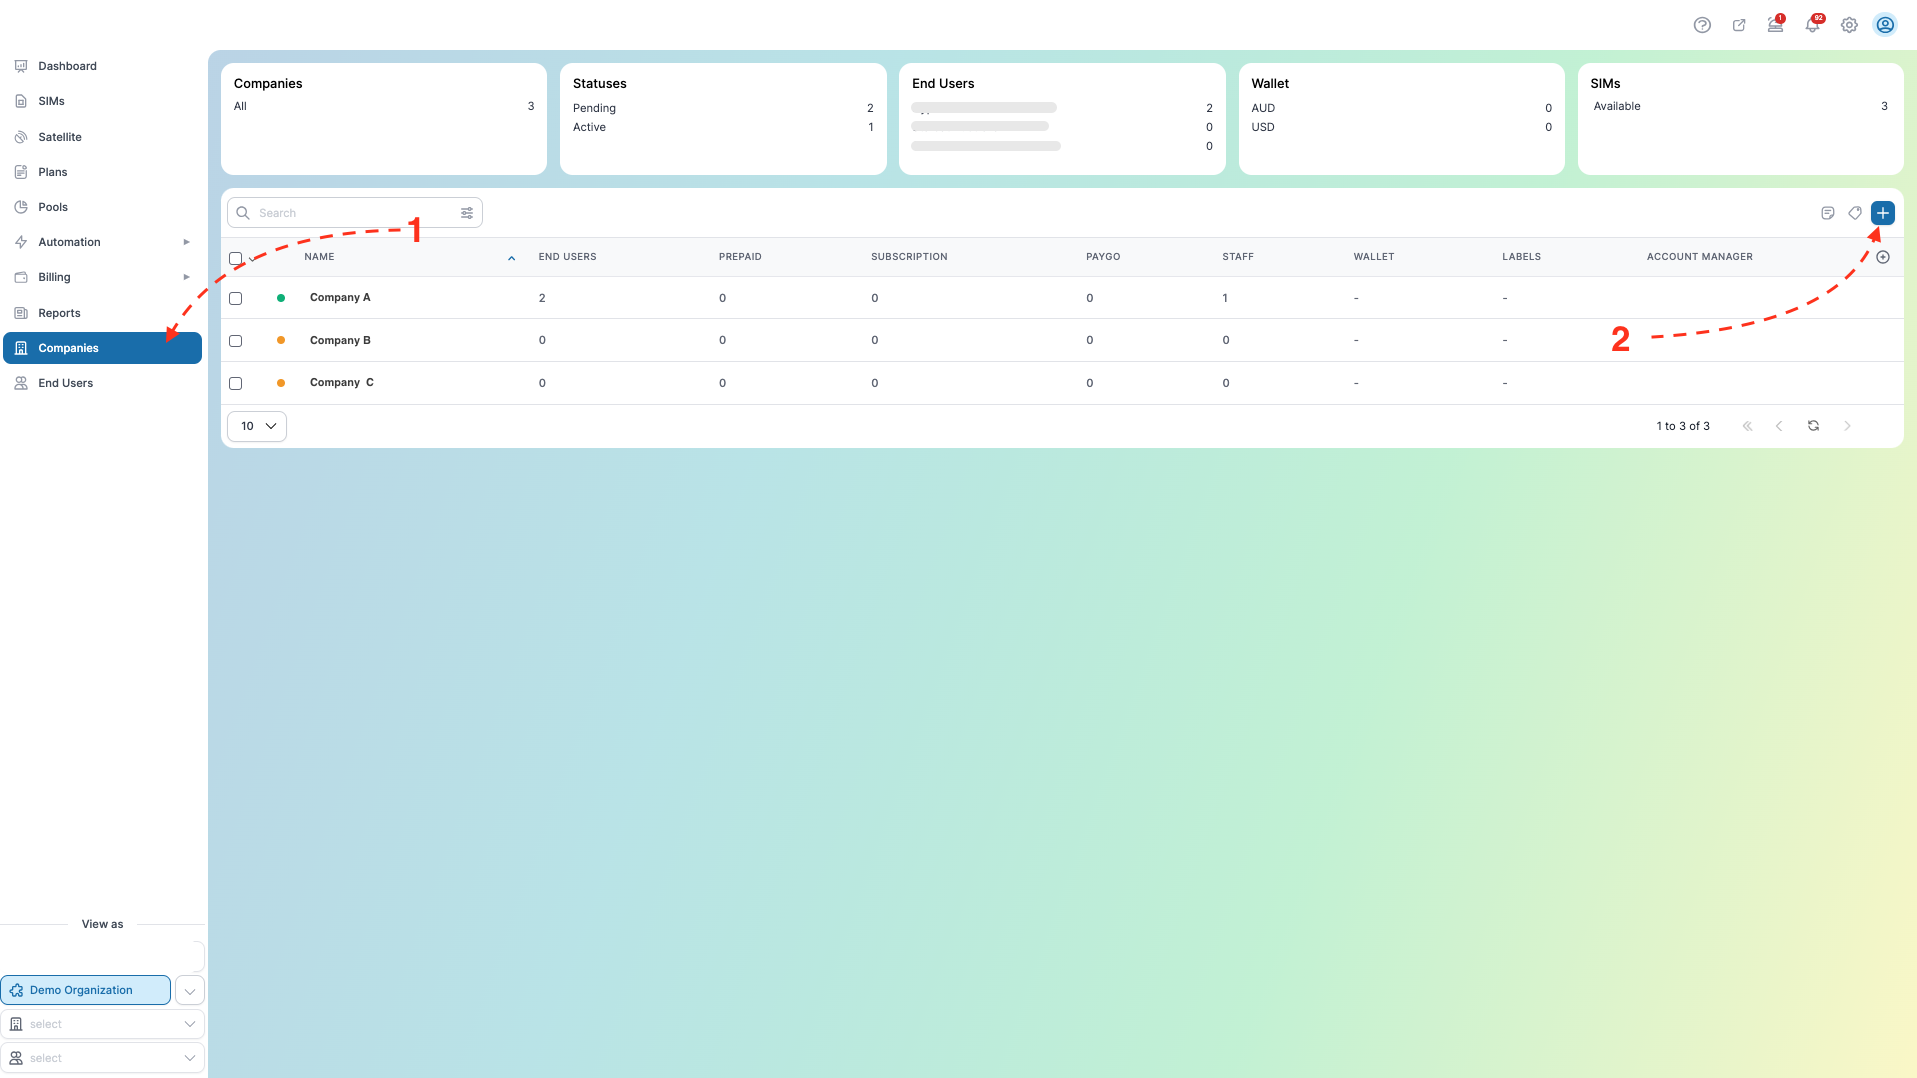
- A wizard will appear, and you will need to fill in all the required information
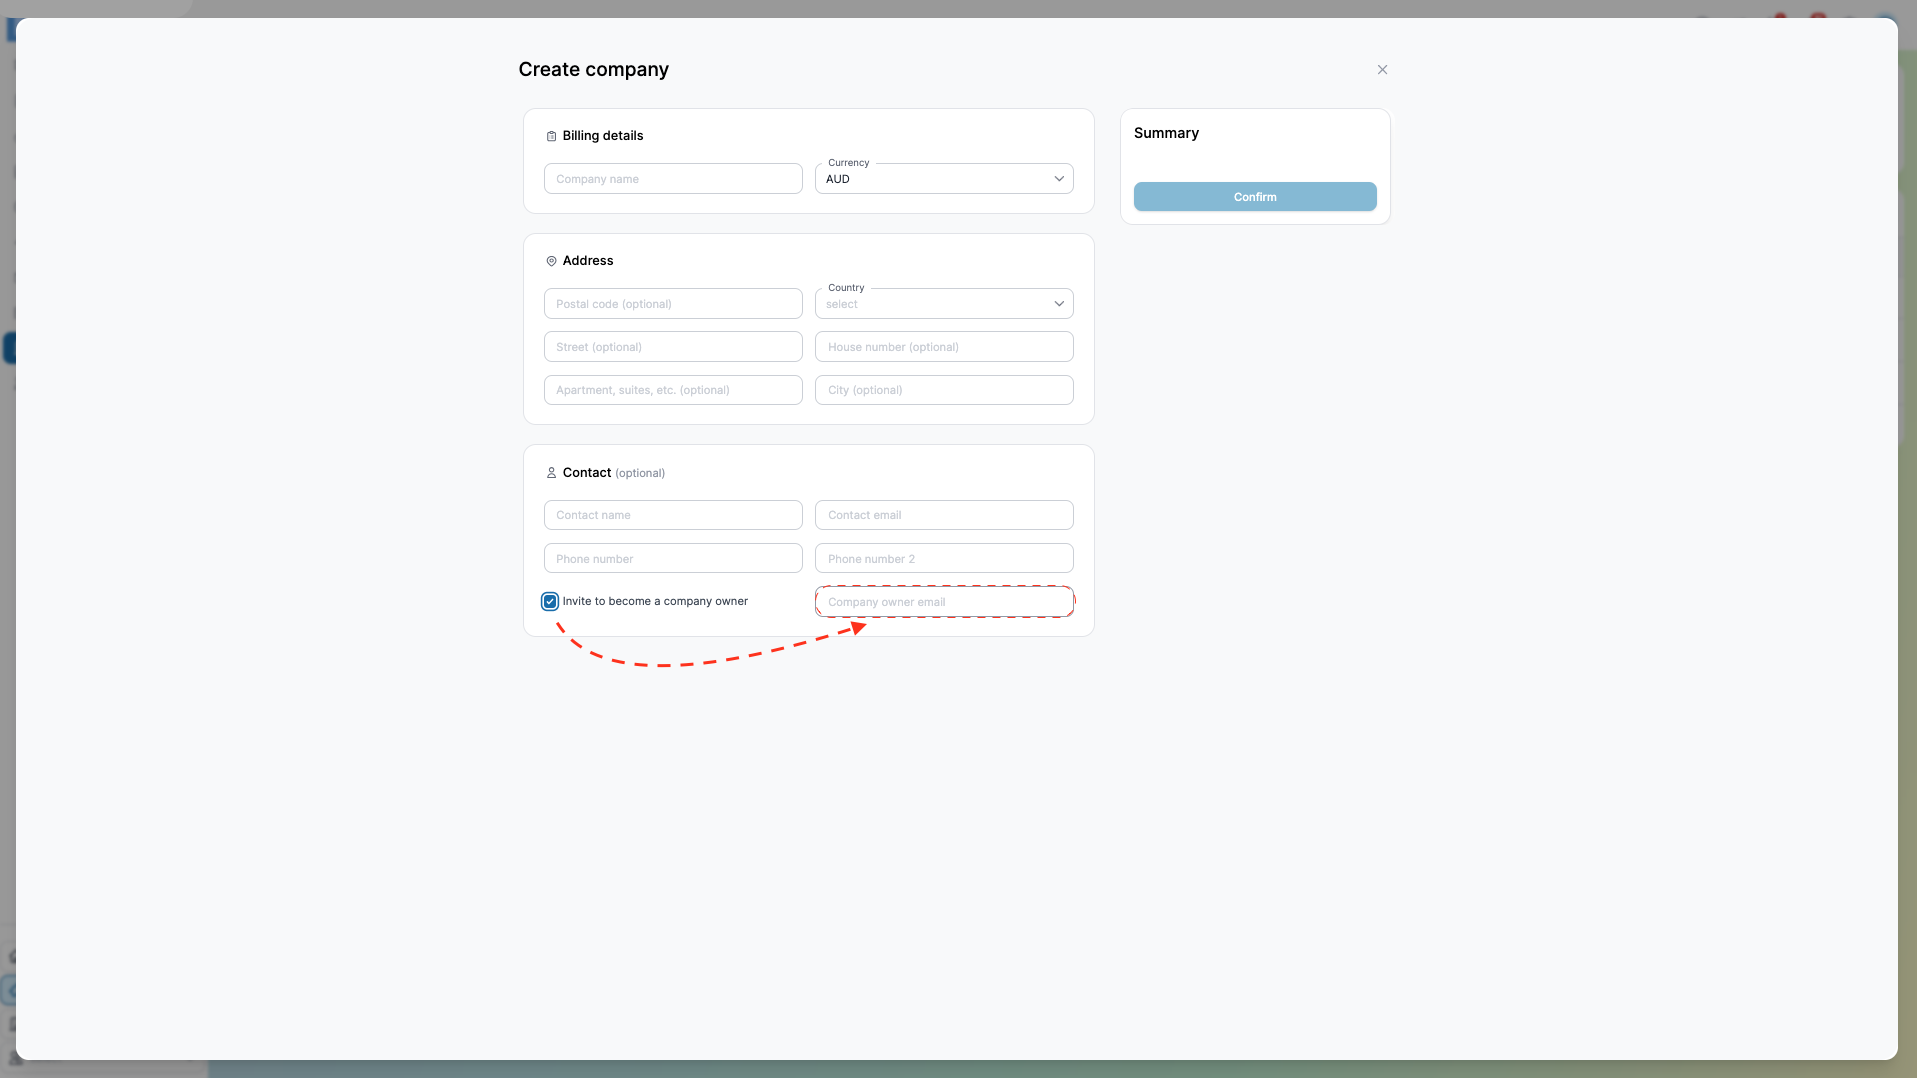
- If you wish to invite someone to administer the company, please provide an email address.
3. Upload your SIM(s)
Complete the following steps:
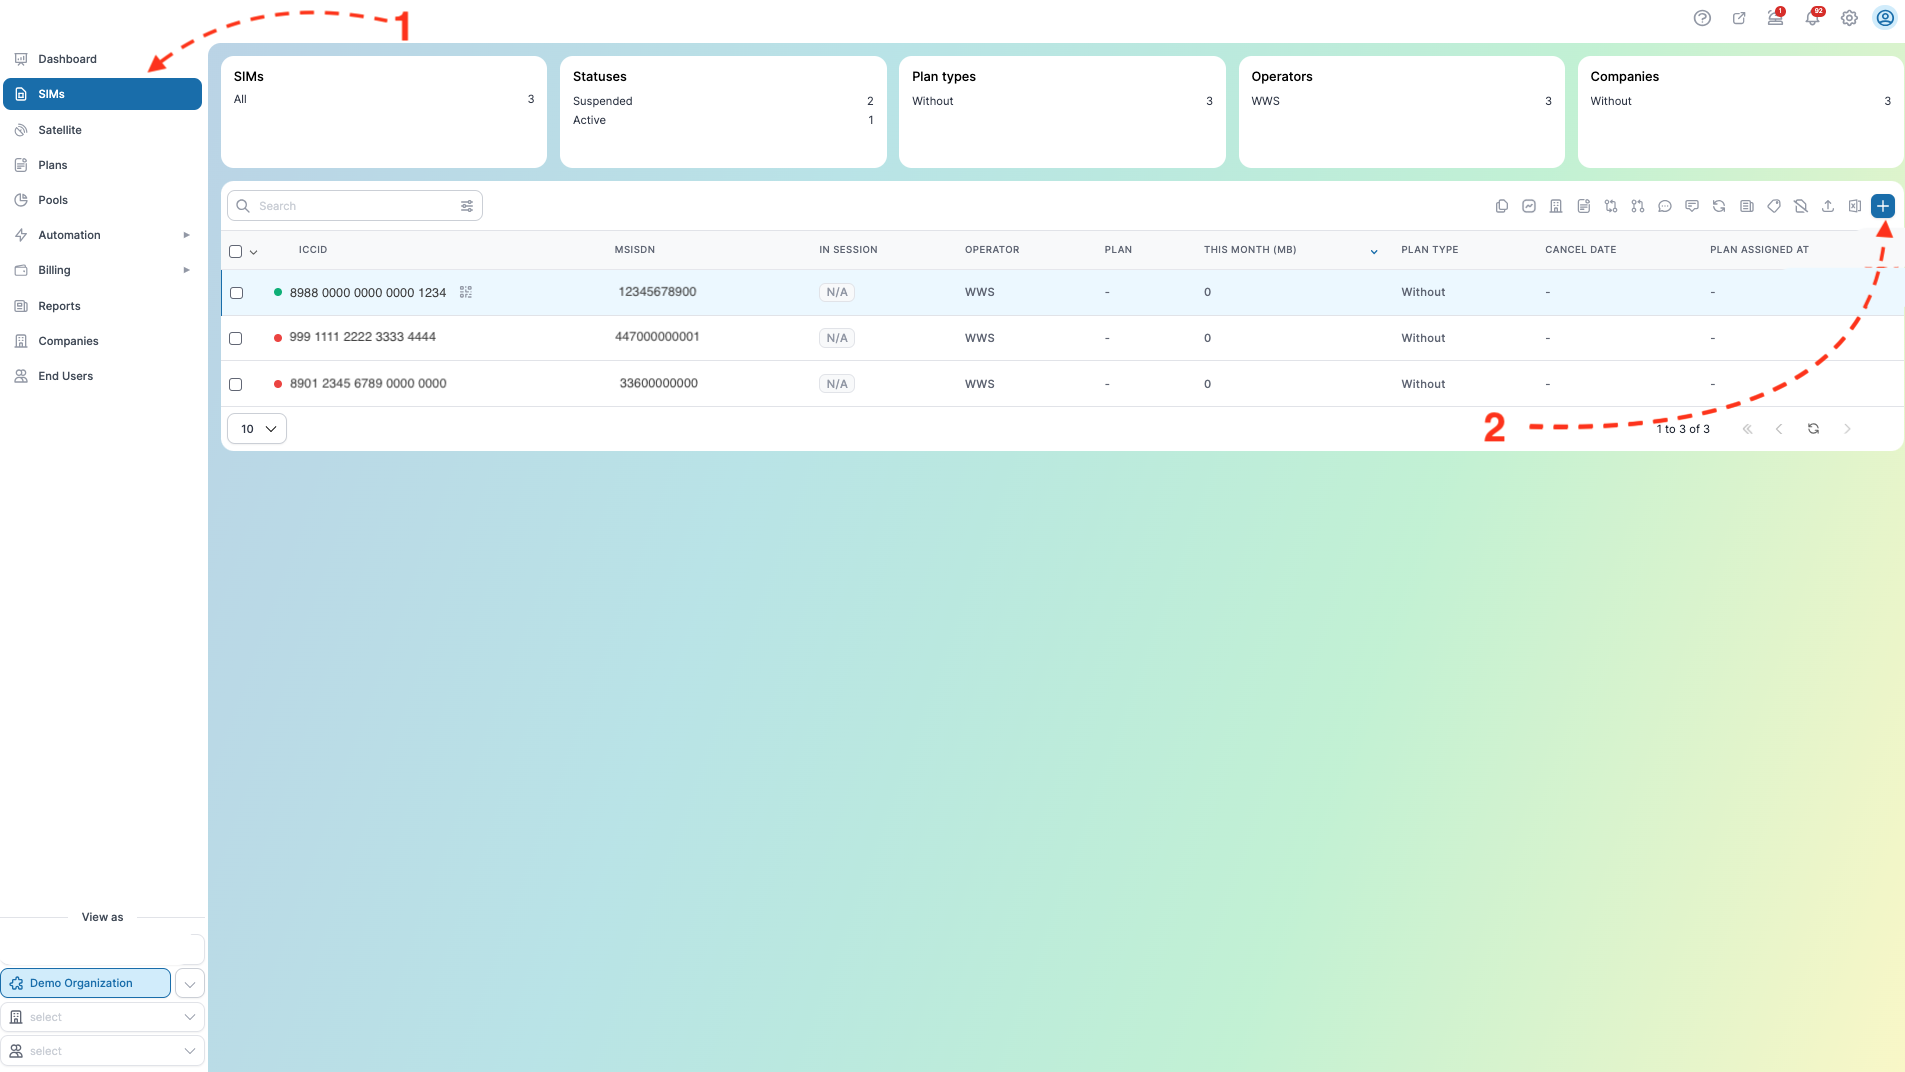
- From the side menu on the left, select 'SIMs'
- Then, press the “plus” button on your right
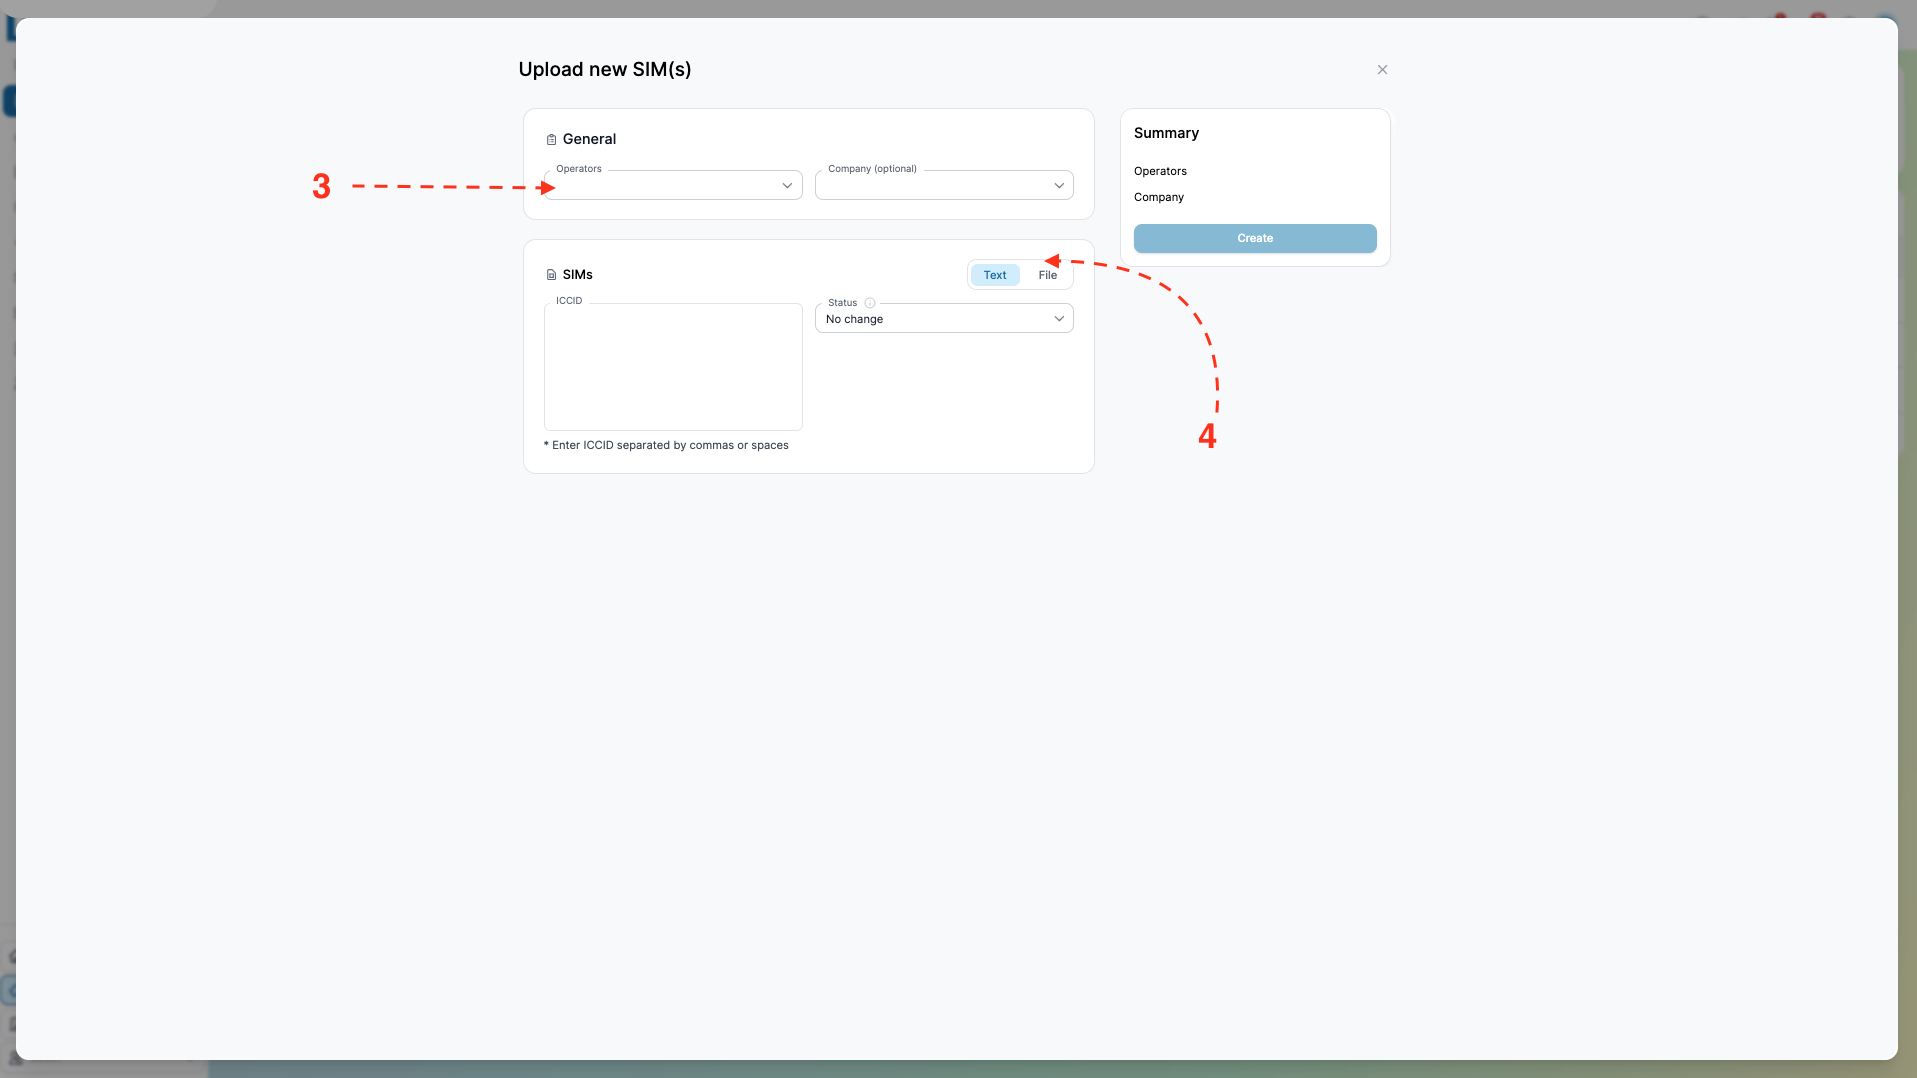
- A wizard will appear. Choose the Operator from the list (obligatory) and the Company these SIM(s) belong to (Optional)
- You can add SIMs (ICCID) manually through a comma or by uploading an XLSX file (choose the preferred option)
IMPORTANT!
Before adding/uploading SIMs, please check with your operator if they are active. Sometimes you need to activate SIM(s) with the operator first.
“Activation ready” status means that the SIM is active but has never generated any traffic.
More detailed information about SIM types you may find here: SIMs
4. Create Plan(s)
Complete the following steps:
- Go to the “Plans” button on your left side of the navigation menu
- On your right, press the “plus” button and choose the plan type you want to create
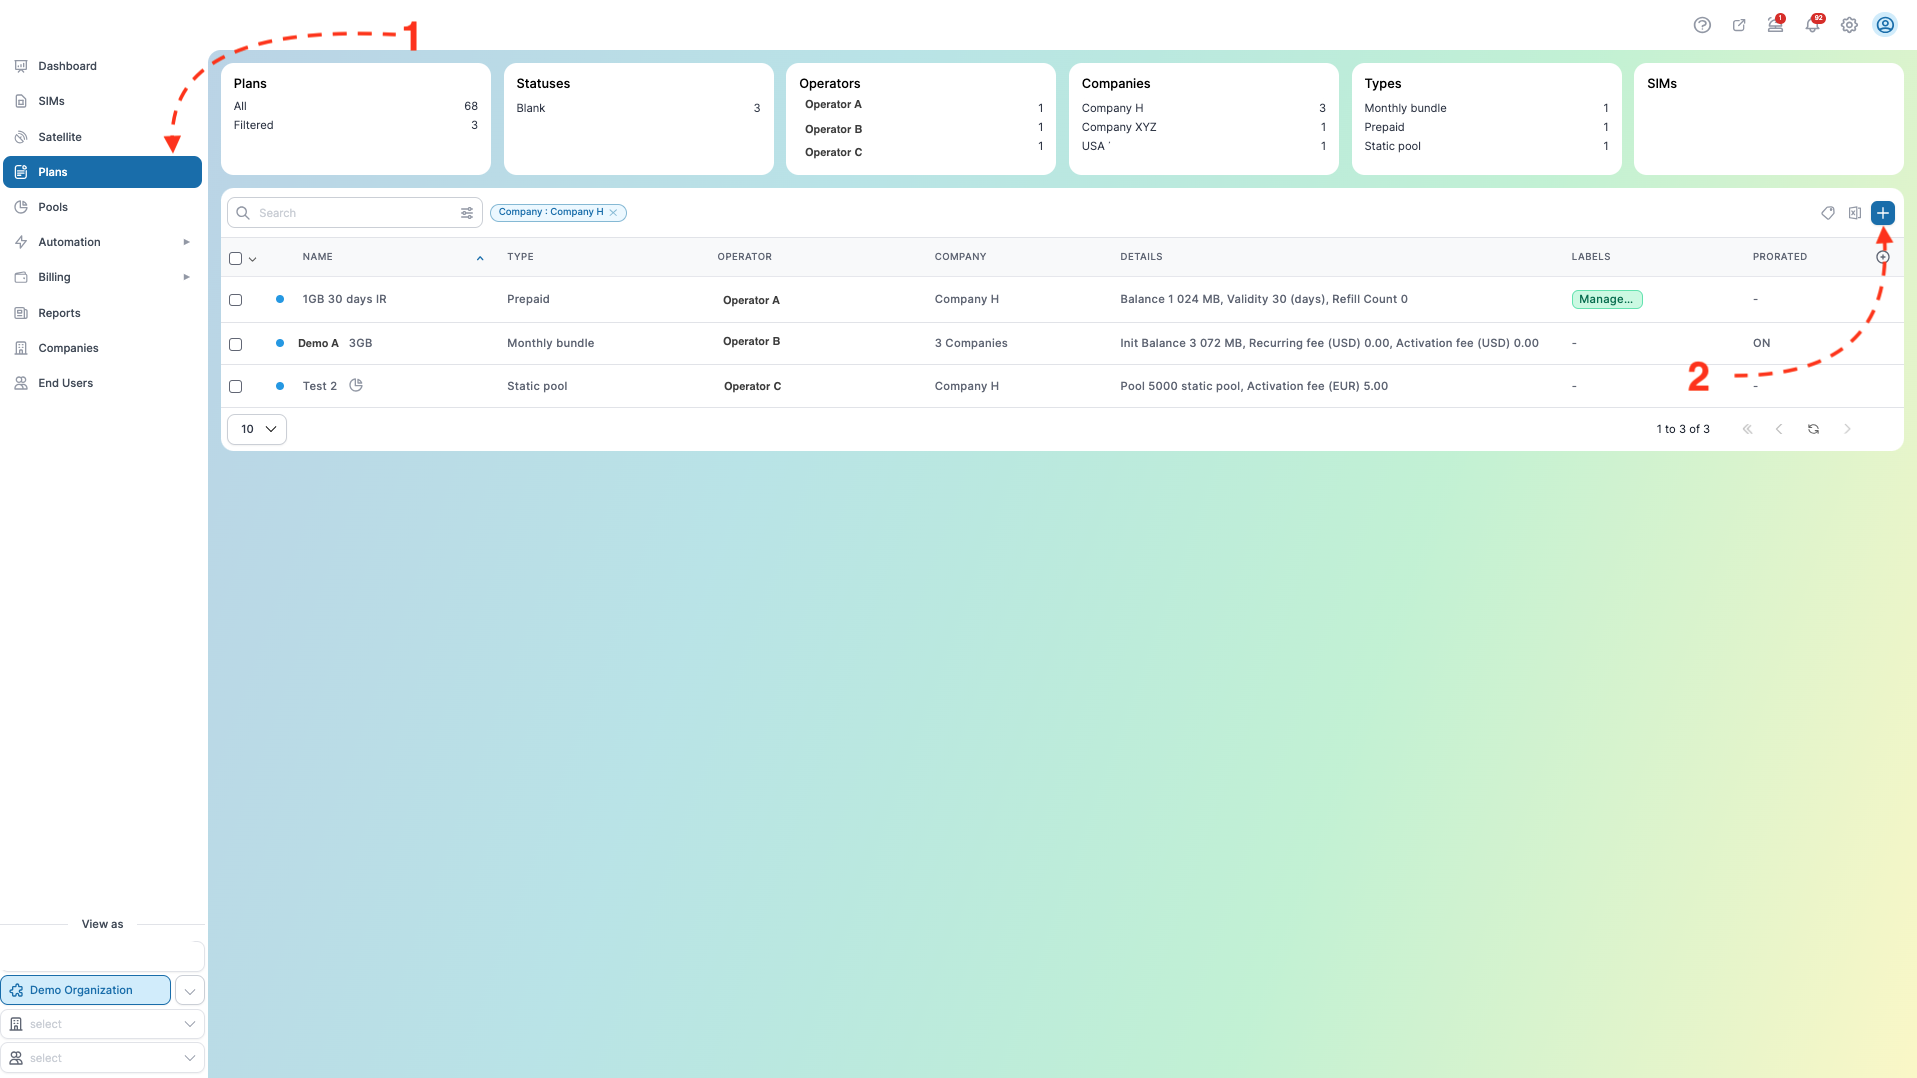
- When a new wizard appears, fill in all essential fields.
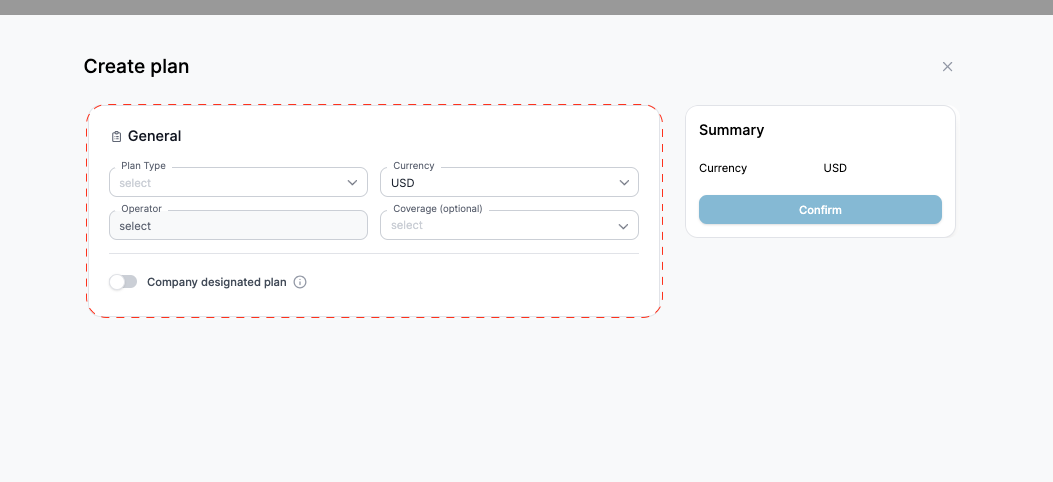
- If you want to make this plan available only to specific company(-ies), please activate the 'Company Designated Plan' toggle.
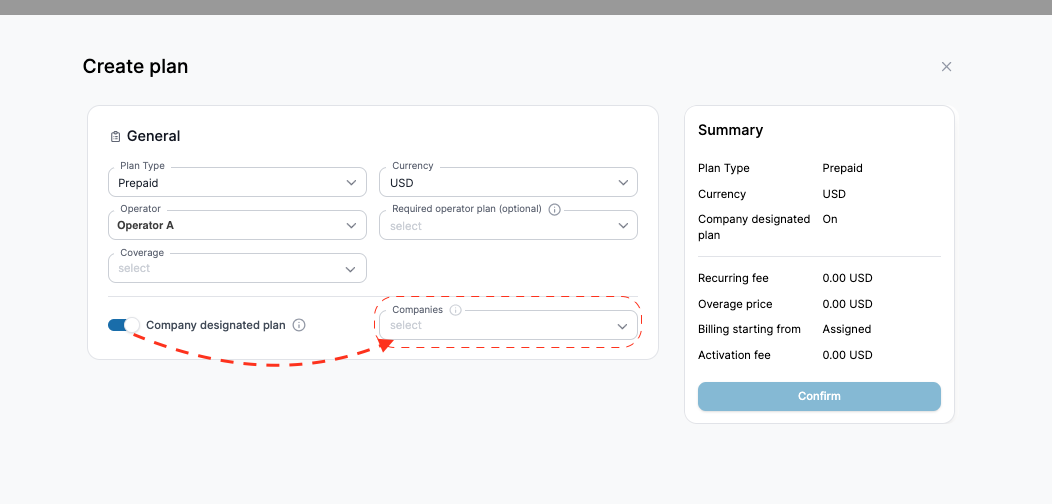
- Fill in all the required information in the Billing section.
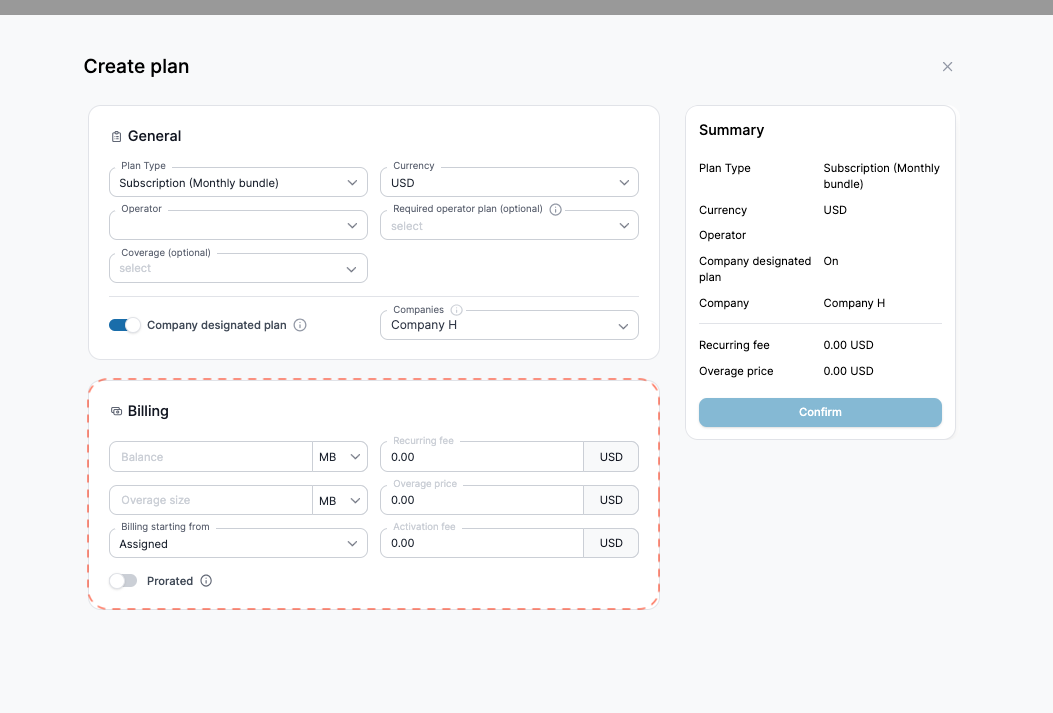
IMPORTANT!
The price must be at least 1.0 when creating a plan.
- If you want the monthly fees and available balance to be prorated at the start and end of the subscription, simply enable the 'Prorated' toggle.
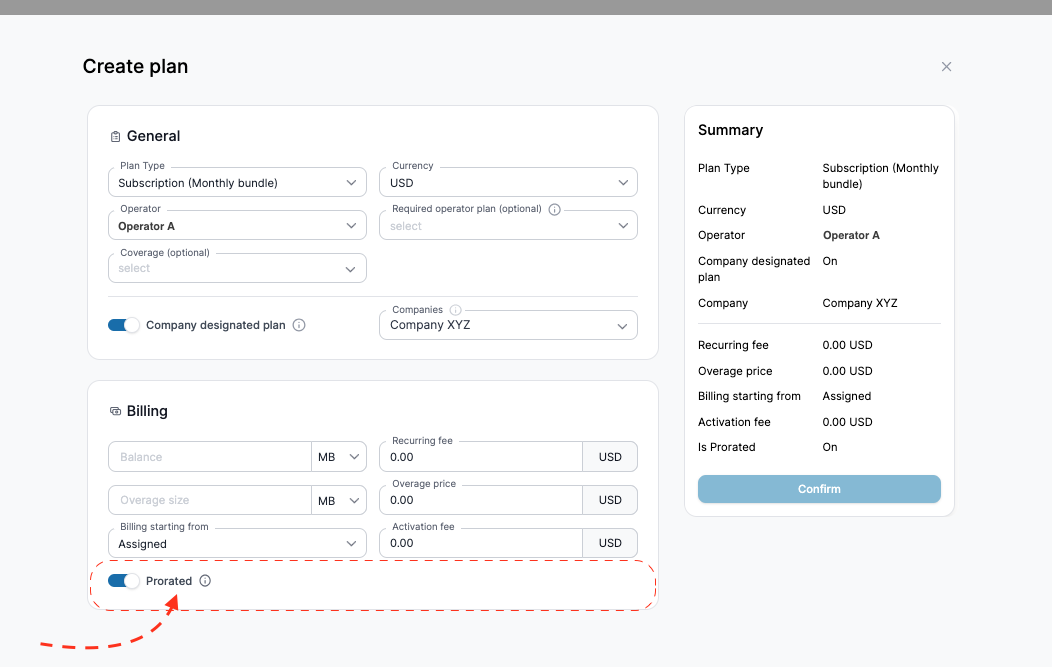
General plan – all current and future companies in this organization will have access to it.
Company designated plan will be assigned to the selected companies.
You can find more information about plan types here: Plans
5. Assign the plan to SIM(s)
To assign a plan (same as assigning in bulk) to SIM(s)
Complete the following steps:
- Go to the “SIMs” on your left side of the navigation menu
- Select the necessary SIM(s).
- Click the PLUS button on the left in the toolbar.
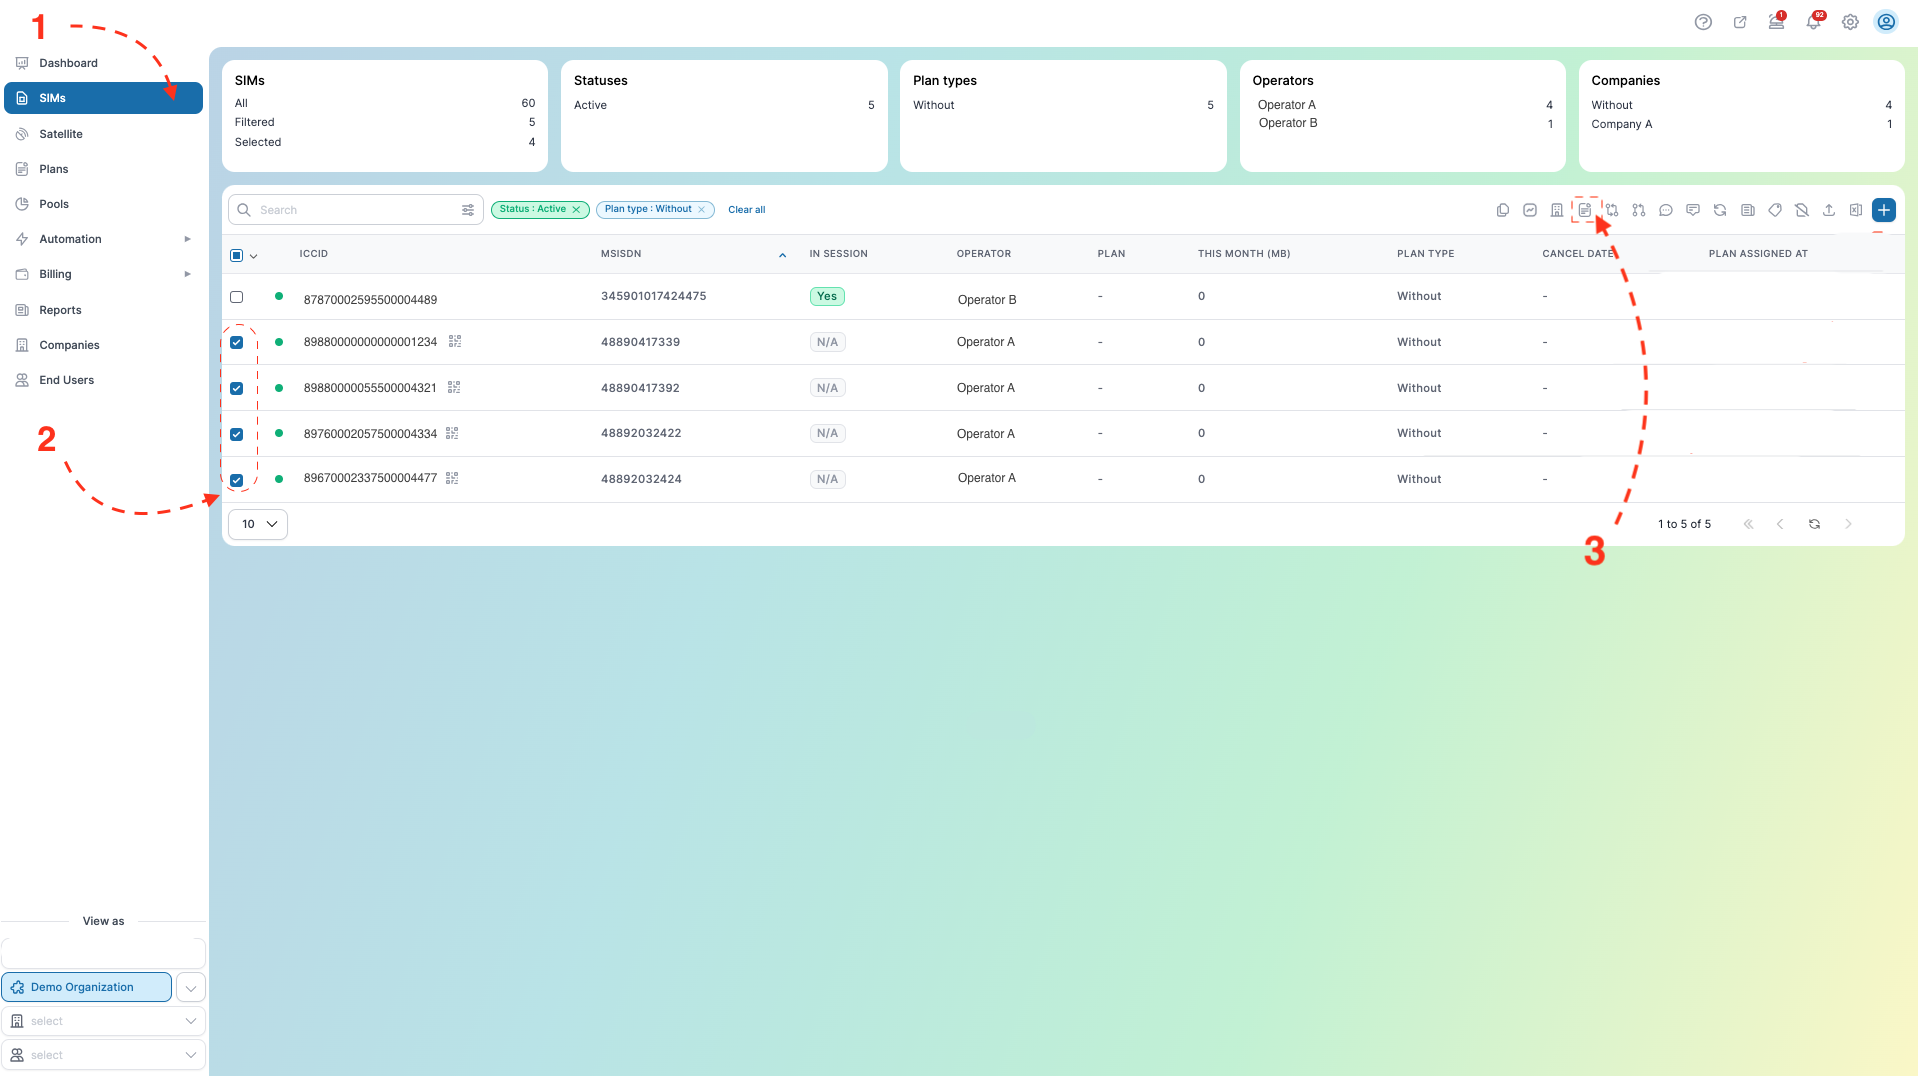
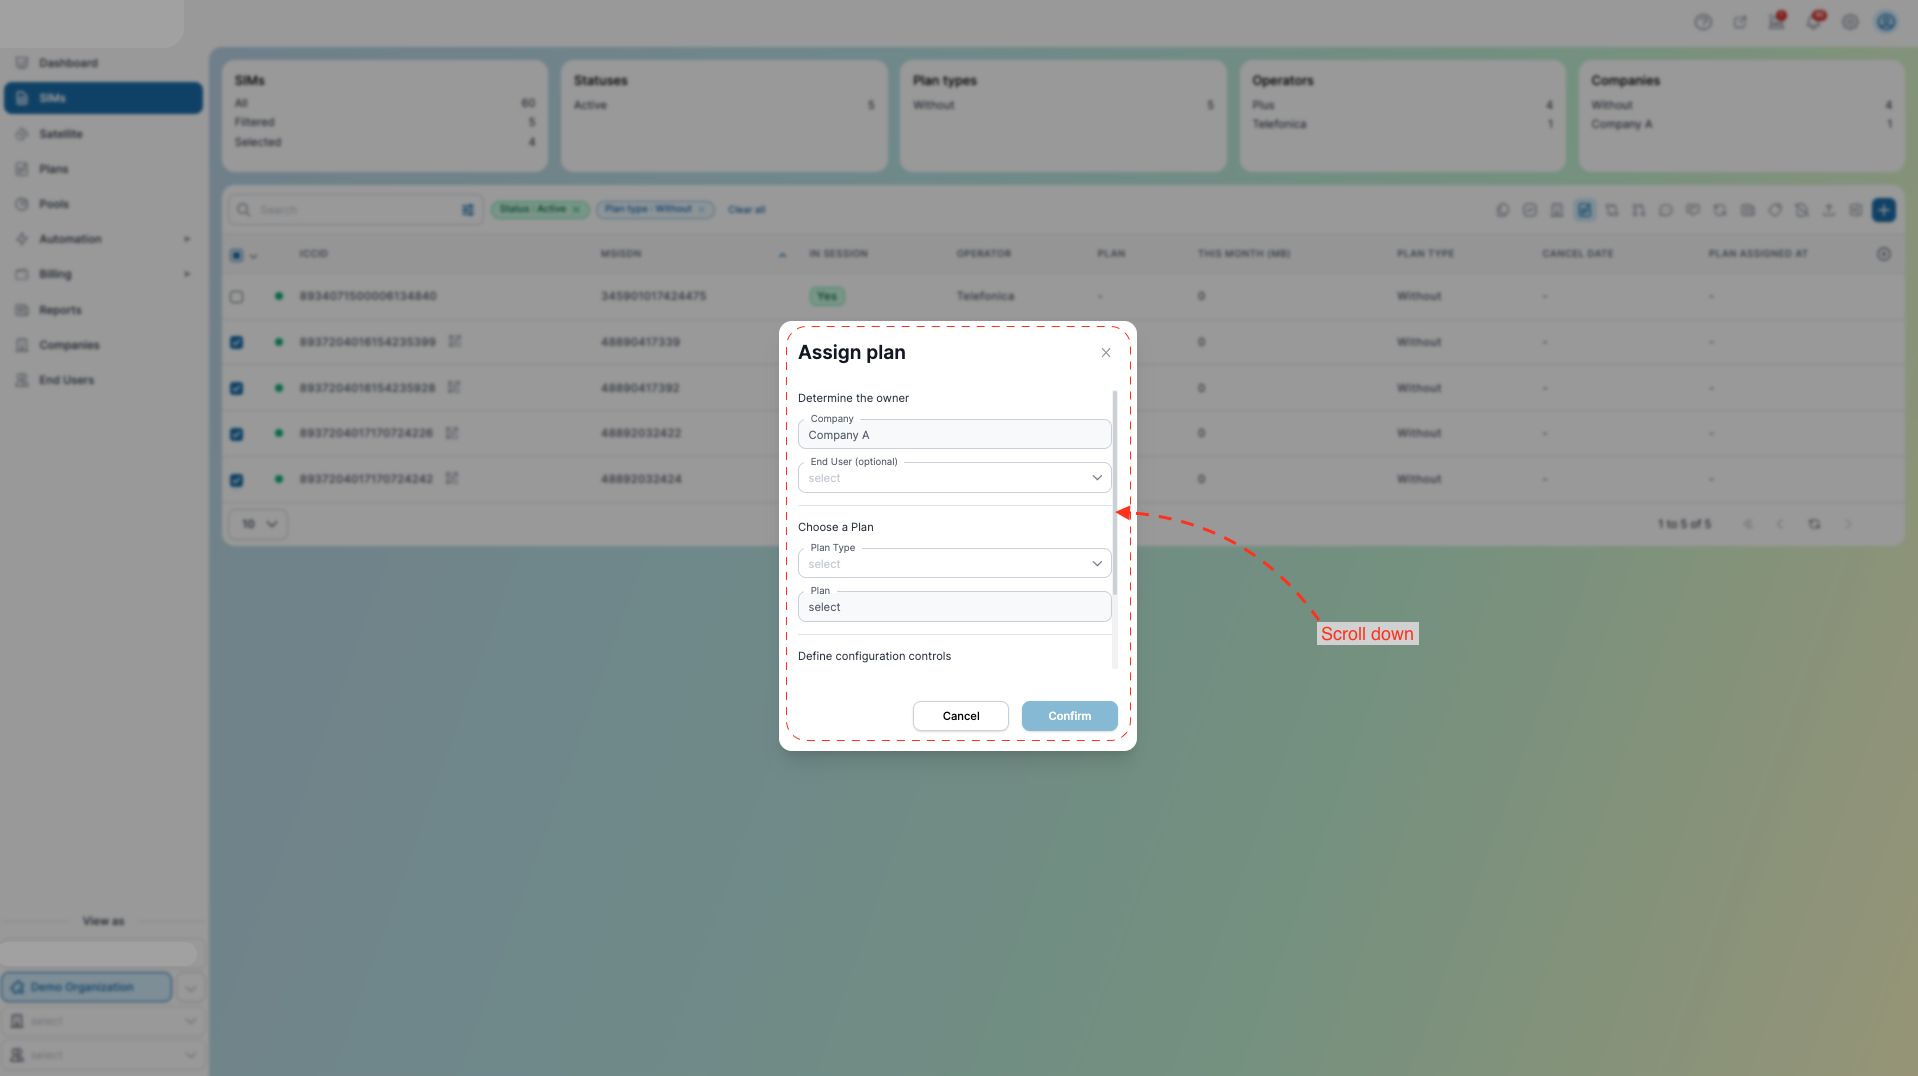
- The Modal window will open. Select the corresponding Plan Type, Plan, and other corresponding fields
- The company is already indicated in the Company field.
- ICCIDs are automatically uploaded to the SIMs field.
- Click the Confirm button.
By completing these steps, you have successfully created a "Product" by associating your SIM(s) with a specific company and plan.
Optional settings
1. Account Settings
Complete the following steps:
- Go to Settings
- Choose “Business”
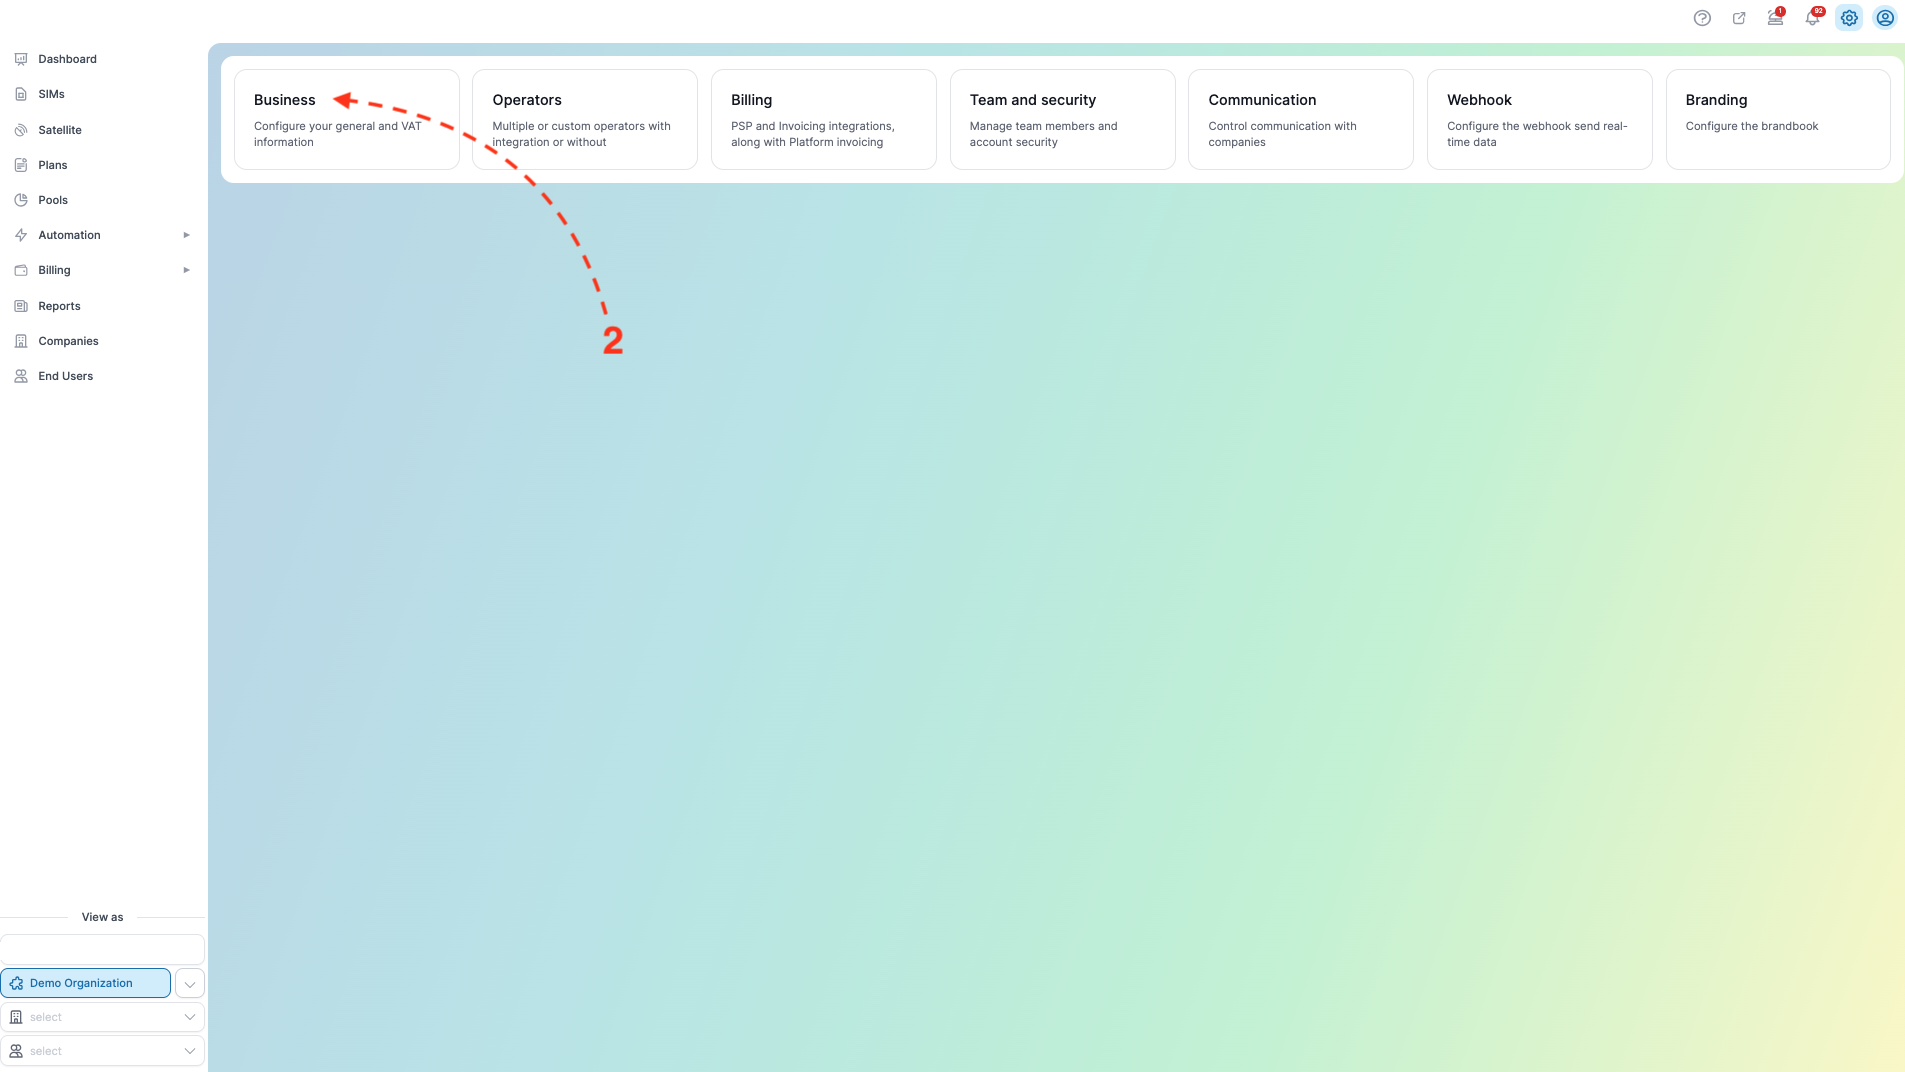
- Click on the Account Details tab – Fill in all the required fields
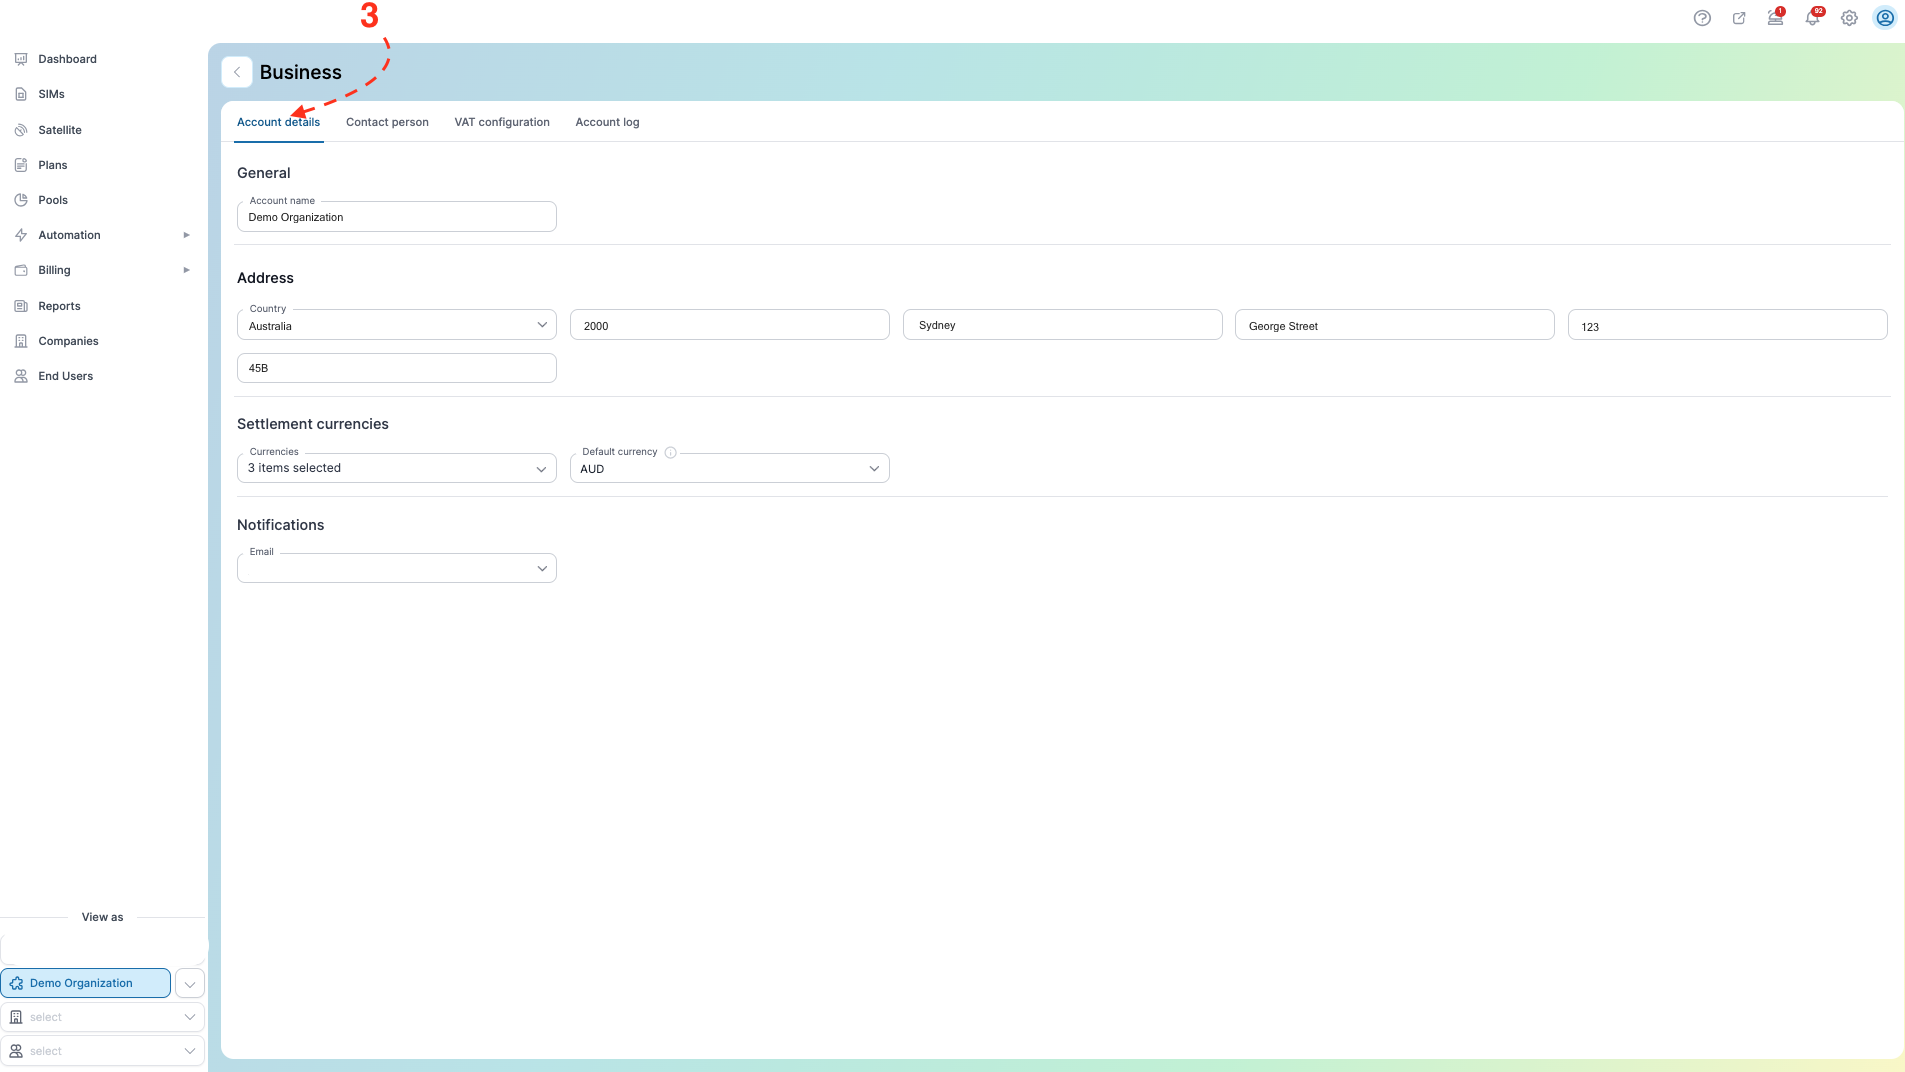
- Click on the Contact Person tab – Provide the relevant contact information.
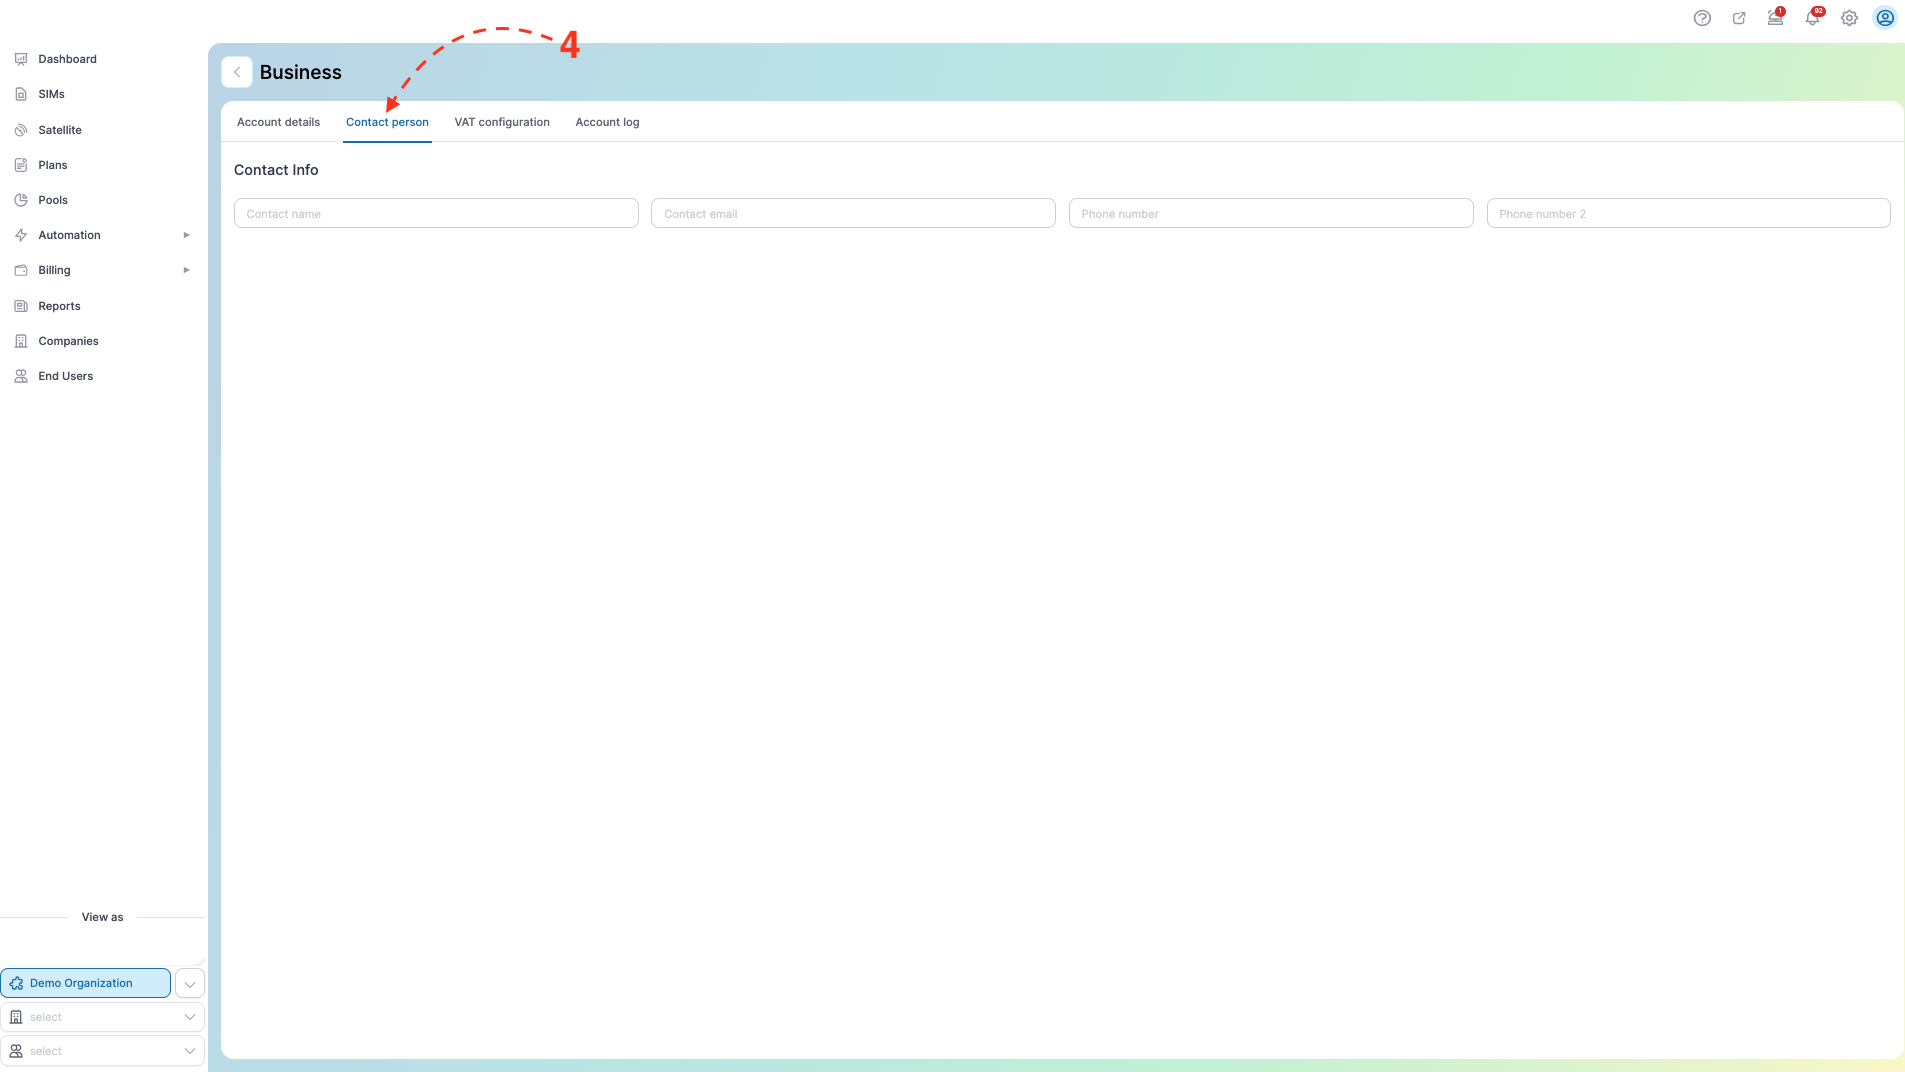
- Click on the VAT Configuration tab – If you would like VAT to be applied to the account, please activate the toggle.
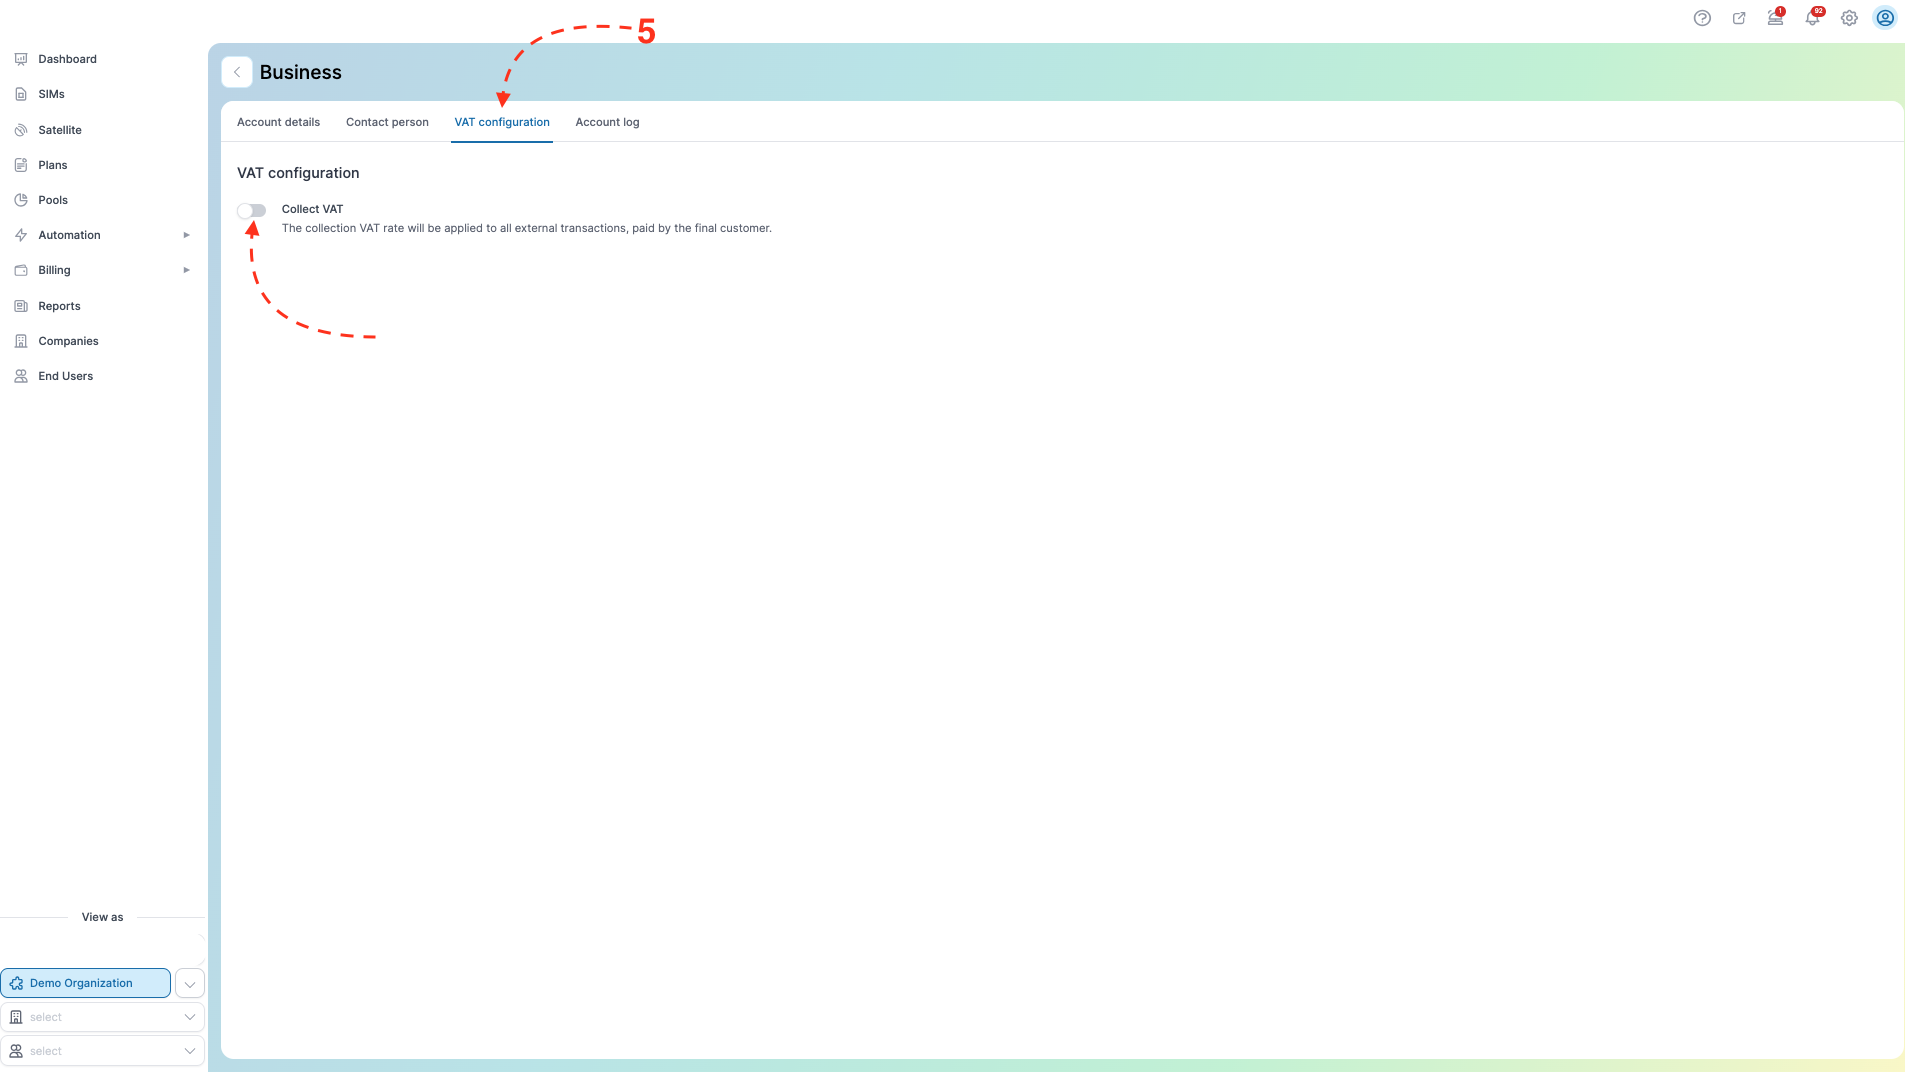
- Enter the VAT number and percentage, then click Save
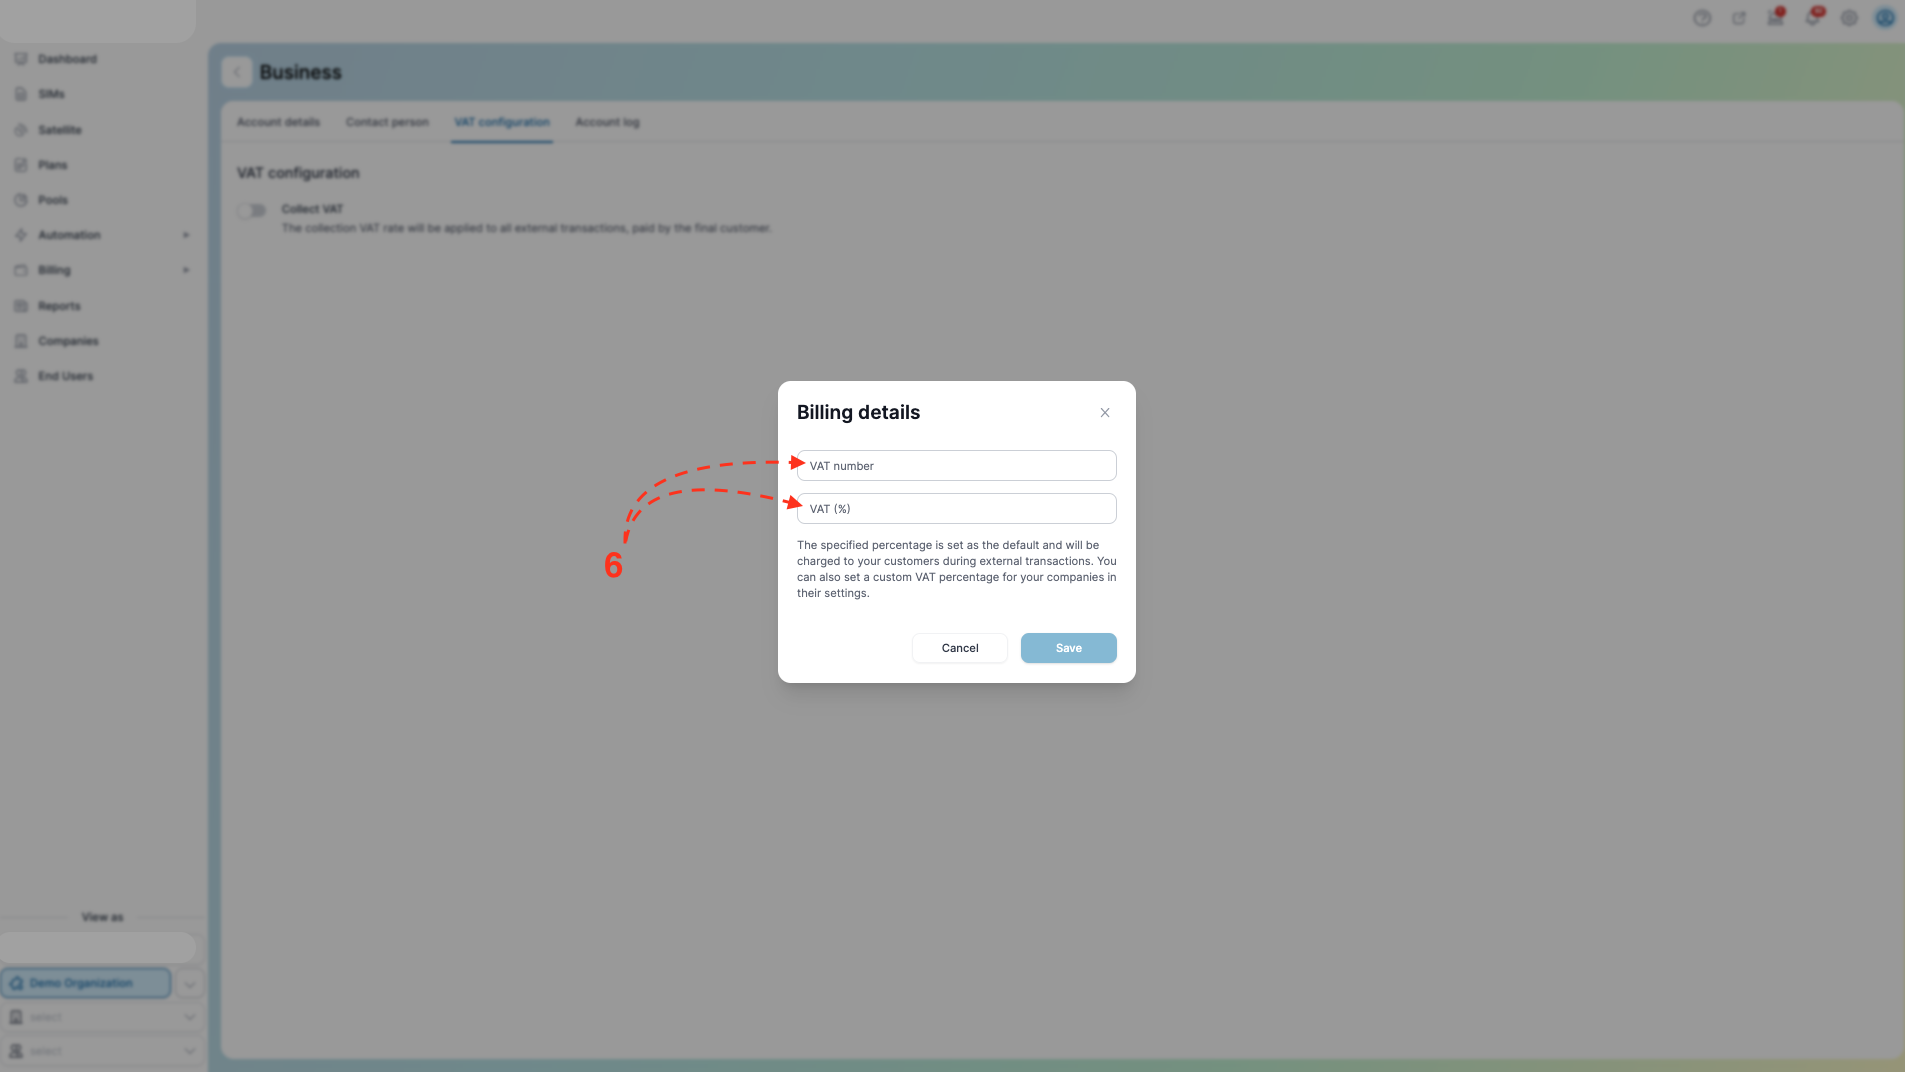
2. User Profile
Complete the following steps:
- Go to select the user profile icon.
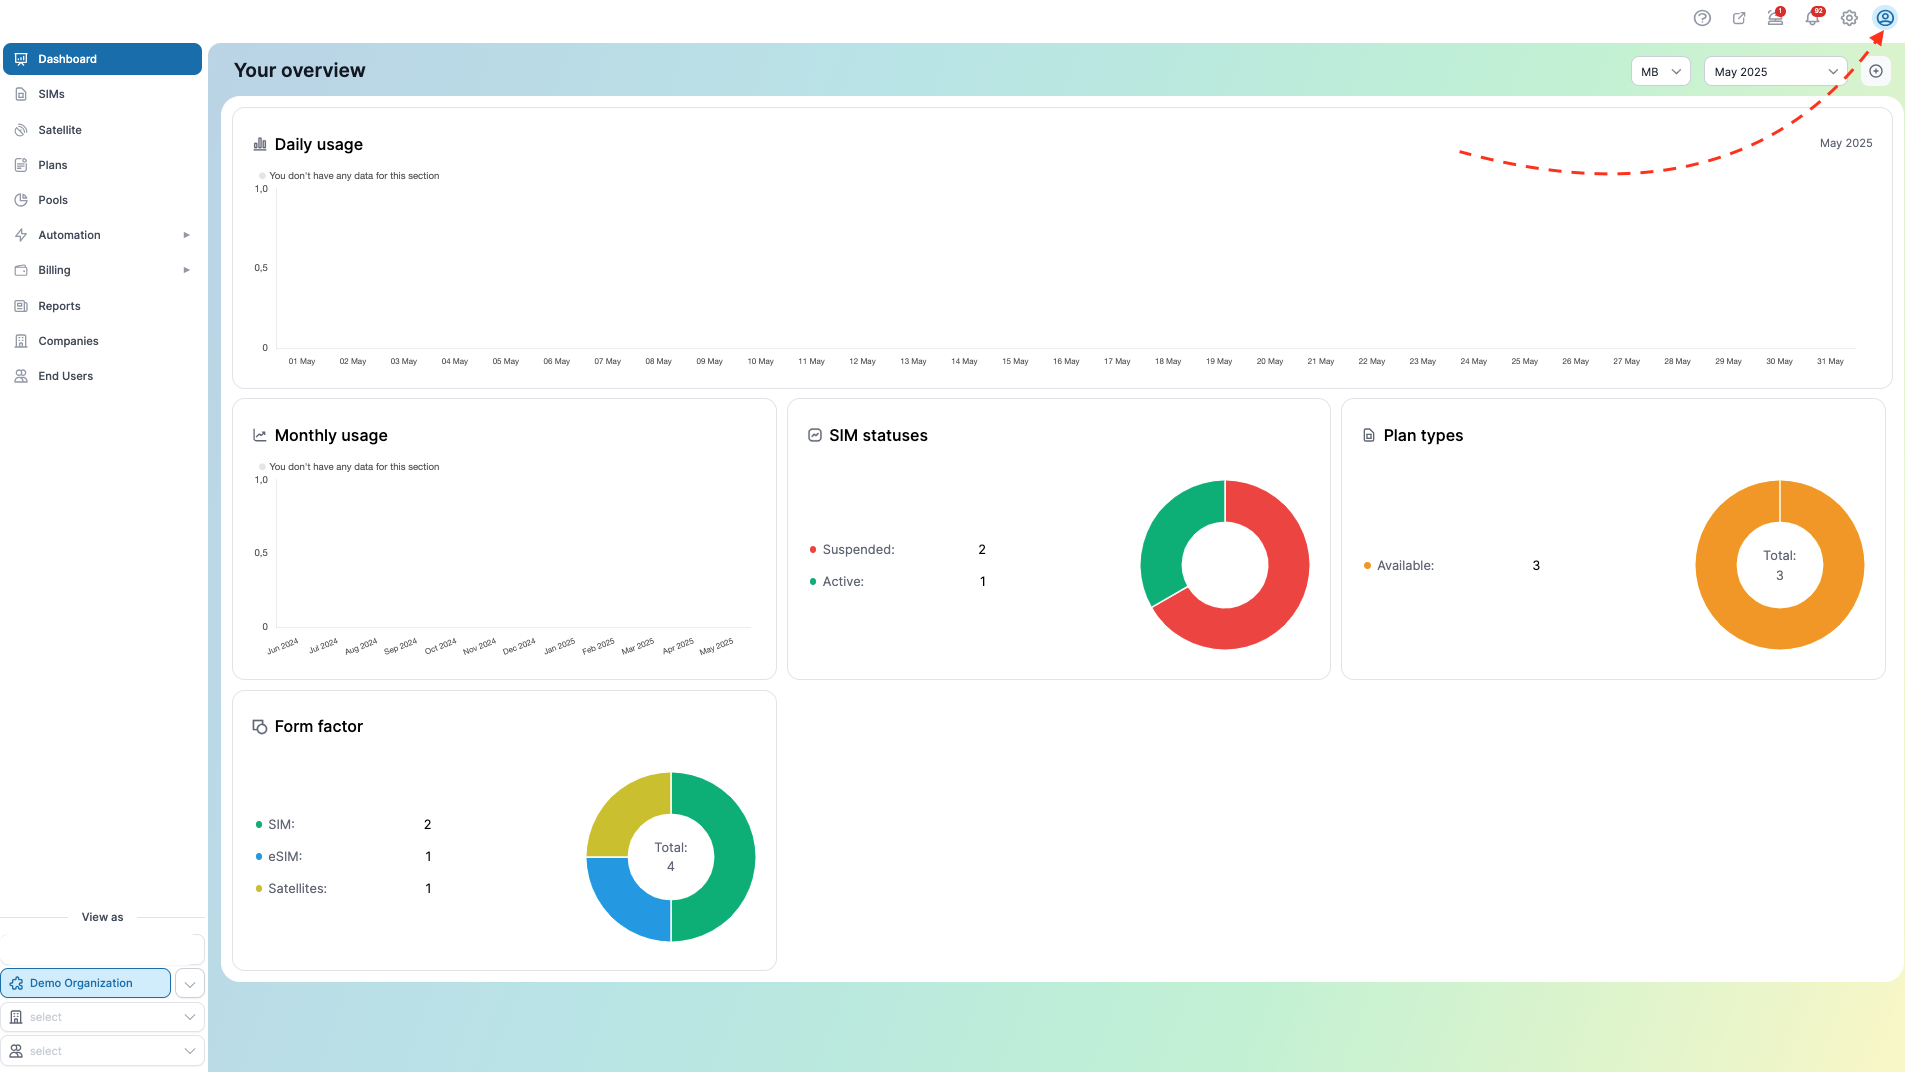
- Fill in your personal info, multi-factor authentication, and time zone.
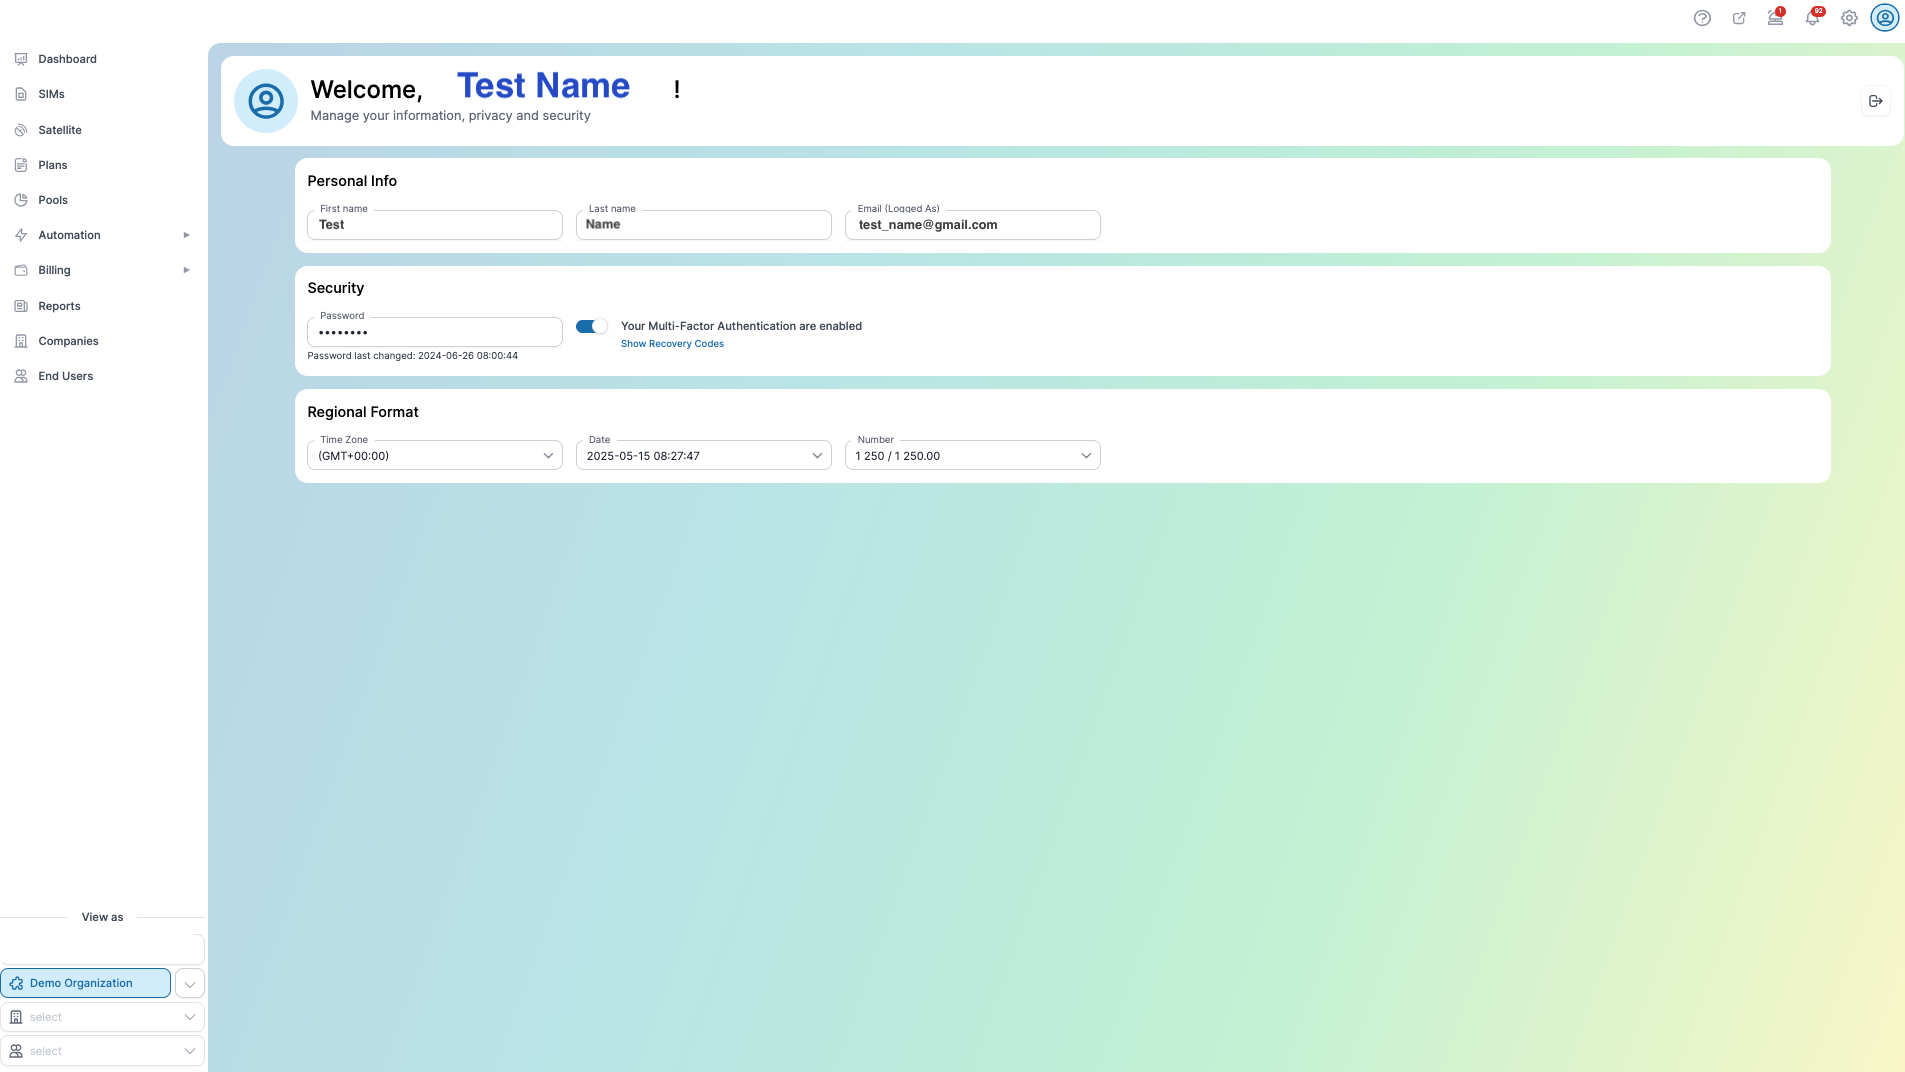
If you want to change your password:
- Click on the password field.
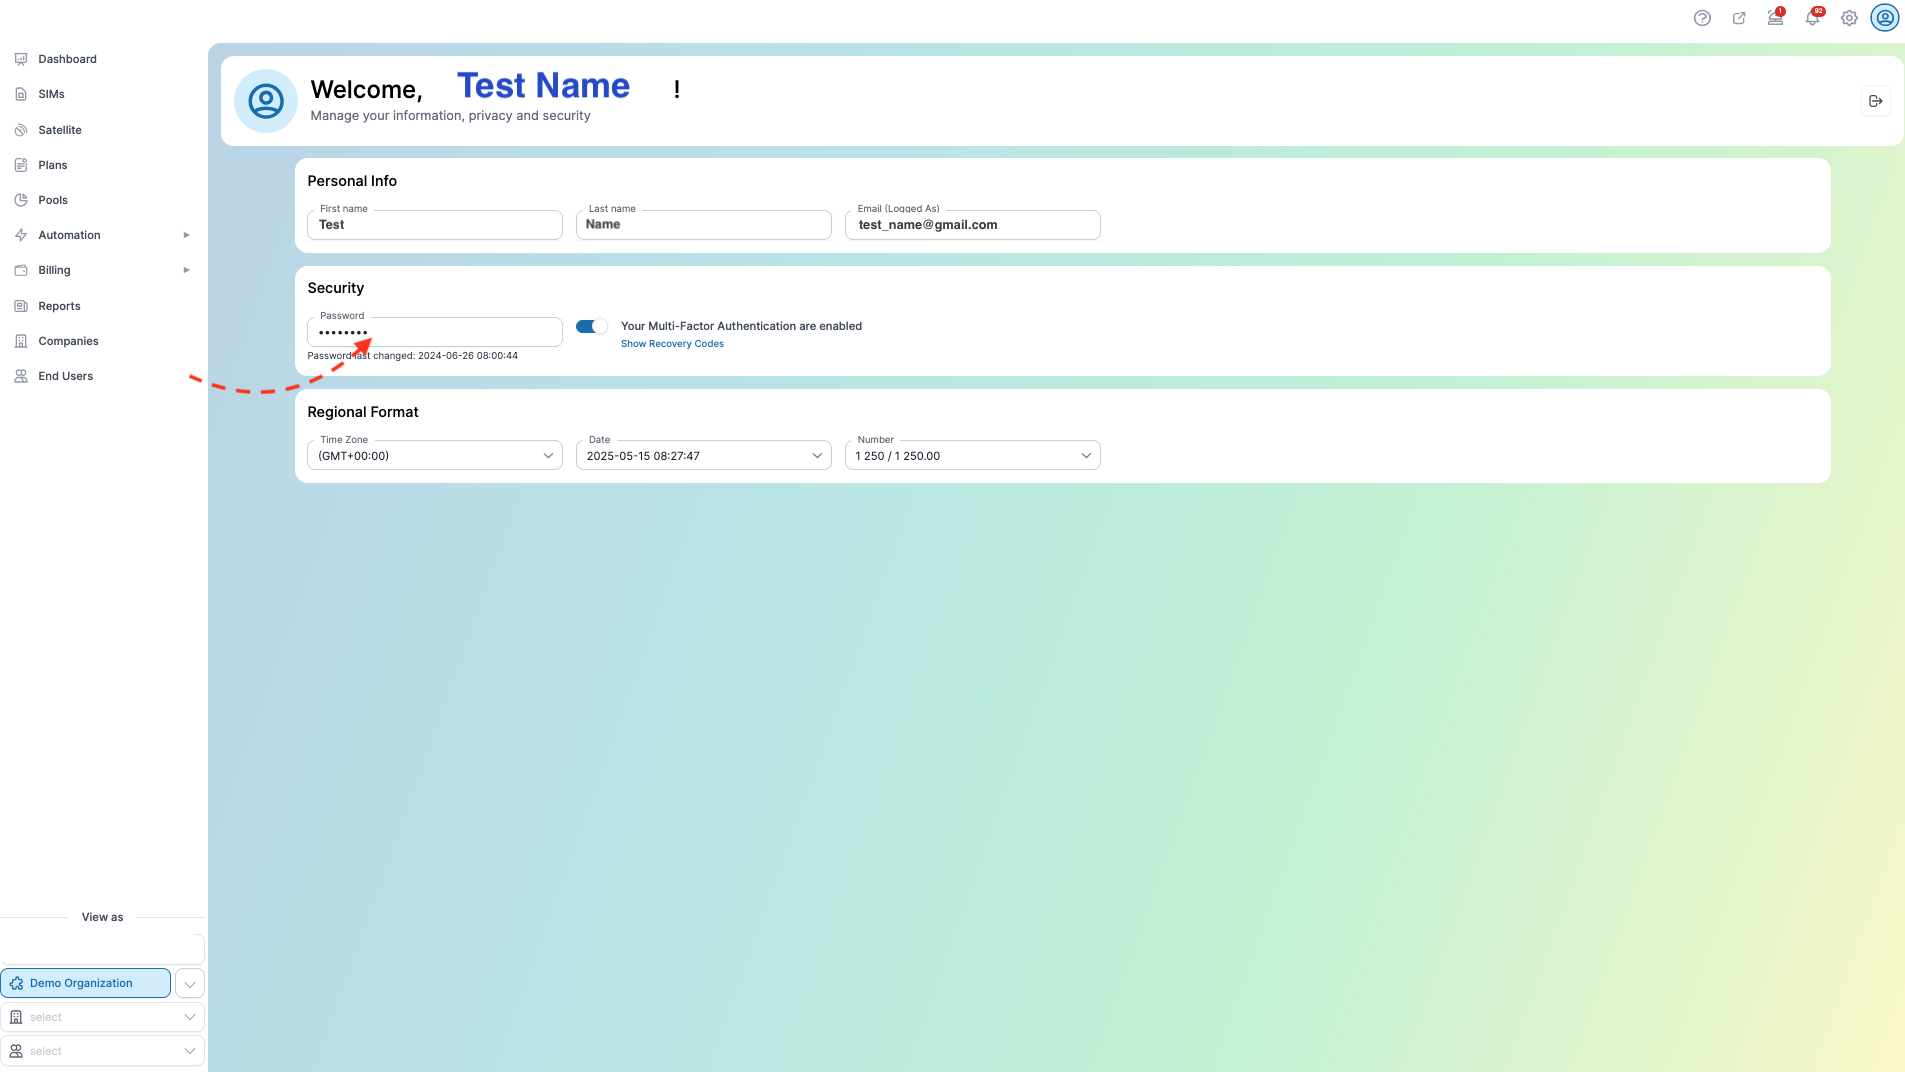
- A wizard will appear where you can update your password.
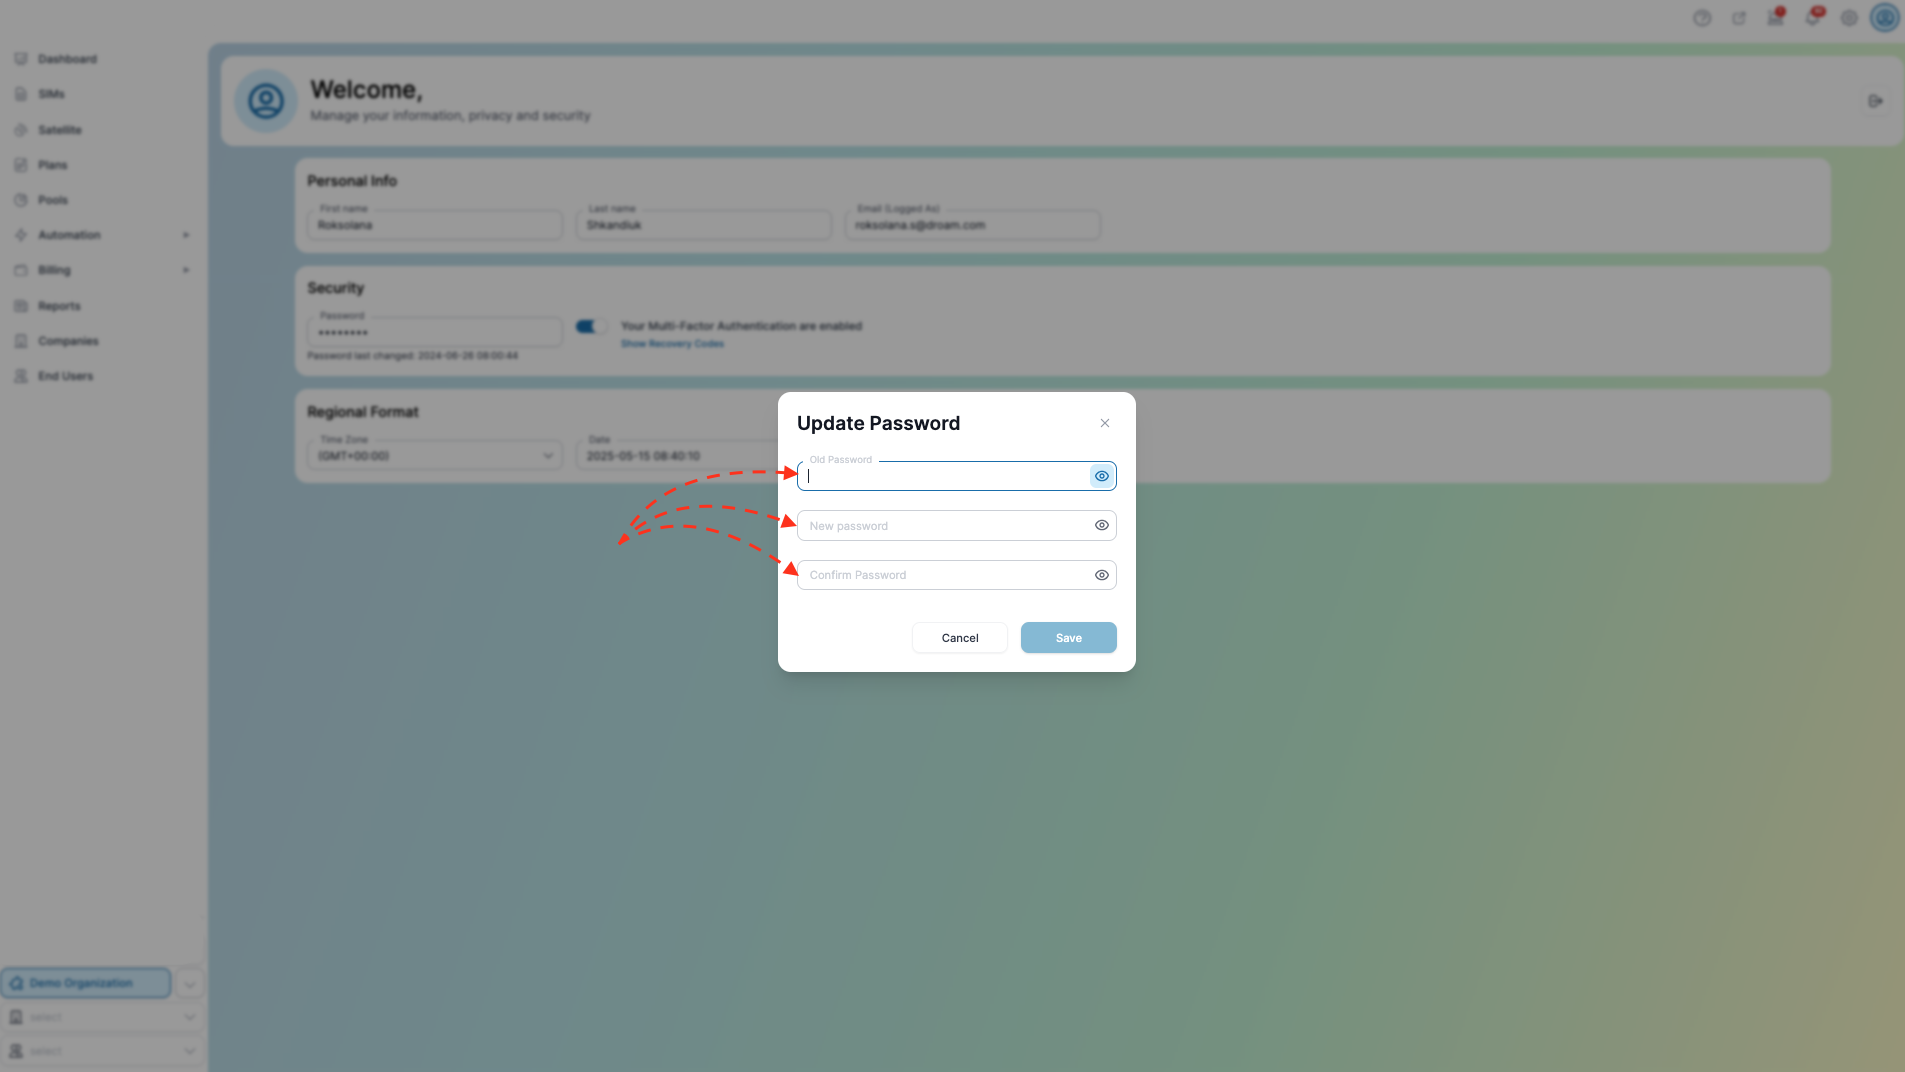
- Follow the instructions.
3. PSP Integration
Complete the following steps:
- Go to Settings
- Choose “Billing”
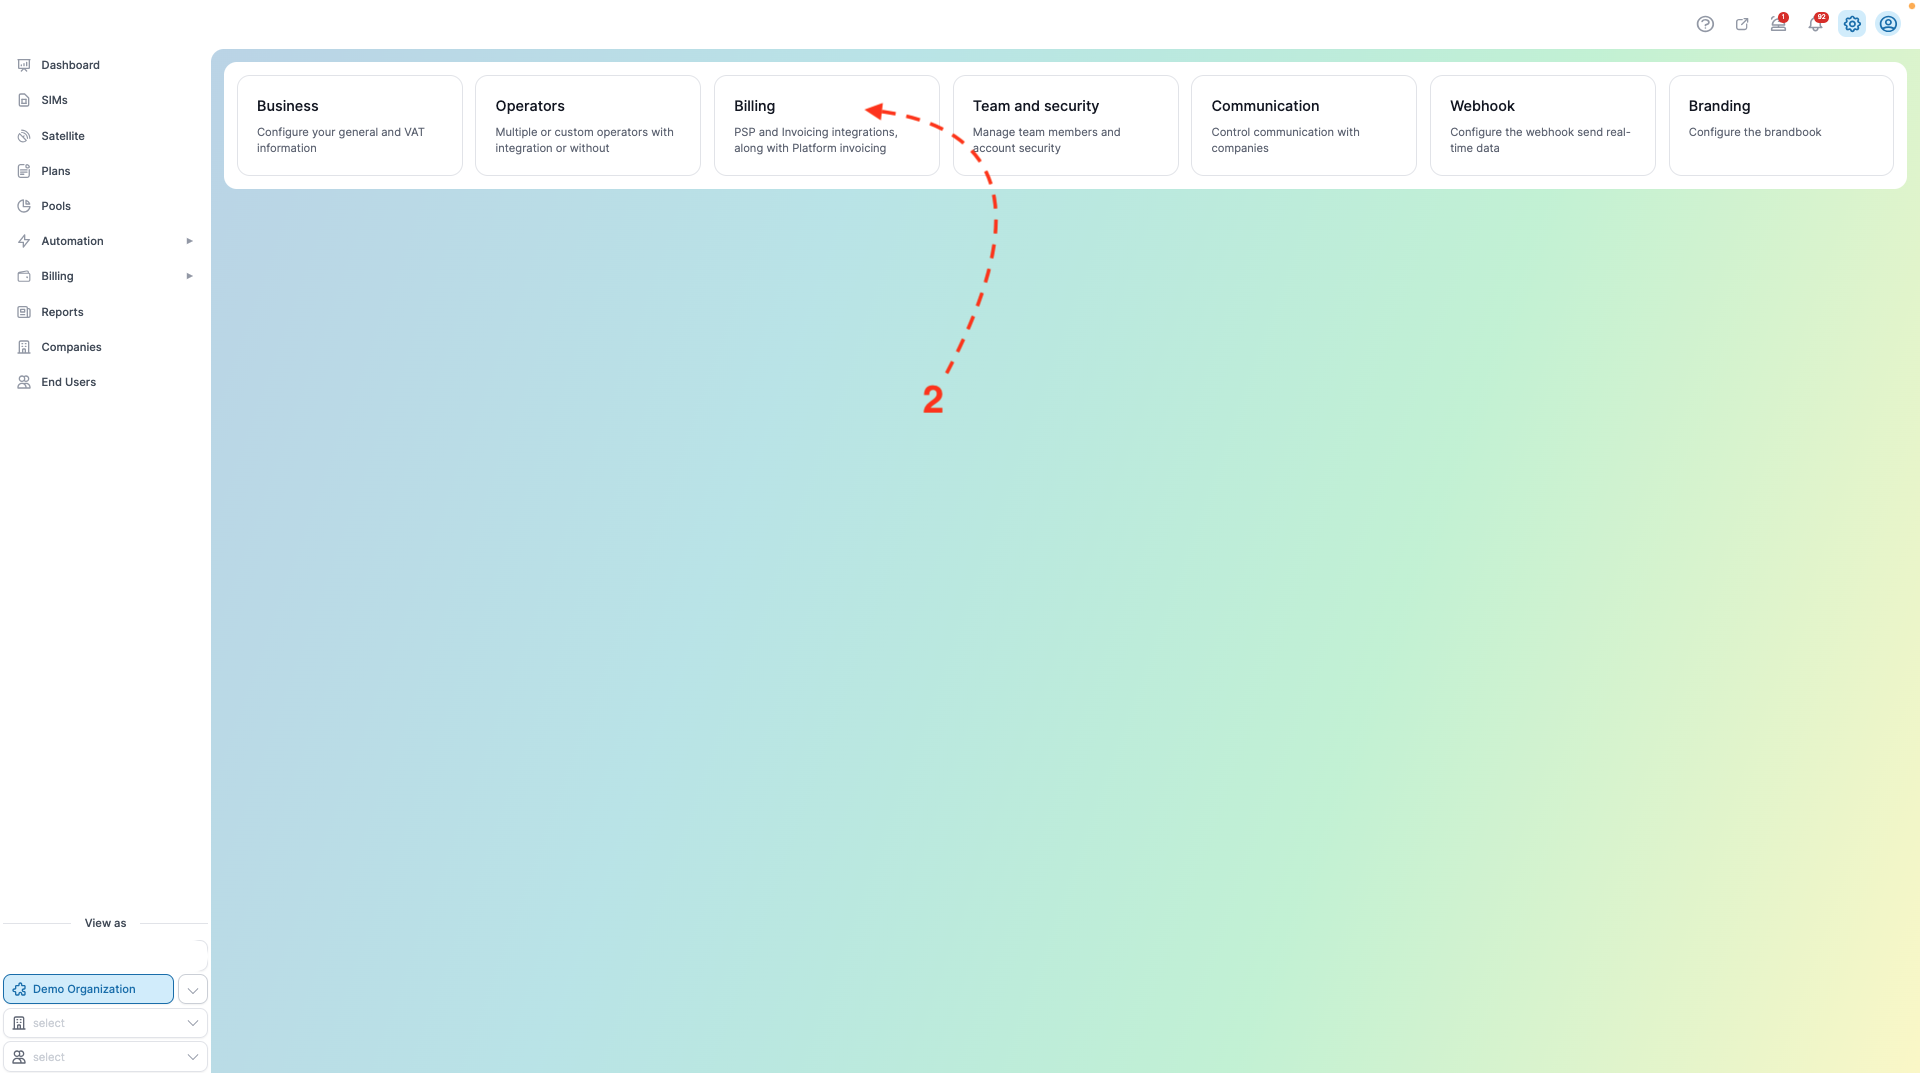
- In the newly opened window, choose the PSPs you will use to collect money
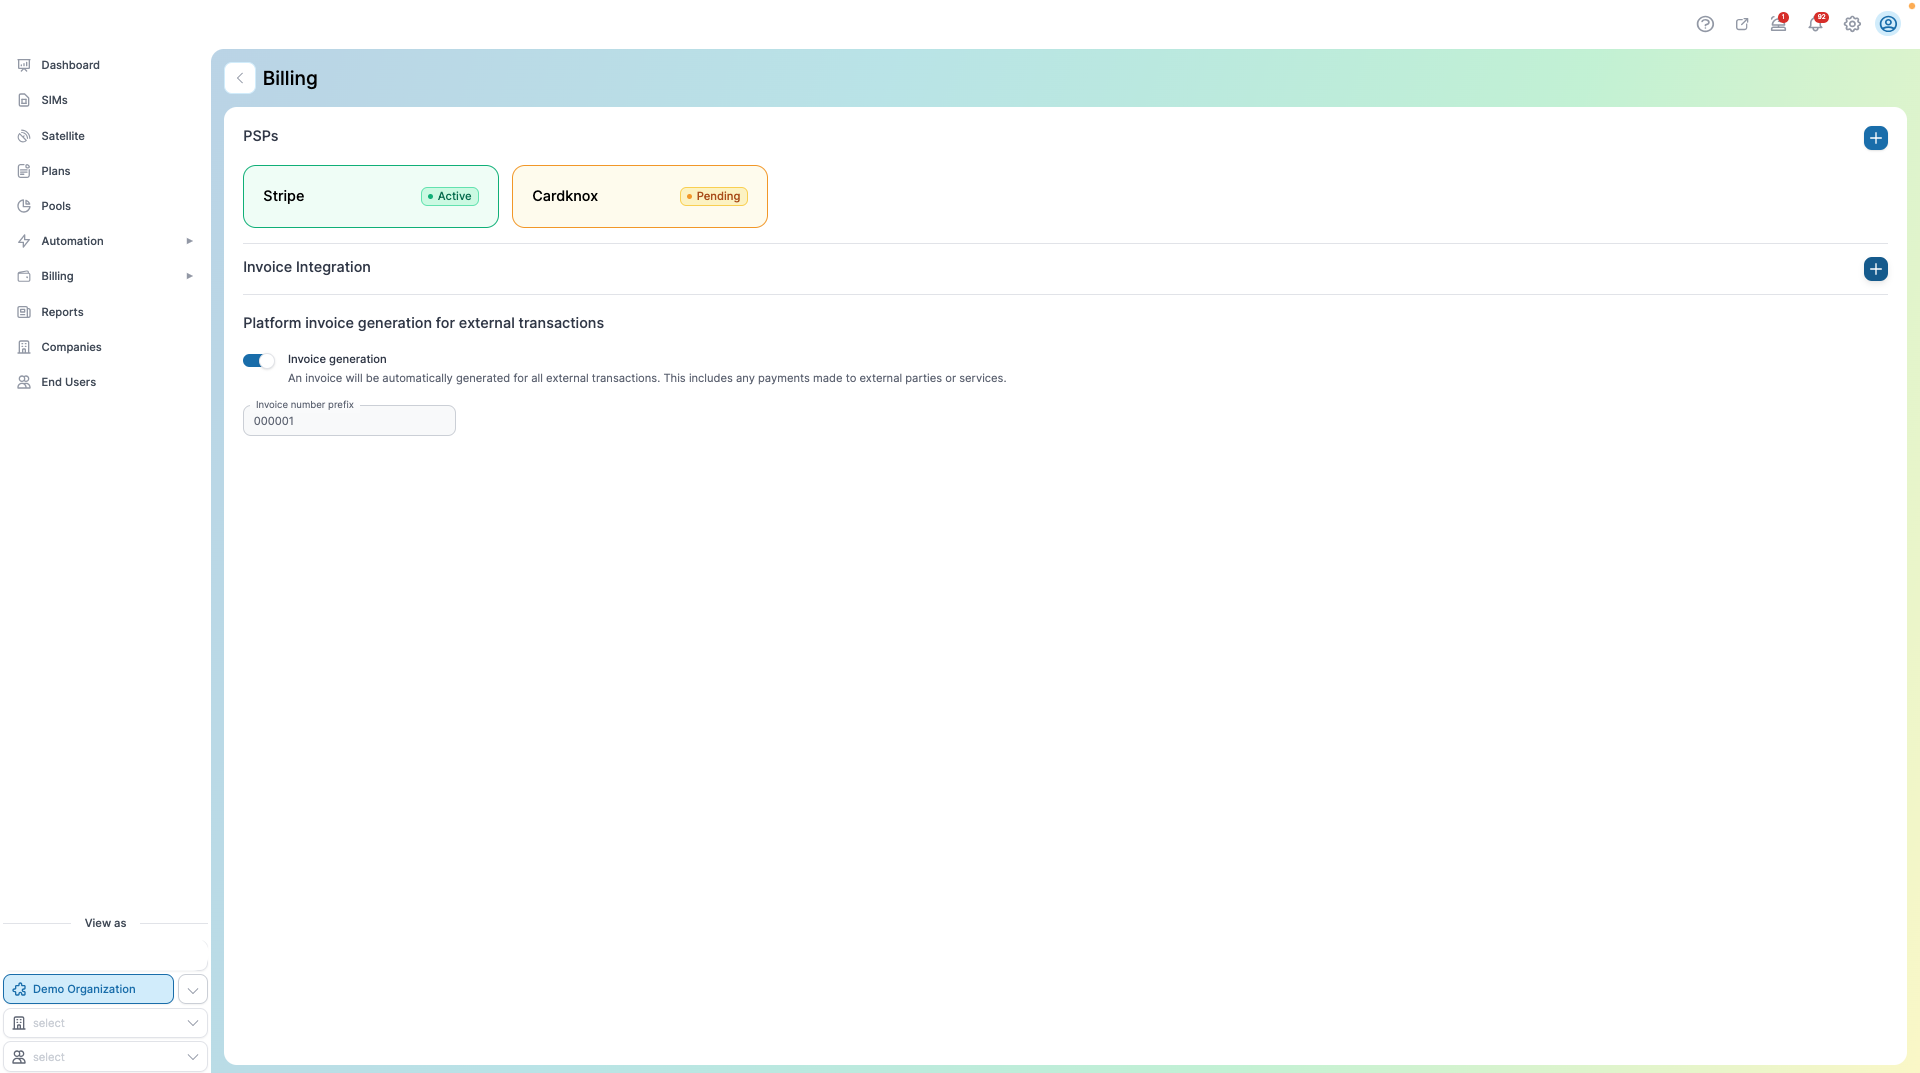
1) Stripe
- Click the + button next to the PSPs section and choose Stripe from the list of integrations.
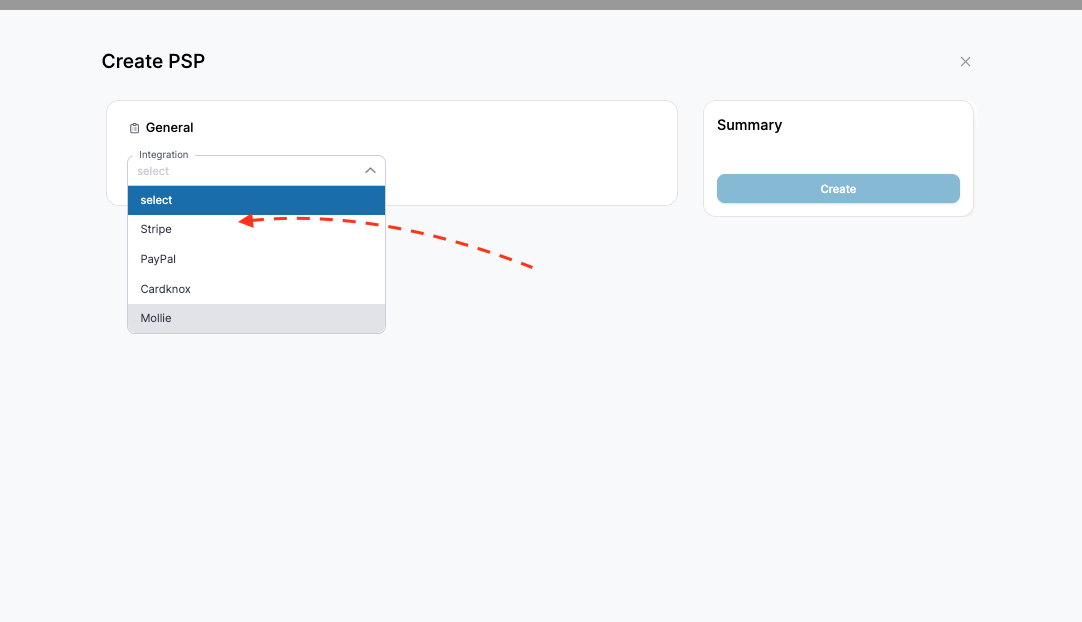
- To set up the integration with Stripe, you will need to enter your Key and Secret.
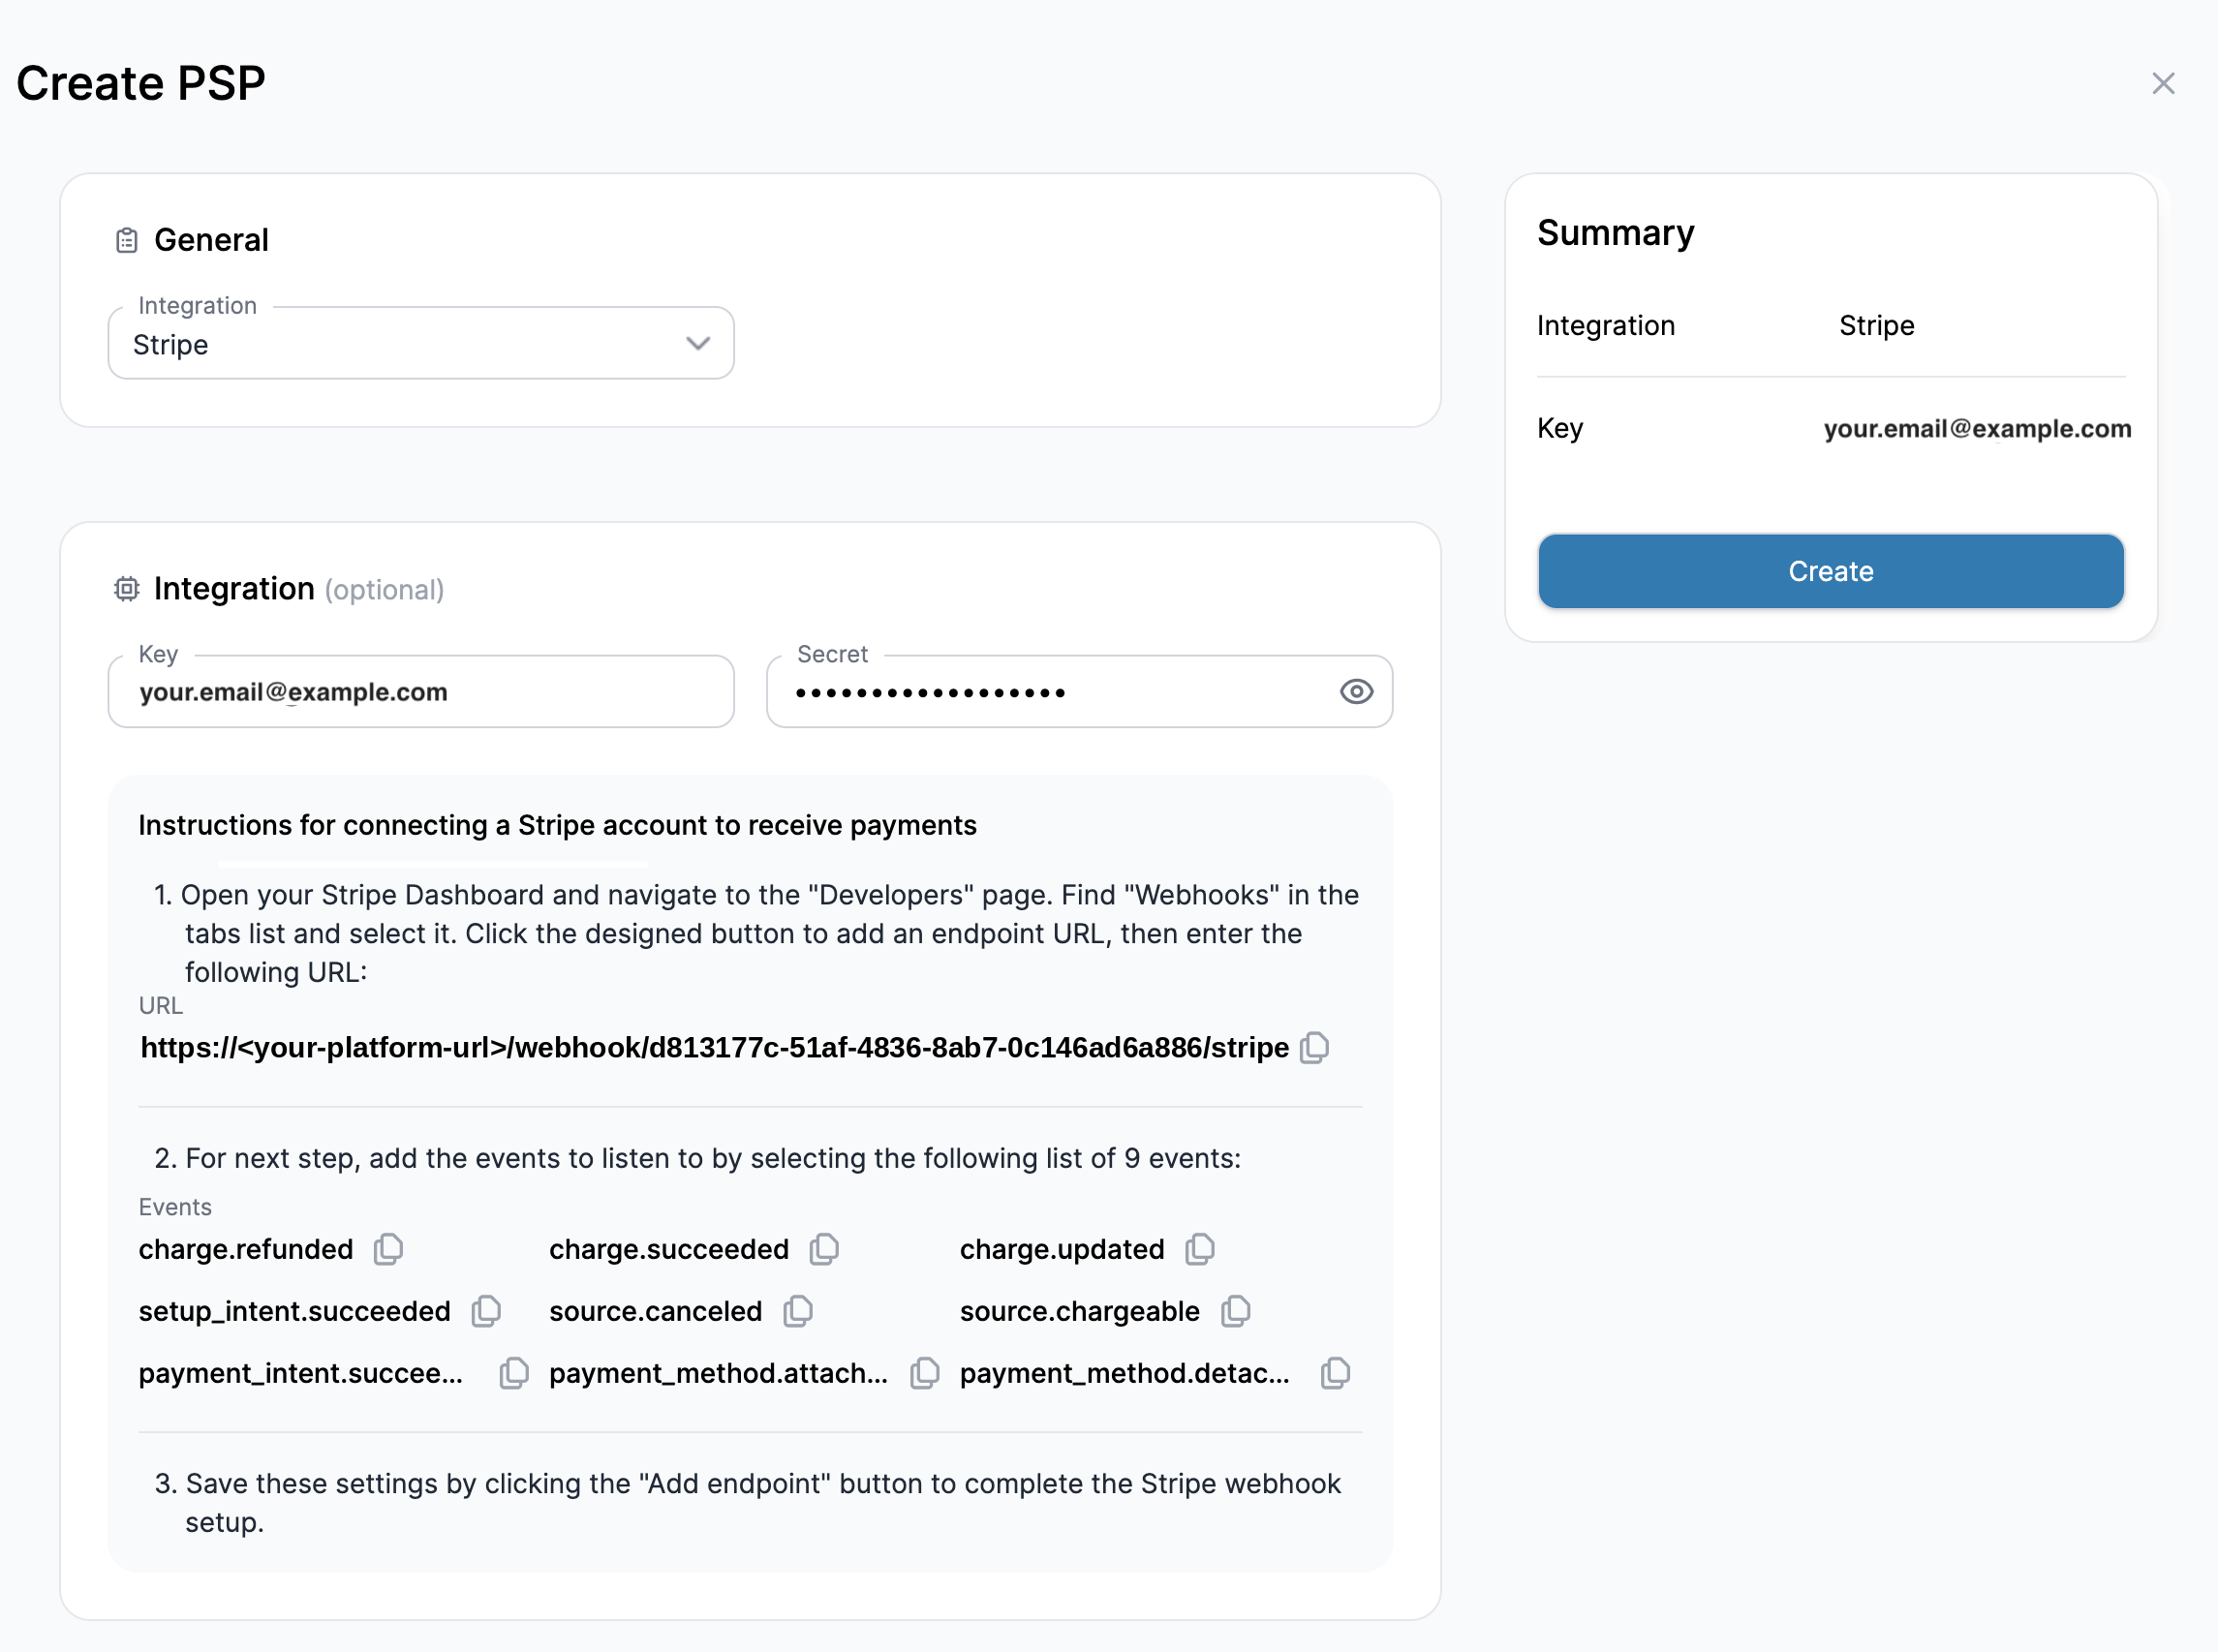
- Follow up on the instructions in the Platform
- Open your Stripe Dashboard and navigate to the "Developers" page. Find "Webhooks" in the tabs list and select it. Click the designed button to add an endpoint URL. Next, follow your unique, personalized link available on the platform.
- For the next step, add the events to listen to by selecting the following list of 9 events:
- charge.refunded
- charge.succeeded
- charge.updated
- setup_intent.succeeded
- source.canceled
- source.chargeable
- payment_intent.succeeded
- payment_method.attached
- payment_method.detached
- Save these settings by clicking the "Add endpoint" button to complete the Stripe webhook setup.
2) PayPal
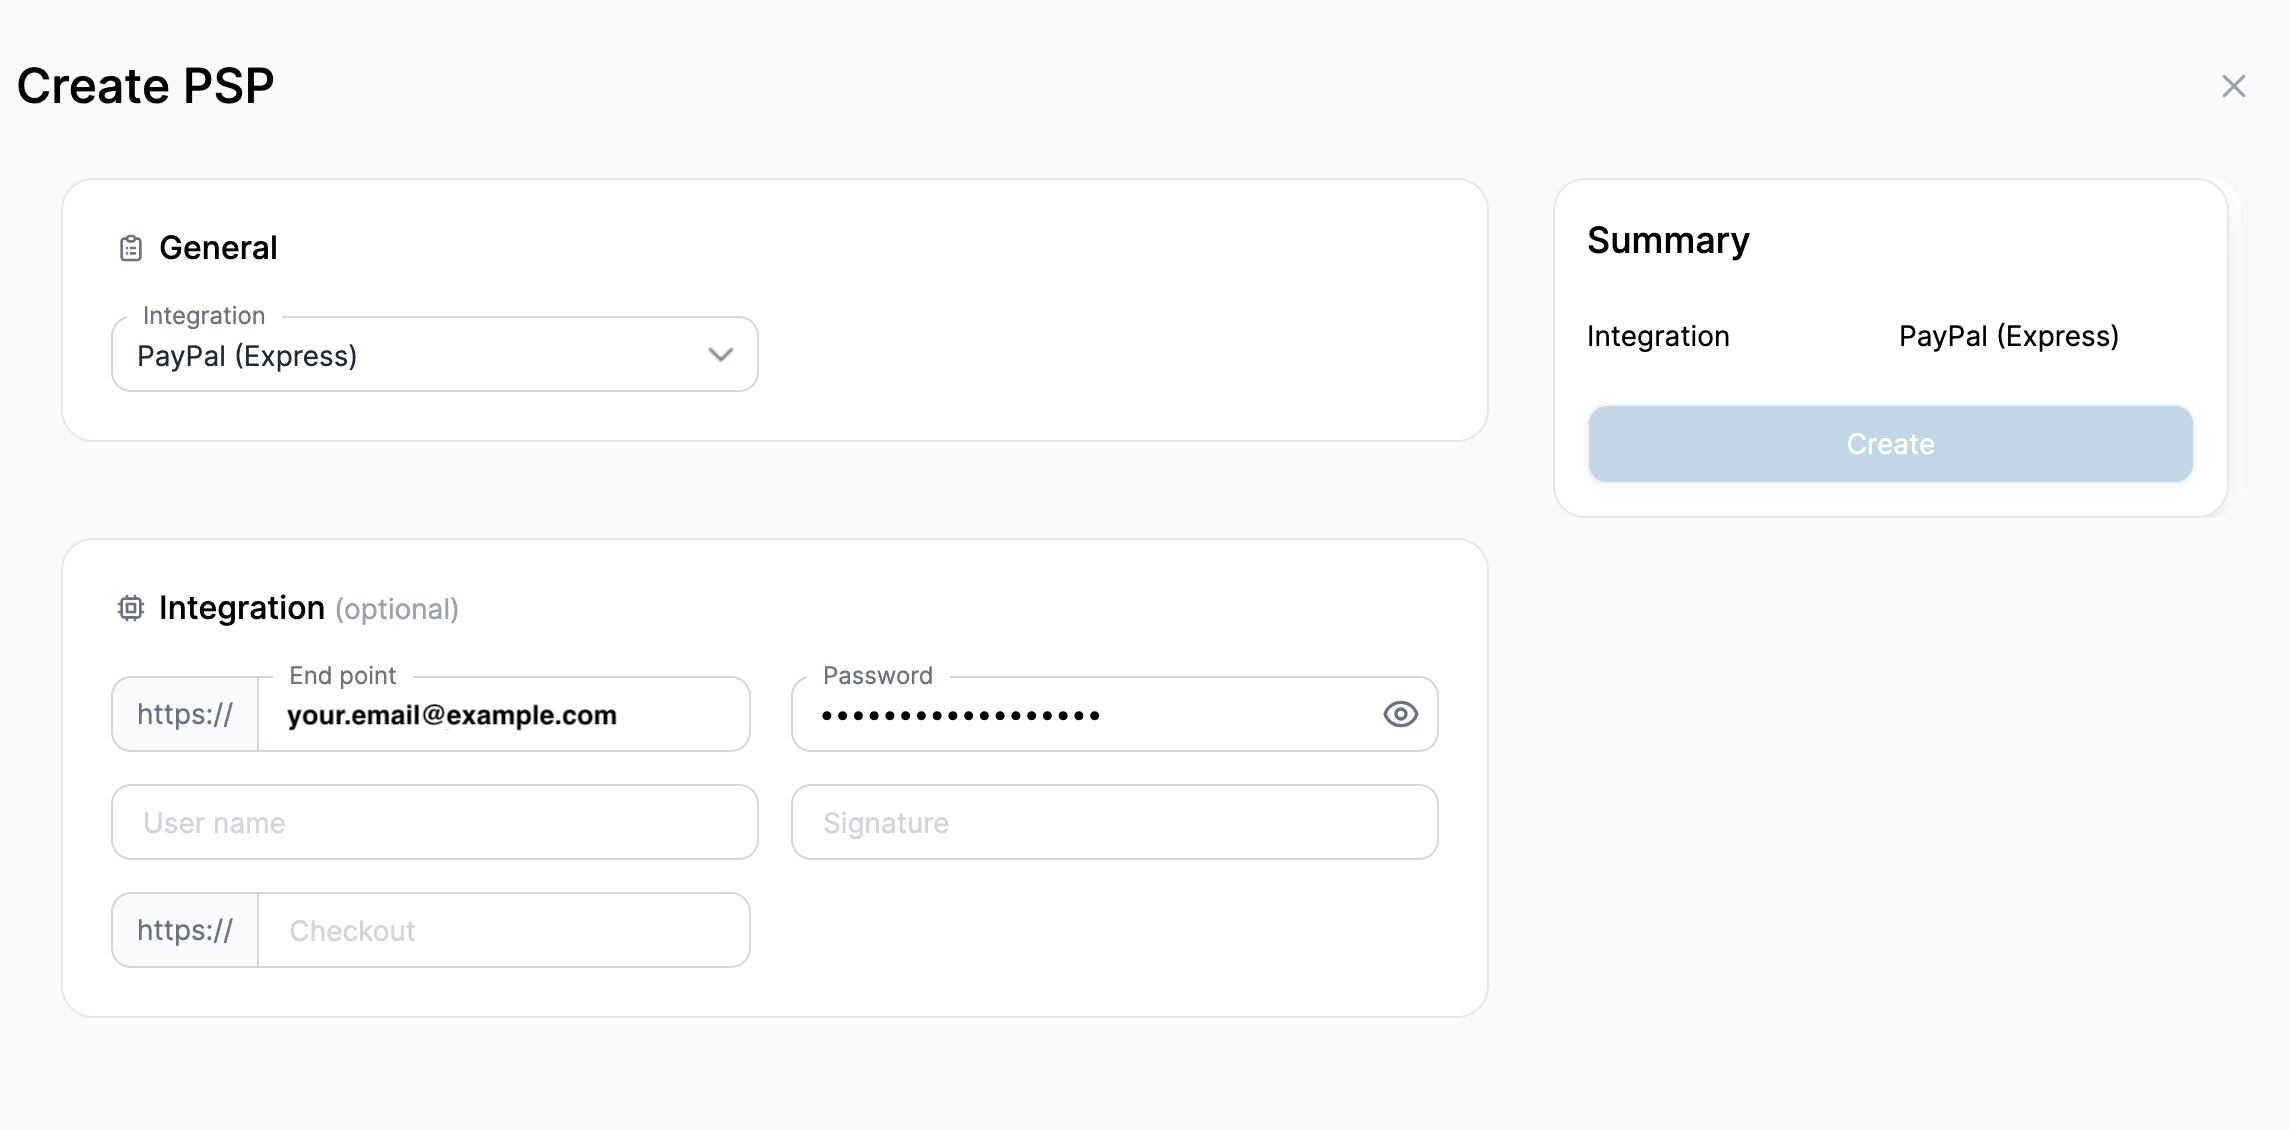
To integrate with PayPal, you will need to provide the following details:
- Endpoint
- Username
- Password
- Checkout
- Signature
3) Cardknox (pending)
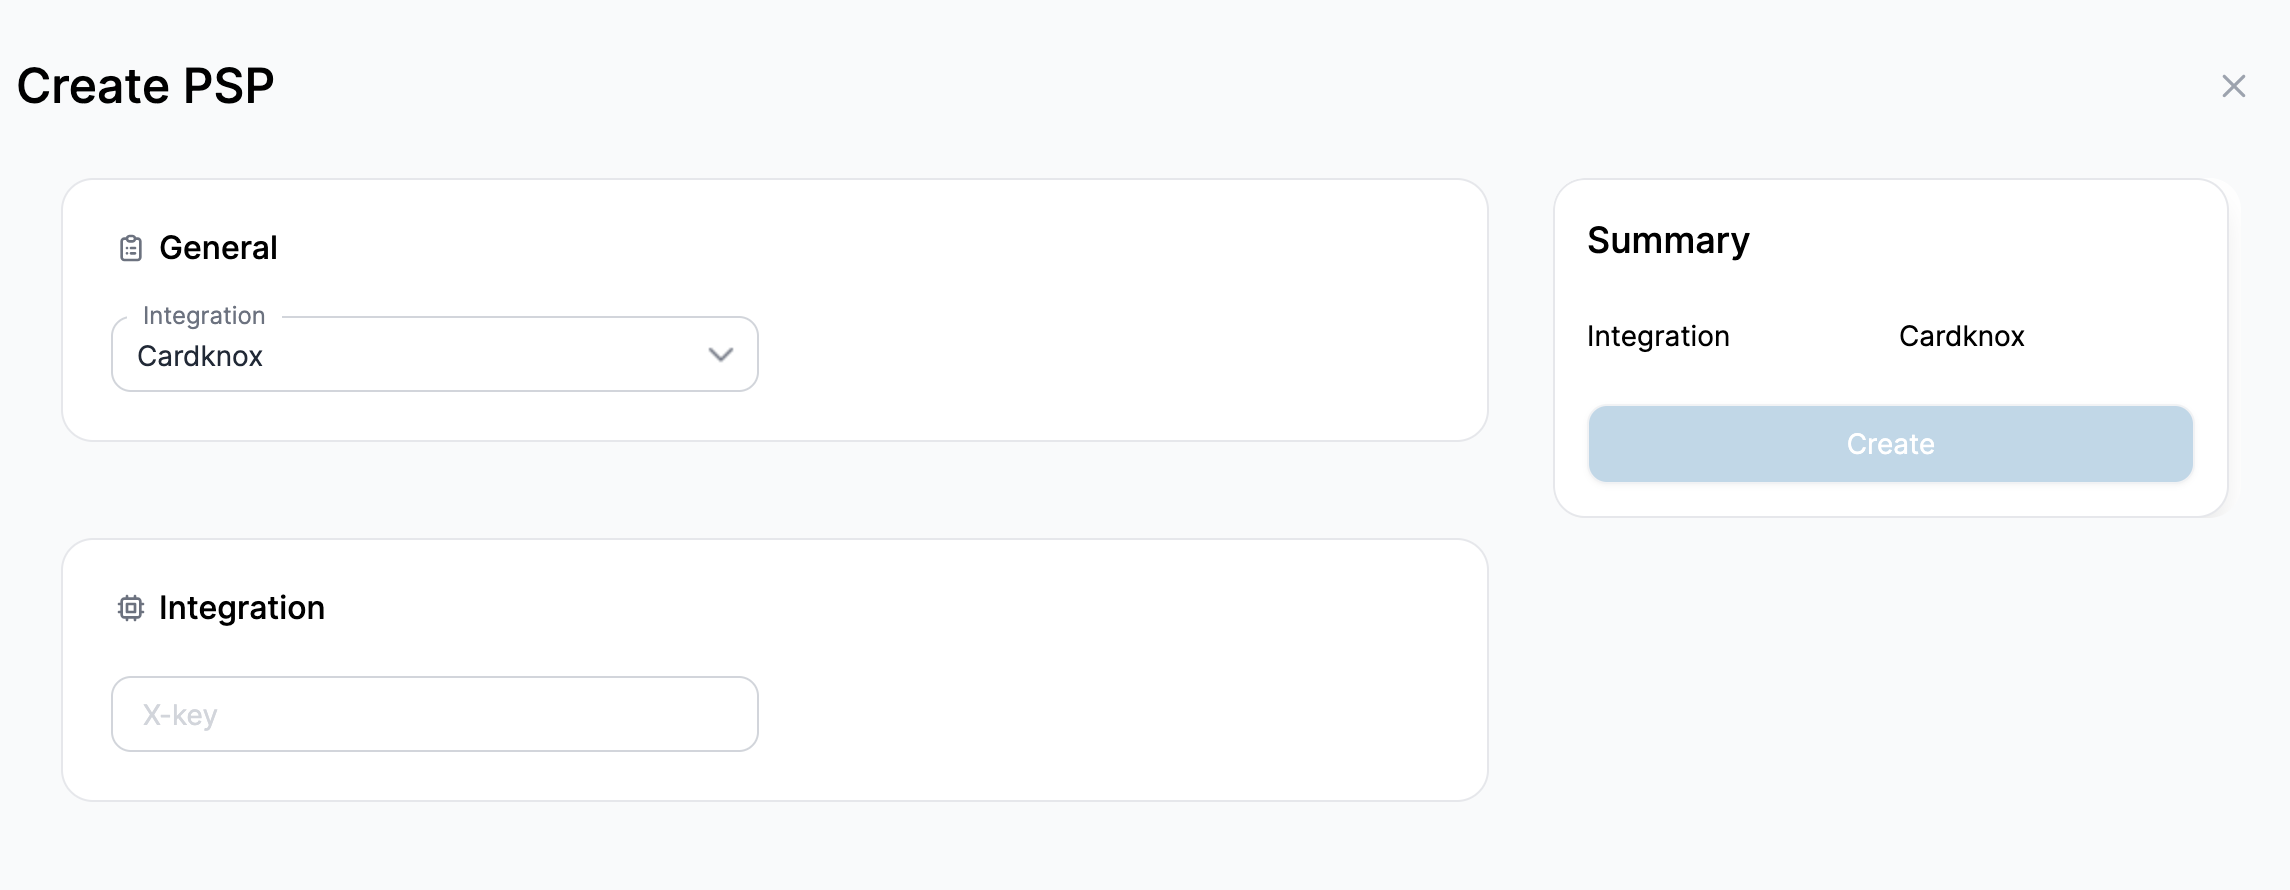
To integrate with Cardknox, you will need to provide the X-key
4) Mollie
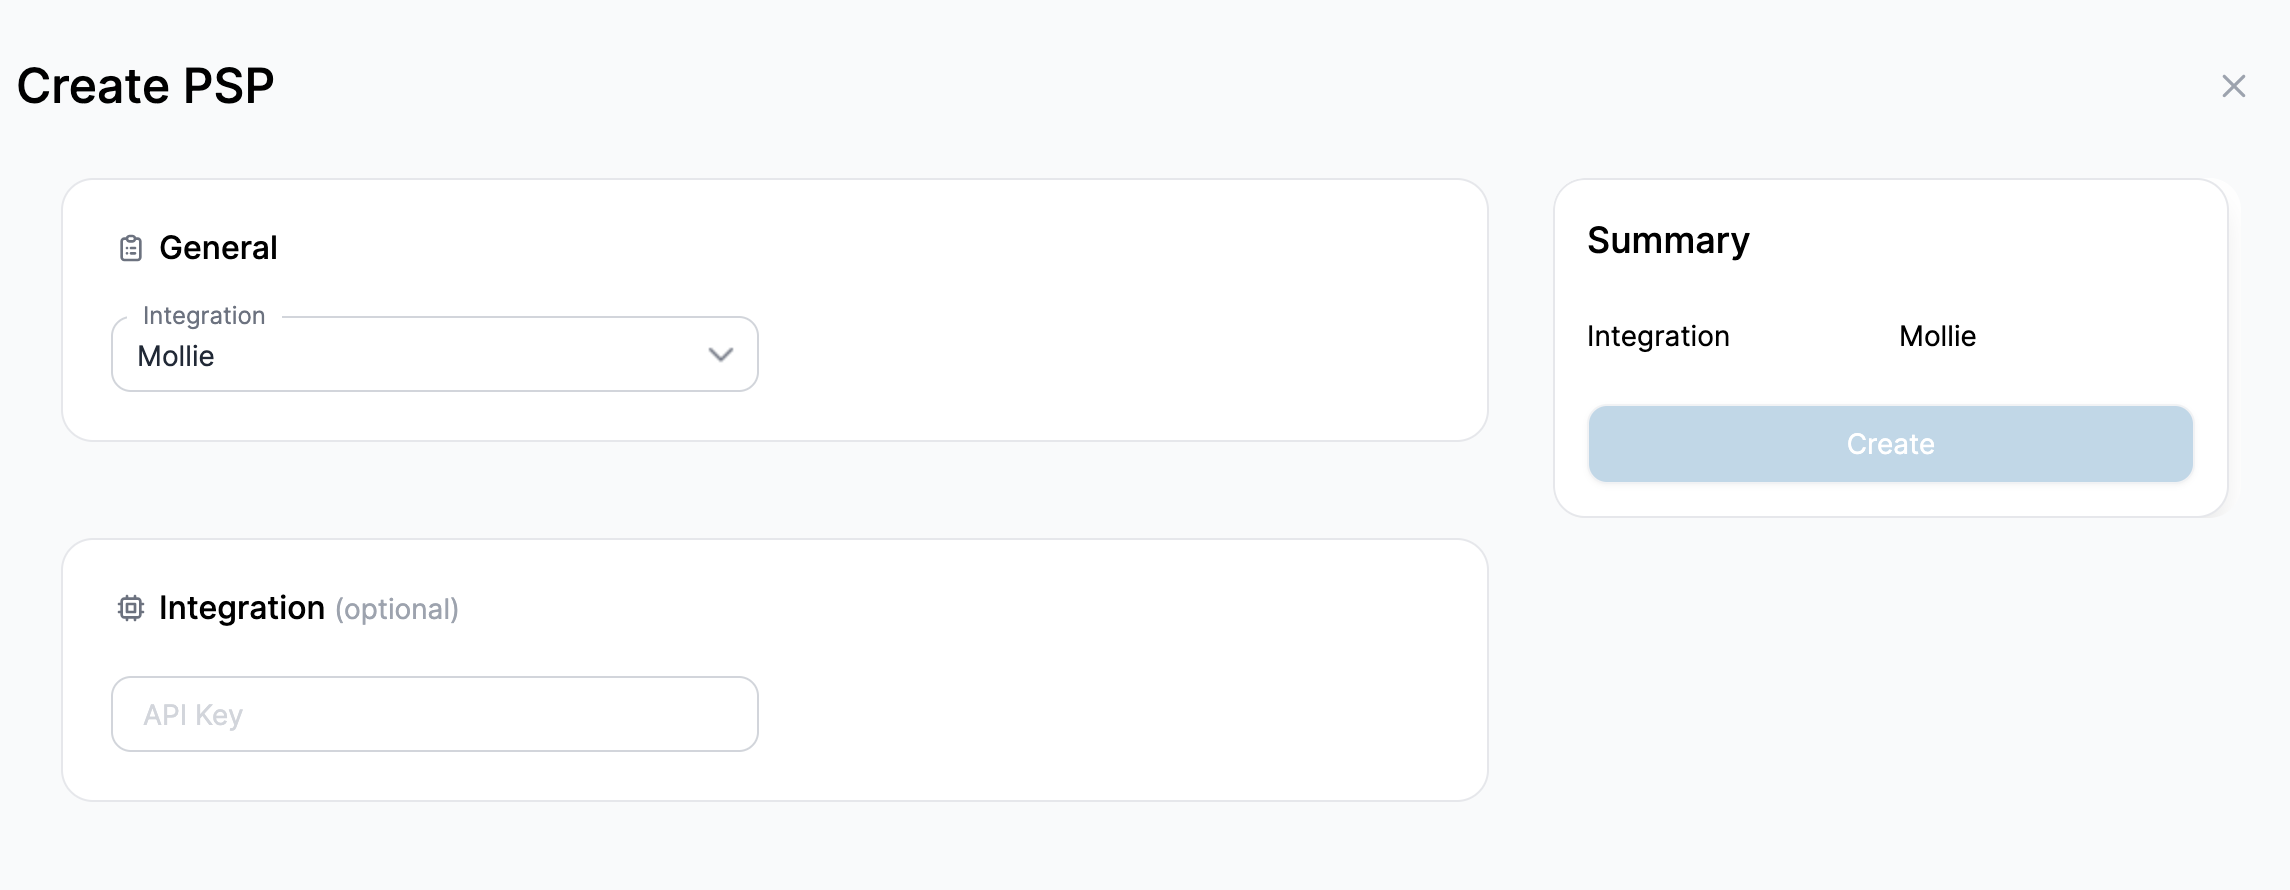
To integrate with Cardknox, you will need to provide the API Key
If you plan to use only the Subscription type, PSP is not needed
4. Invoice Integration
Complete the following steps:
1) Xero
- You need to create a Xero account. https://www.xero.com/
- The next step will be to directly create a billing integration on the
platform (you must have permissions):
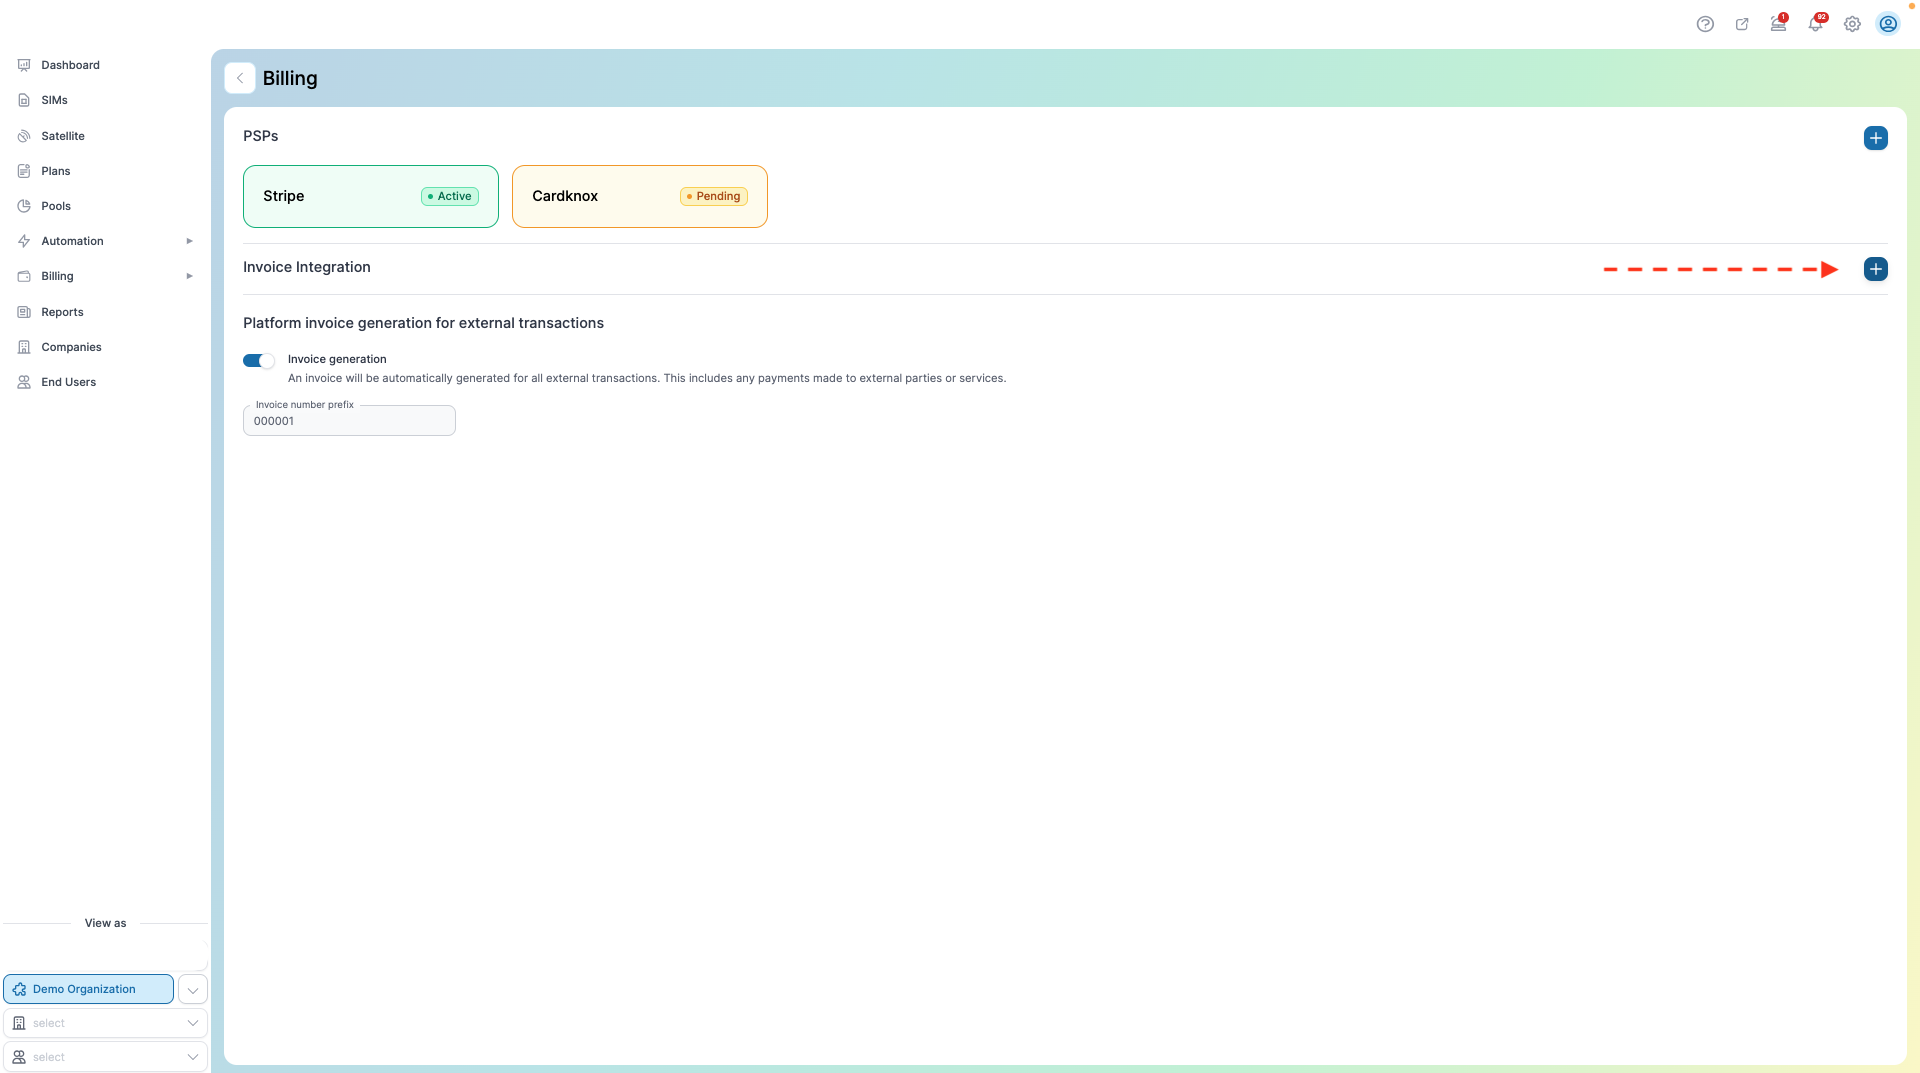
- Select “Xero” from the selection menu:
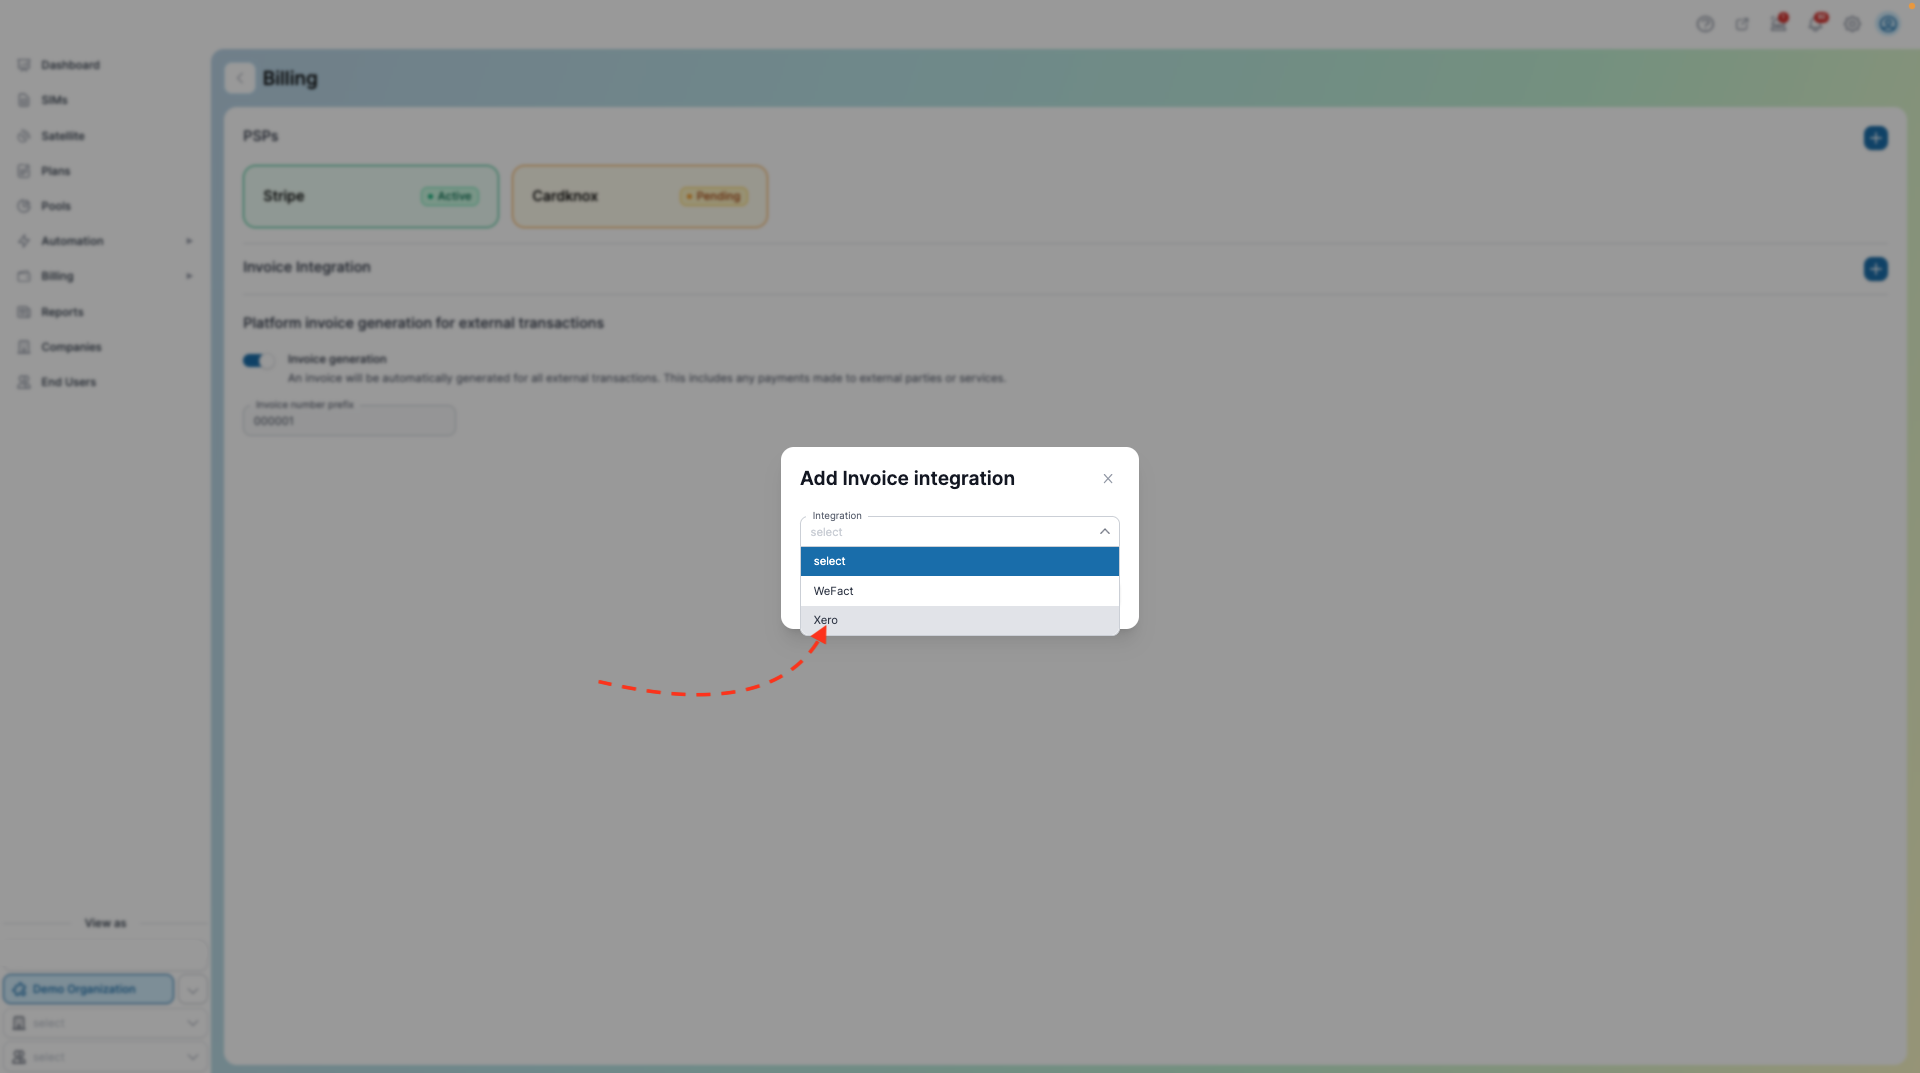
Enter the previously generated Client ID and Client Secret key, and confirm the action by clicking "Confirm".
With valid credentials and a redirect URI, you will be redirected to the Xero authorization page. There, you will need to confirm access to your organization.
4. You will be redirected to the Xero authorization page. There, you will need to confirm access to your organization:
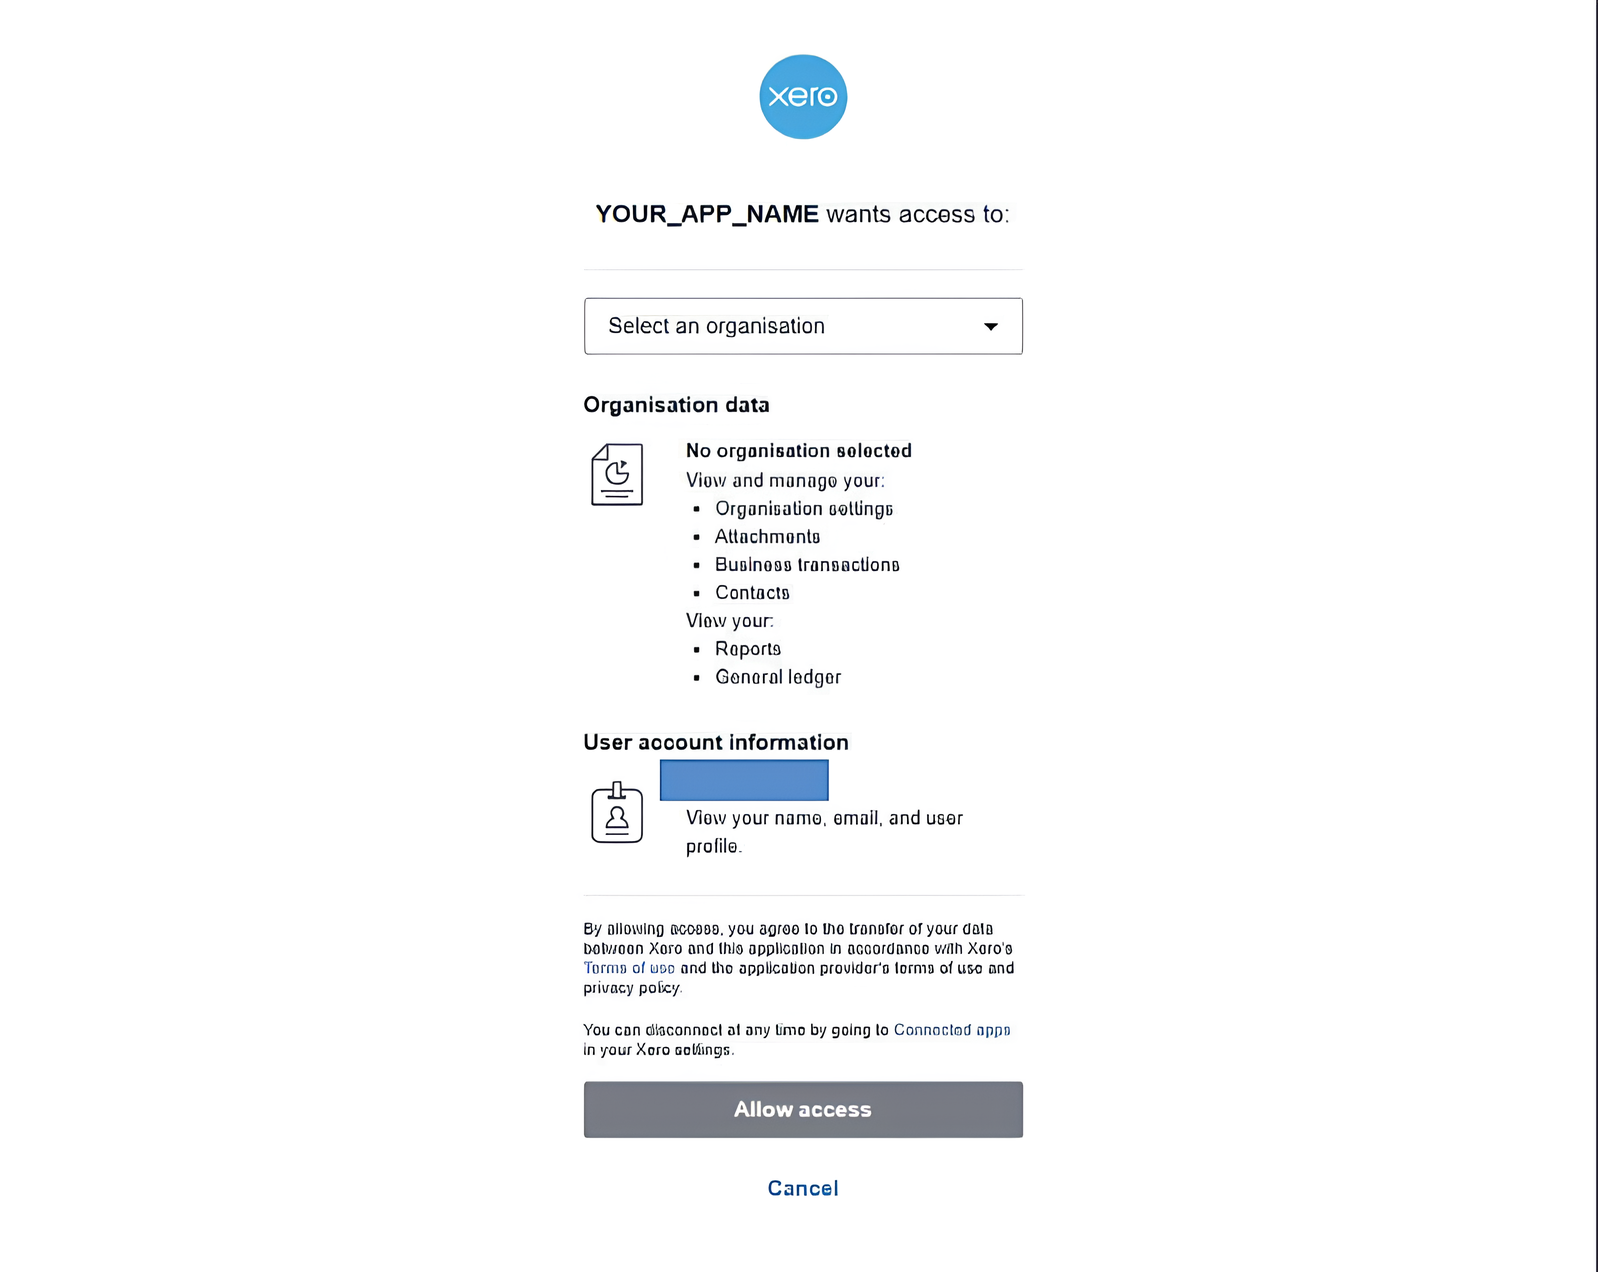
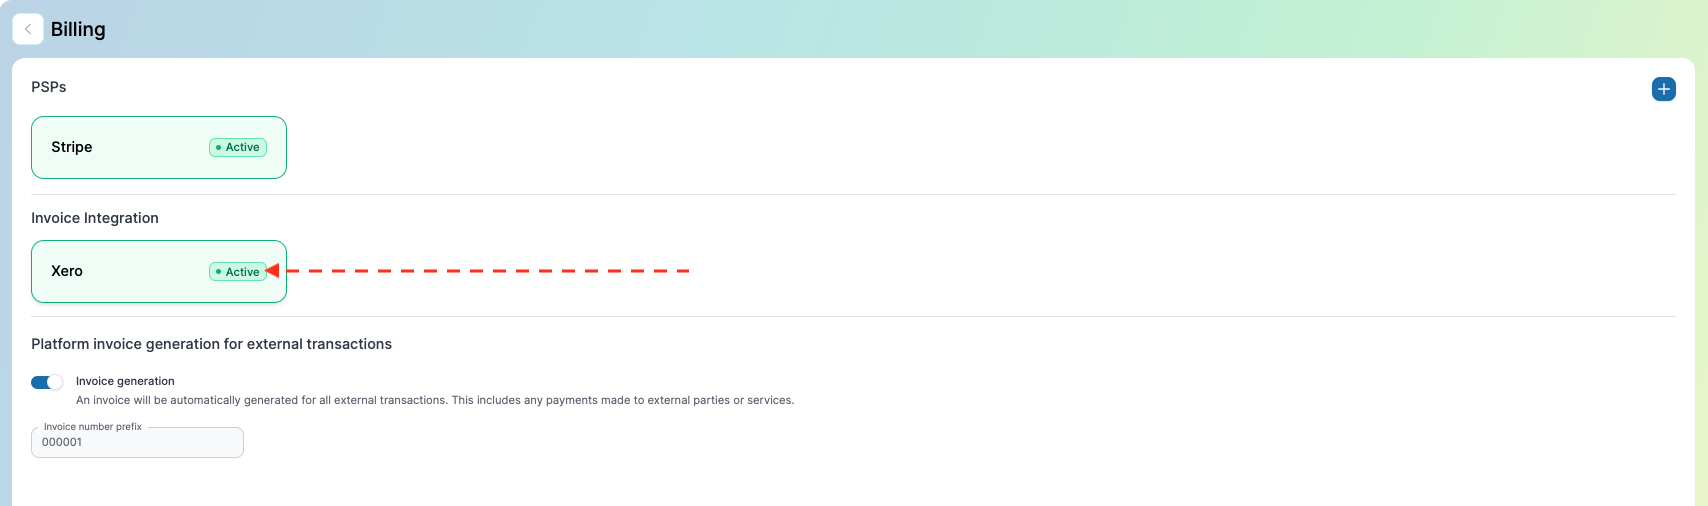
- After confirmation and successful access, you will be returned to the
billing integration page, where the created billing integration will be
displayed:
IMPORTANT!
Your billing integration will be valid for 60 days from the moment of
creation. If you do not perform any actions related to
this integration during this period, you will have to reconfirm access to the application!
Xero App Creating Guide
- This can be done by following the link:
https://developer.xero.com/app/manage/
and selecting “My Apps”, click on the “New app” button:

- You should see the following window:
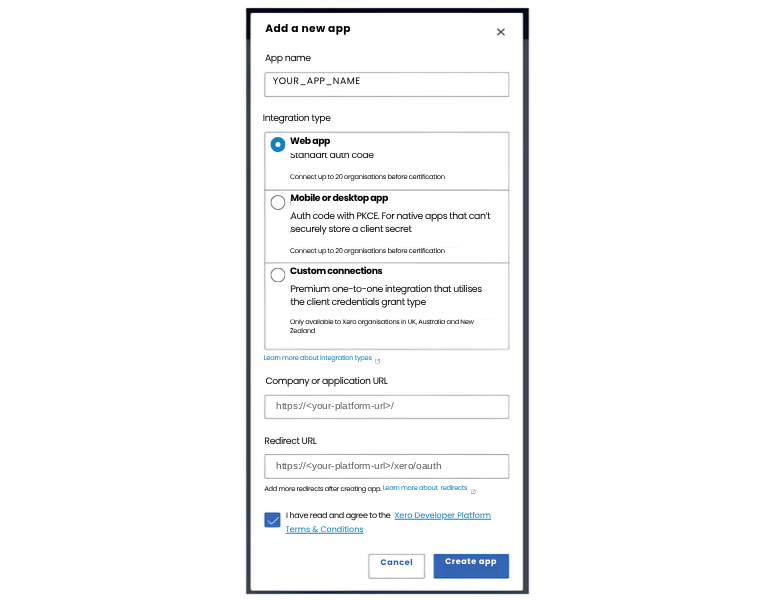
- To correctly create the application, you must enter the following data:
- Integration type: Web app
- App name: \
- Company or application URL:
https://<your-platform-url>/ - Redirect URL:
https://<your-platform-url>/xero/oauth
- Click on the “Create app” button. After that, you will be redirected to the next page
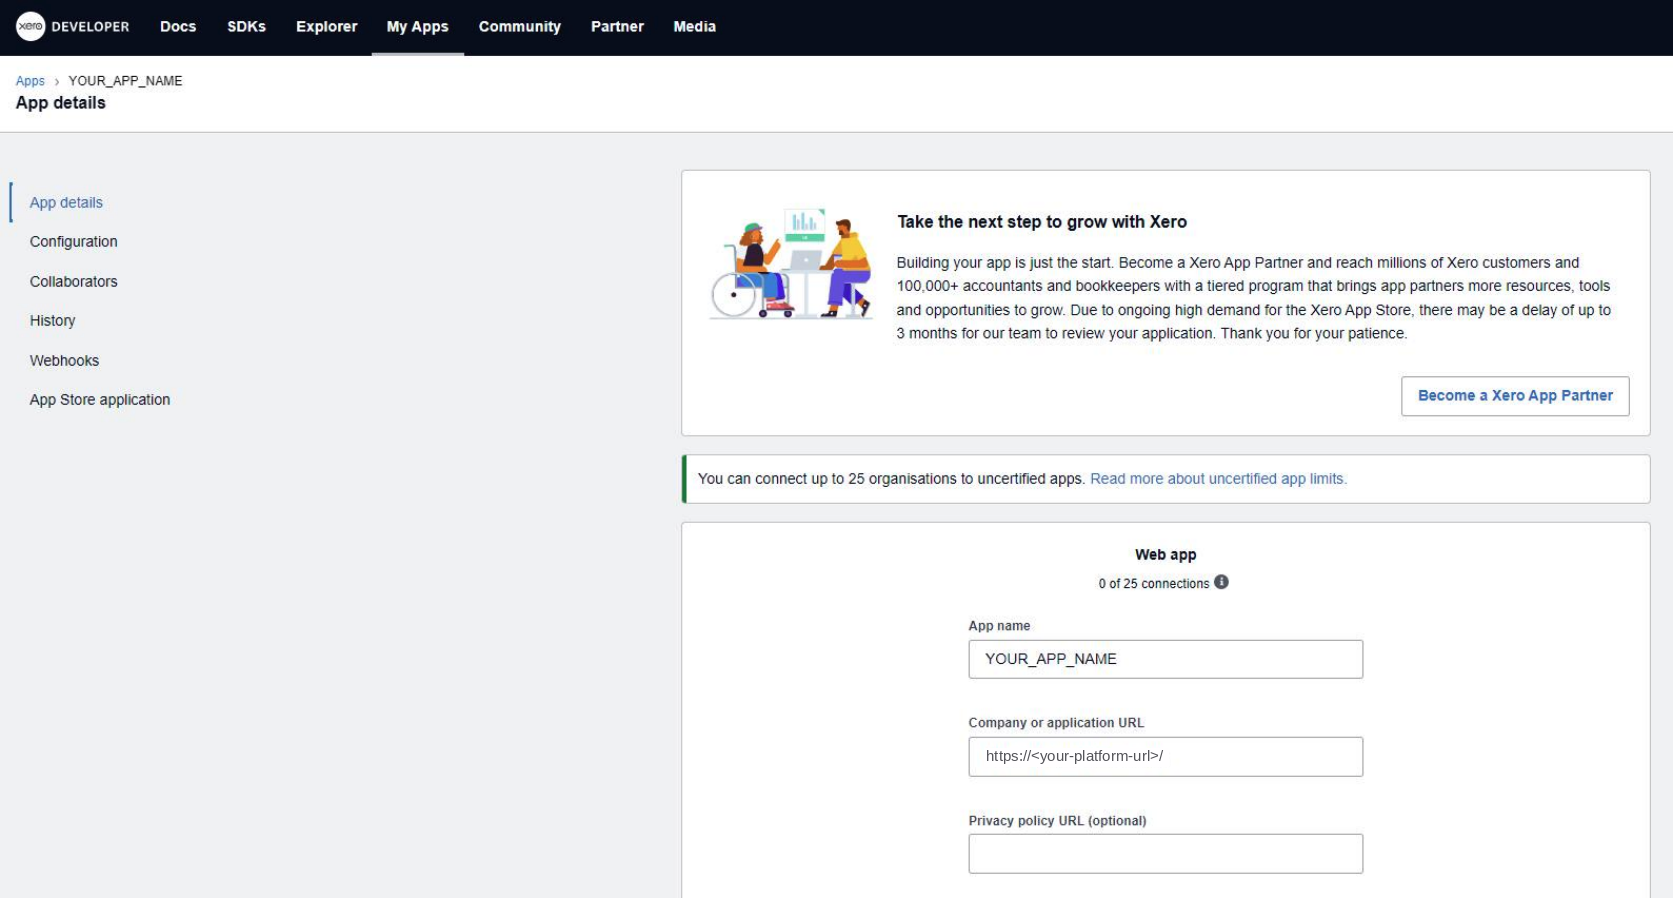
- Here you can get your Client ID and Client Secret key, which are necessary to add integration on the platform. To do this, go to the "Configuration" tab
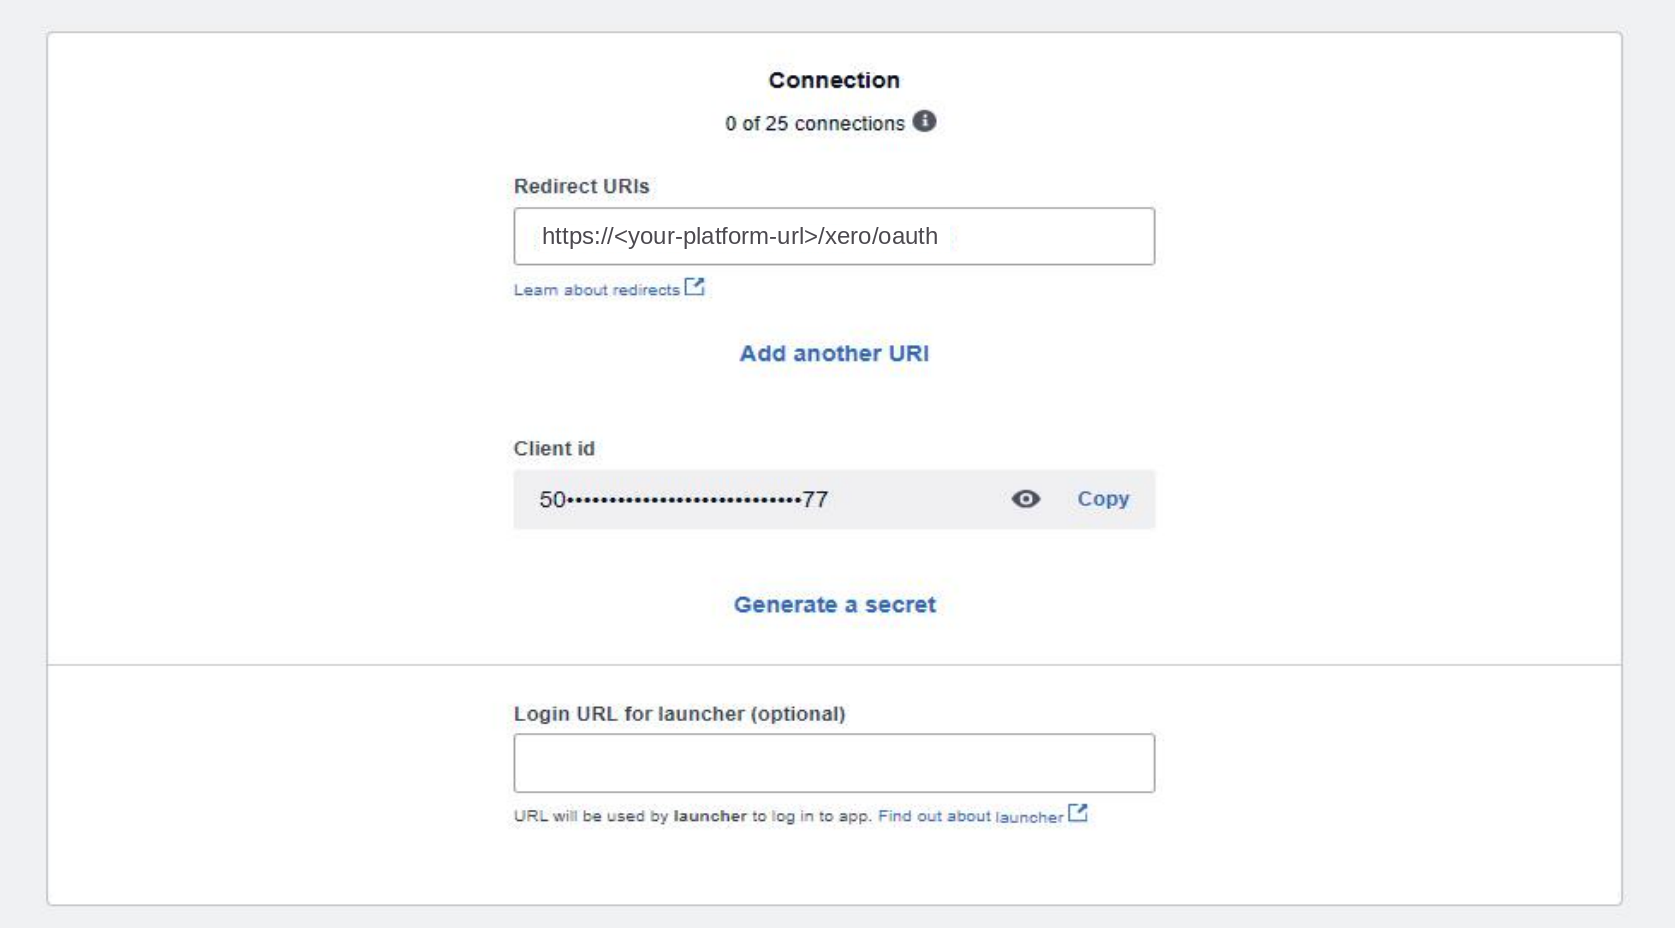
- Generate your Client Secret key by clicking on the box “Generate a secret” (you can generate a new Client Secret key by performing the same action).
IMPORTANT!
KEEP YOUR CLIENT ID AND CLIENT SECRET!
This completes the creation of the application.
You should add this if you want to create documents via WeFact or Xero. However, it's not mandatory, as you can create invoice drafts directly in our platform without using additional integrations.
As our client, you can submit requests to integrate the platform with new payment systems if the one you need is not listed above.
If your invoicing software is not integrated, please use the Export feature to transfer all invoices to your invoicing software.
5. Create Pools
To create pools, you first need to create a plan with the 'Subscription Static Pool' type
Complete the following steps:
- Navigate to the "Pools" section by clicking the corresponding button in the left-hand side navigation menu.
- On the left side, click the "plus" (+) button, then select the type of pool you wish to create from the options provided.
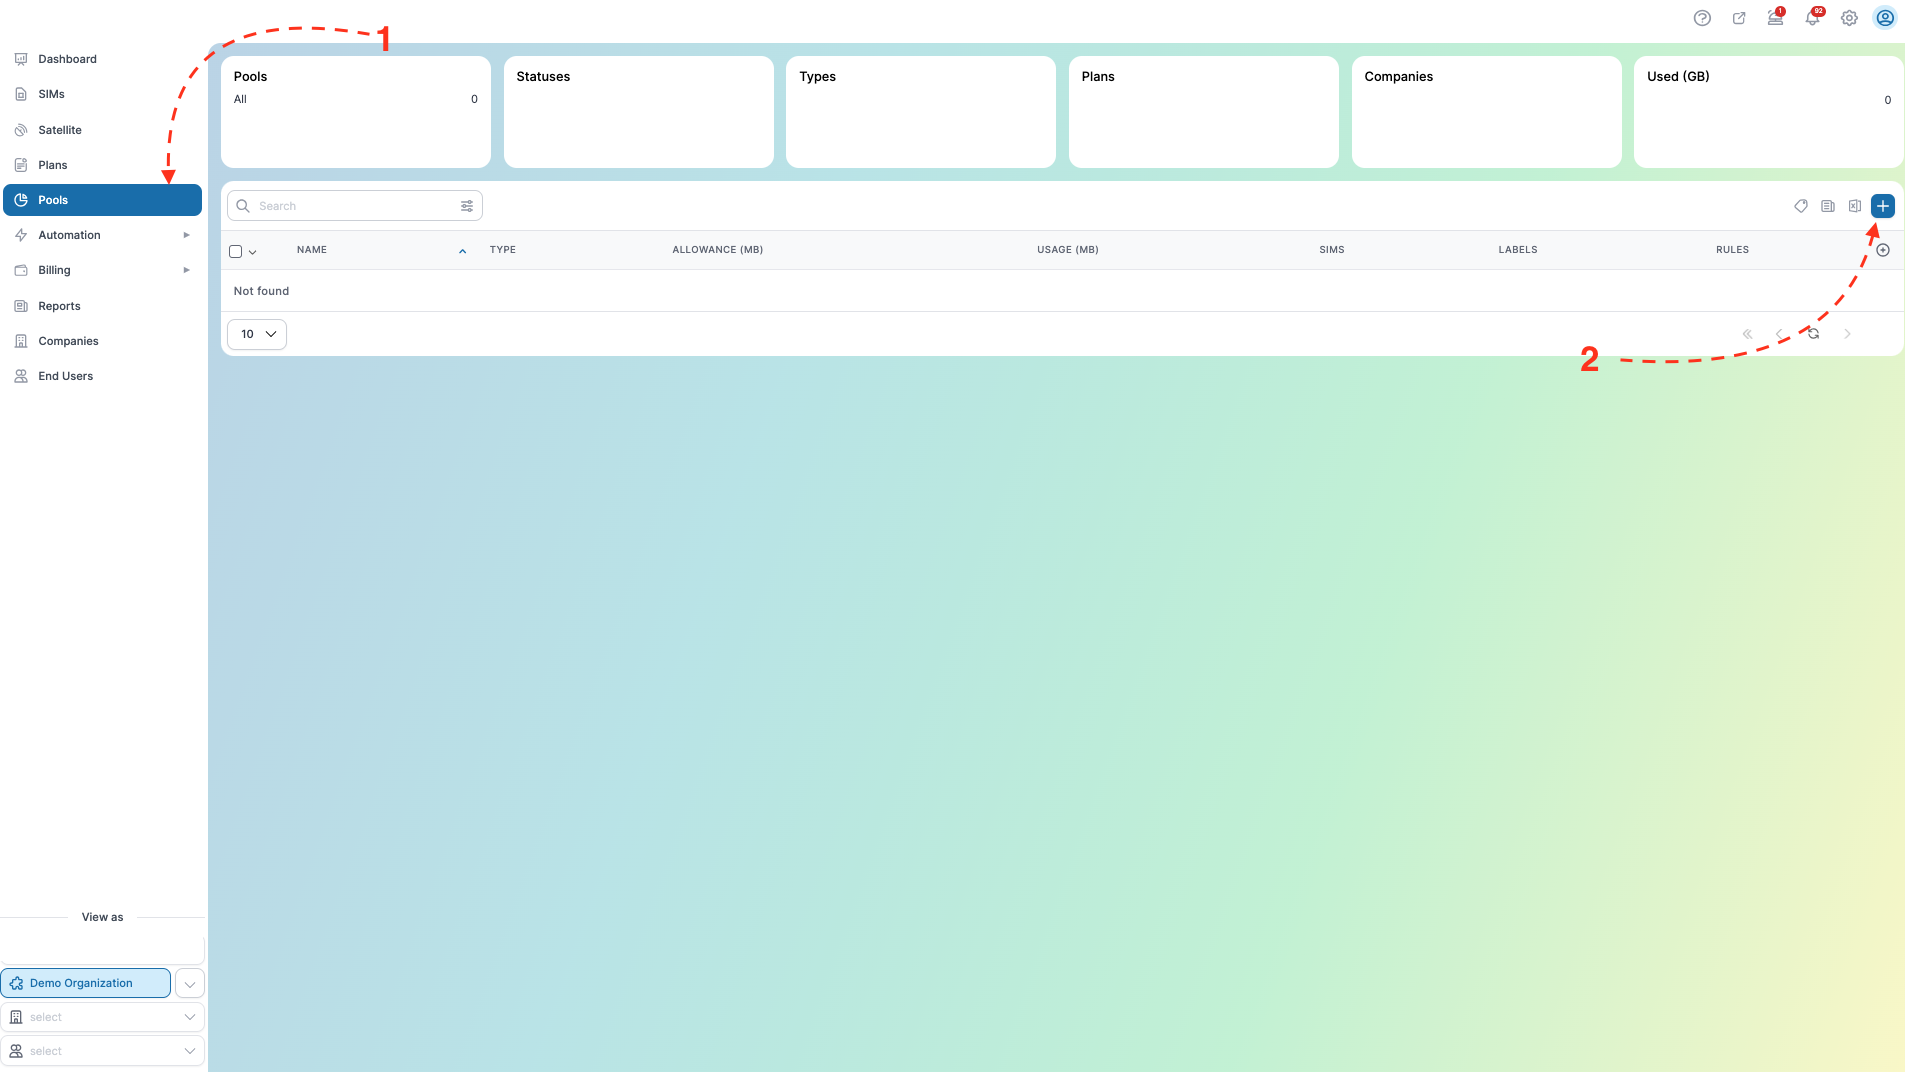
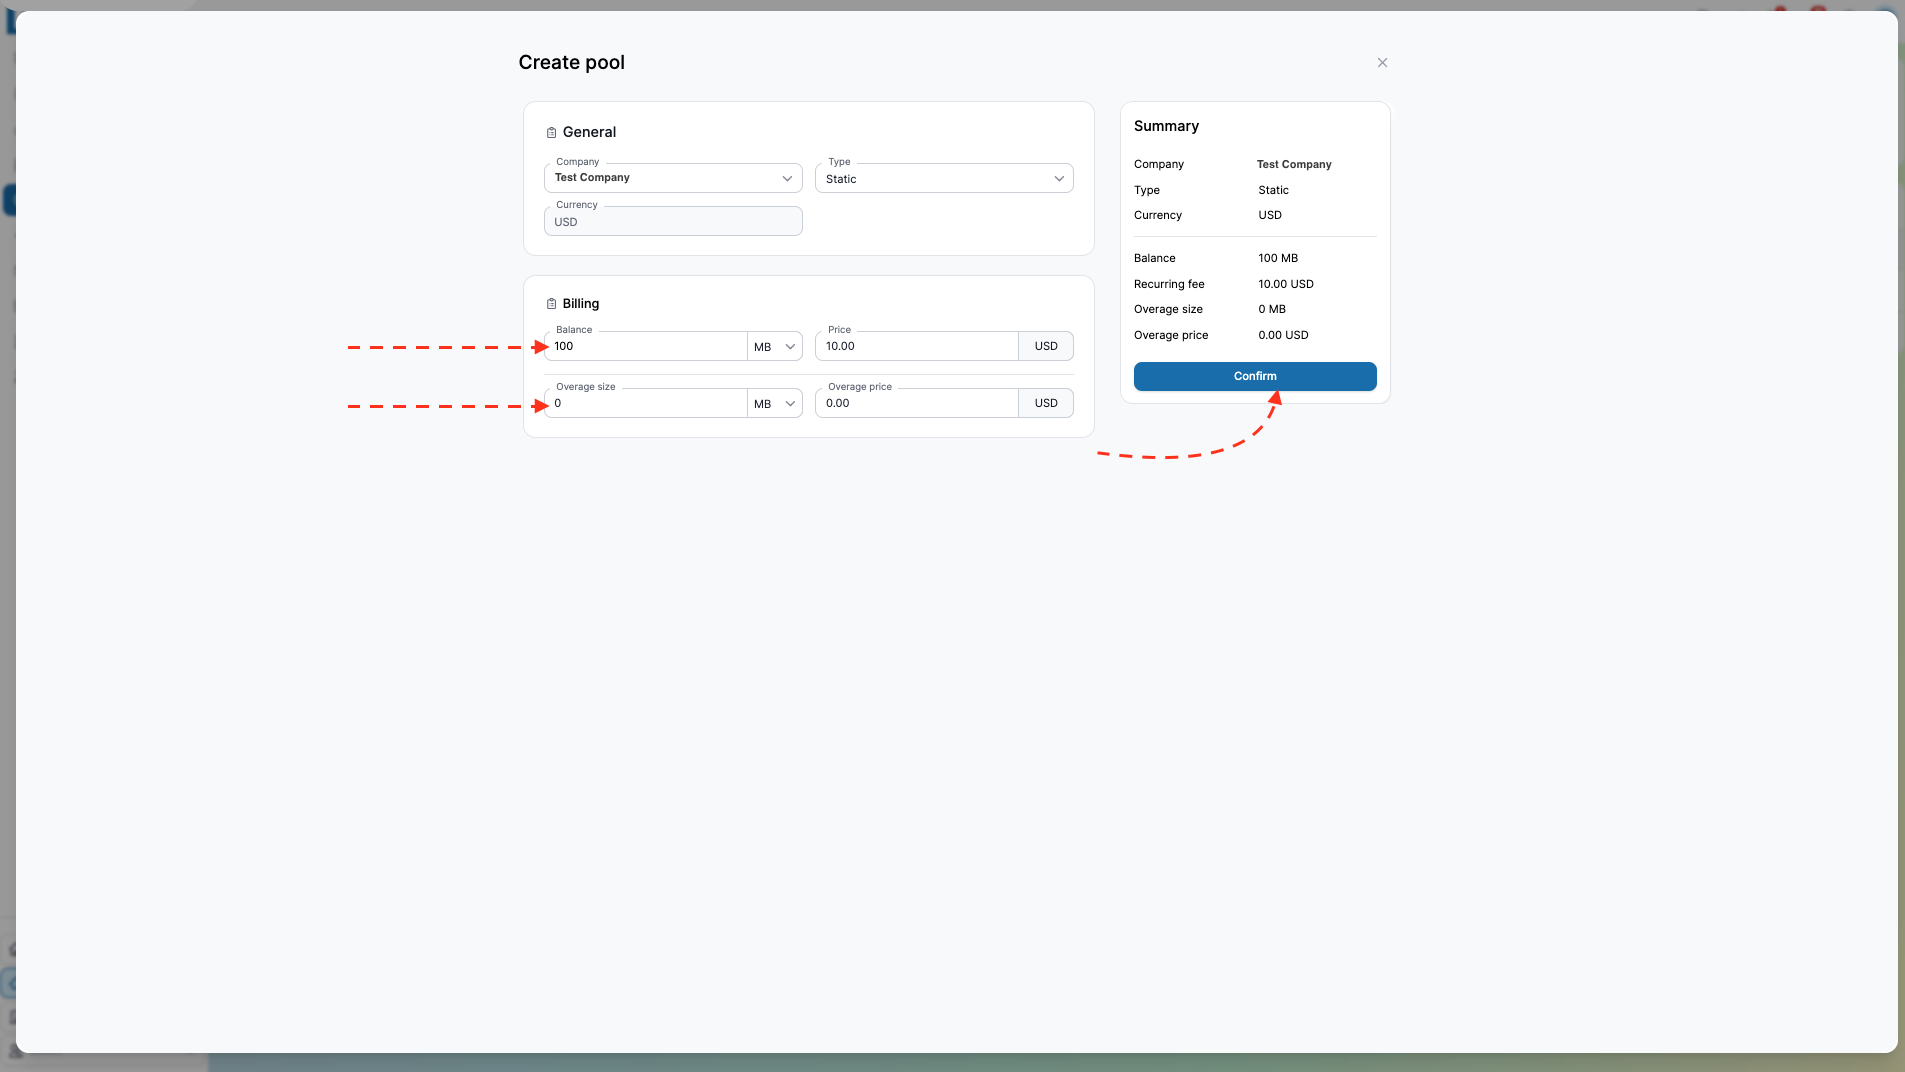
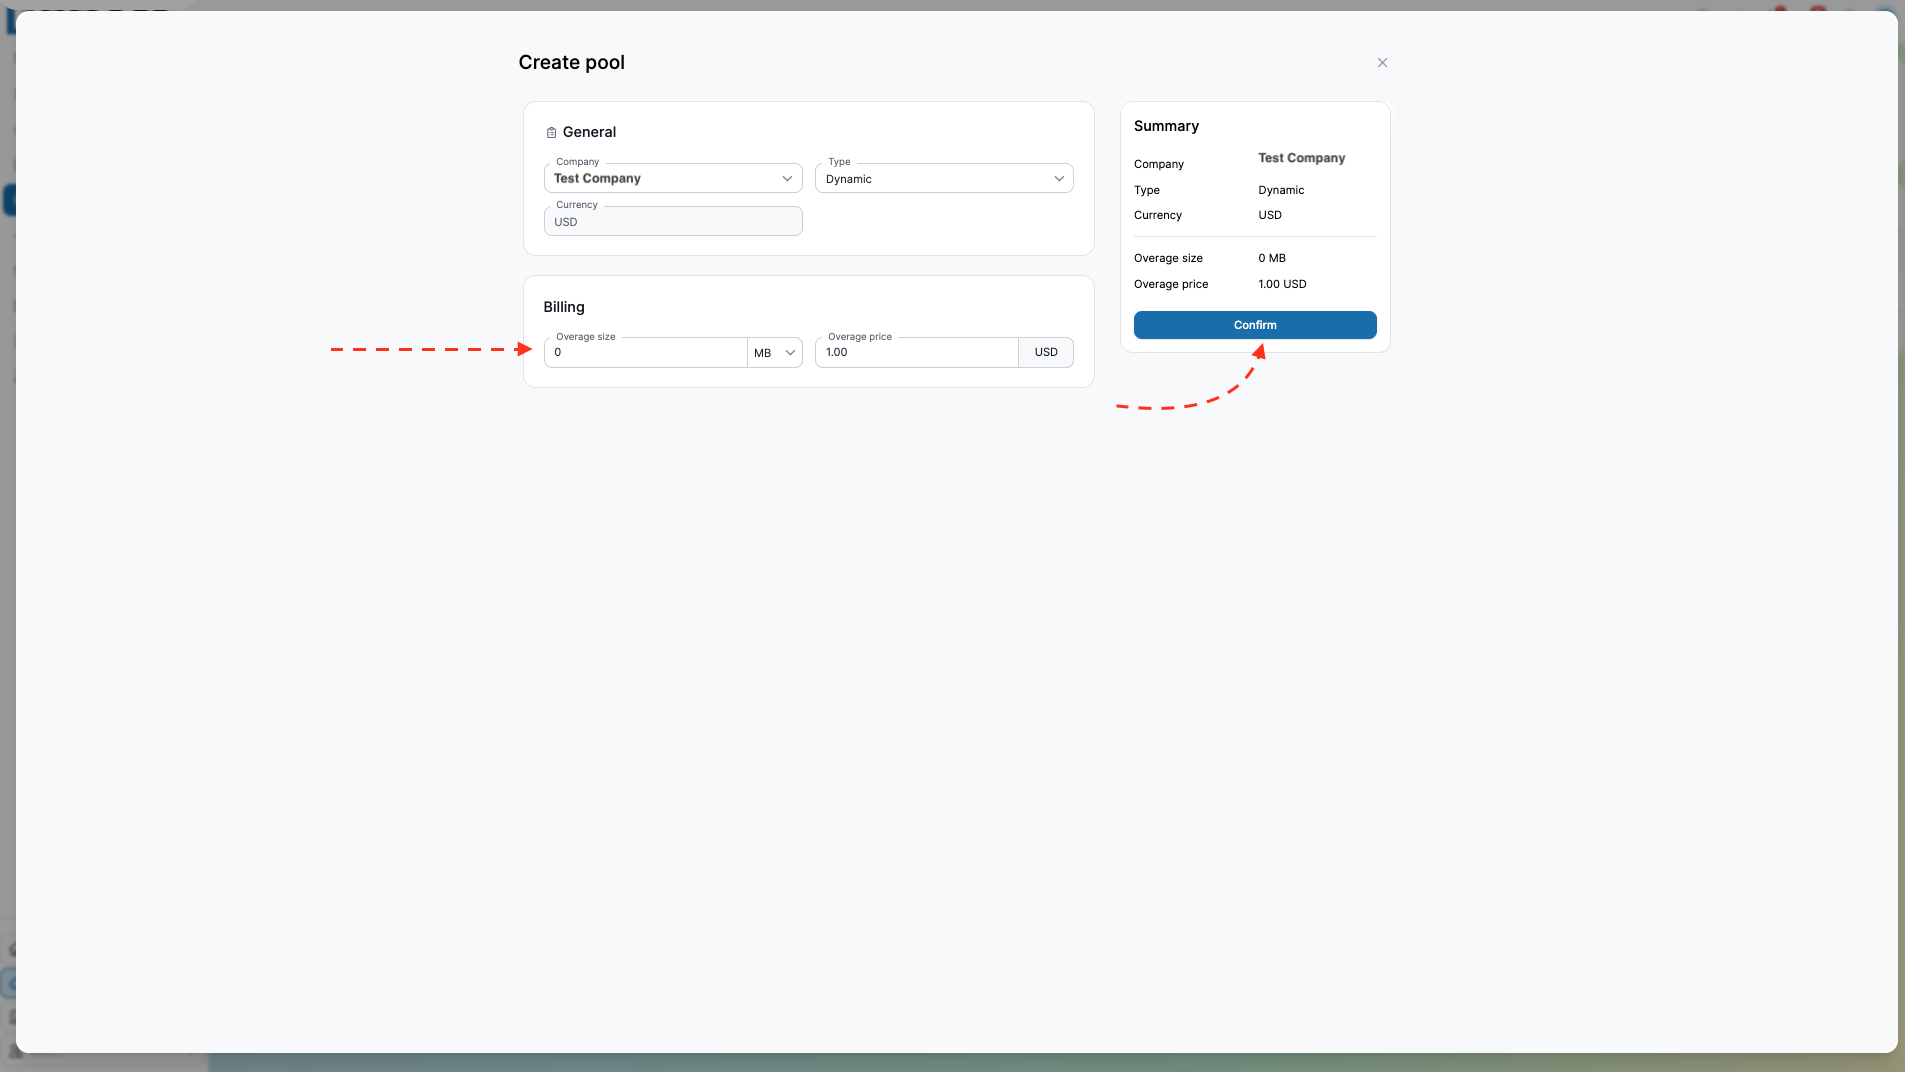
- Complete all fields and choose the pool type: Static or Dynamic
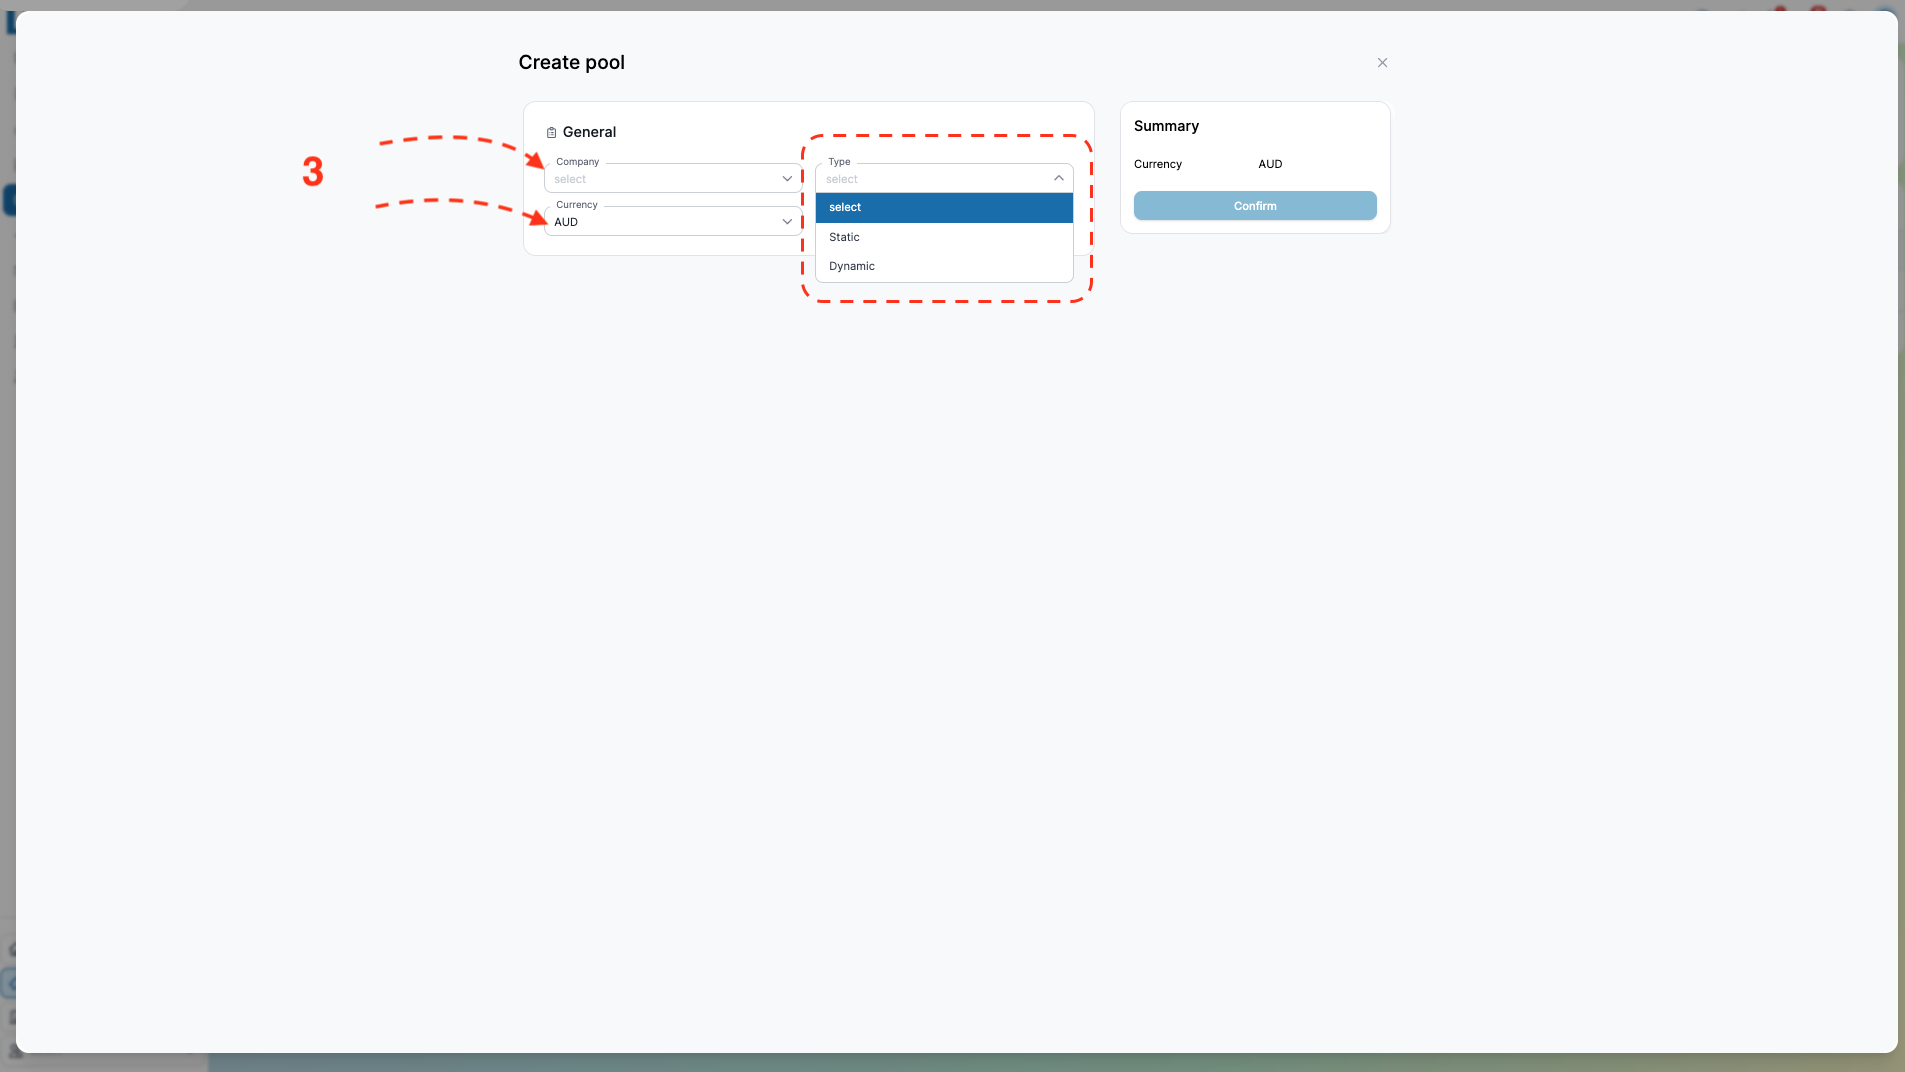
-
If you selected the Static pool type, fill in the following information in the Billing section:
-
Balance
- Price
- Overage Size
- Overage Price
Review the information in the column on the right, then click Confirm.
-
If you selected the Dynamic pool type, fill in the following information in the Billing section:
-
Overage Size
- Overage Price
Review the information in the column on the right, then click Confirm.
One pool may be assigned to one company only
6. Invite Staff
You may invite staff in case not only the account owner will work with SIMs
Complete the following steps:
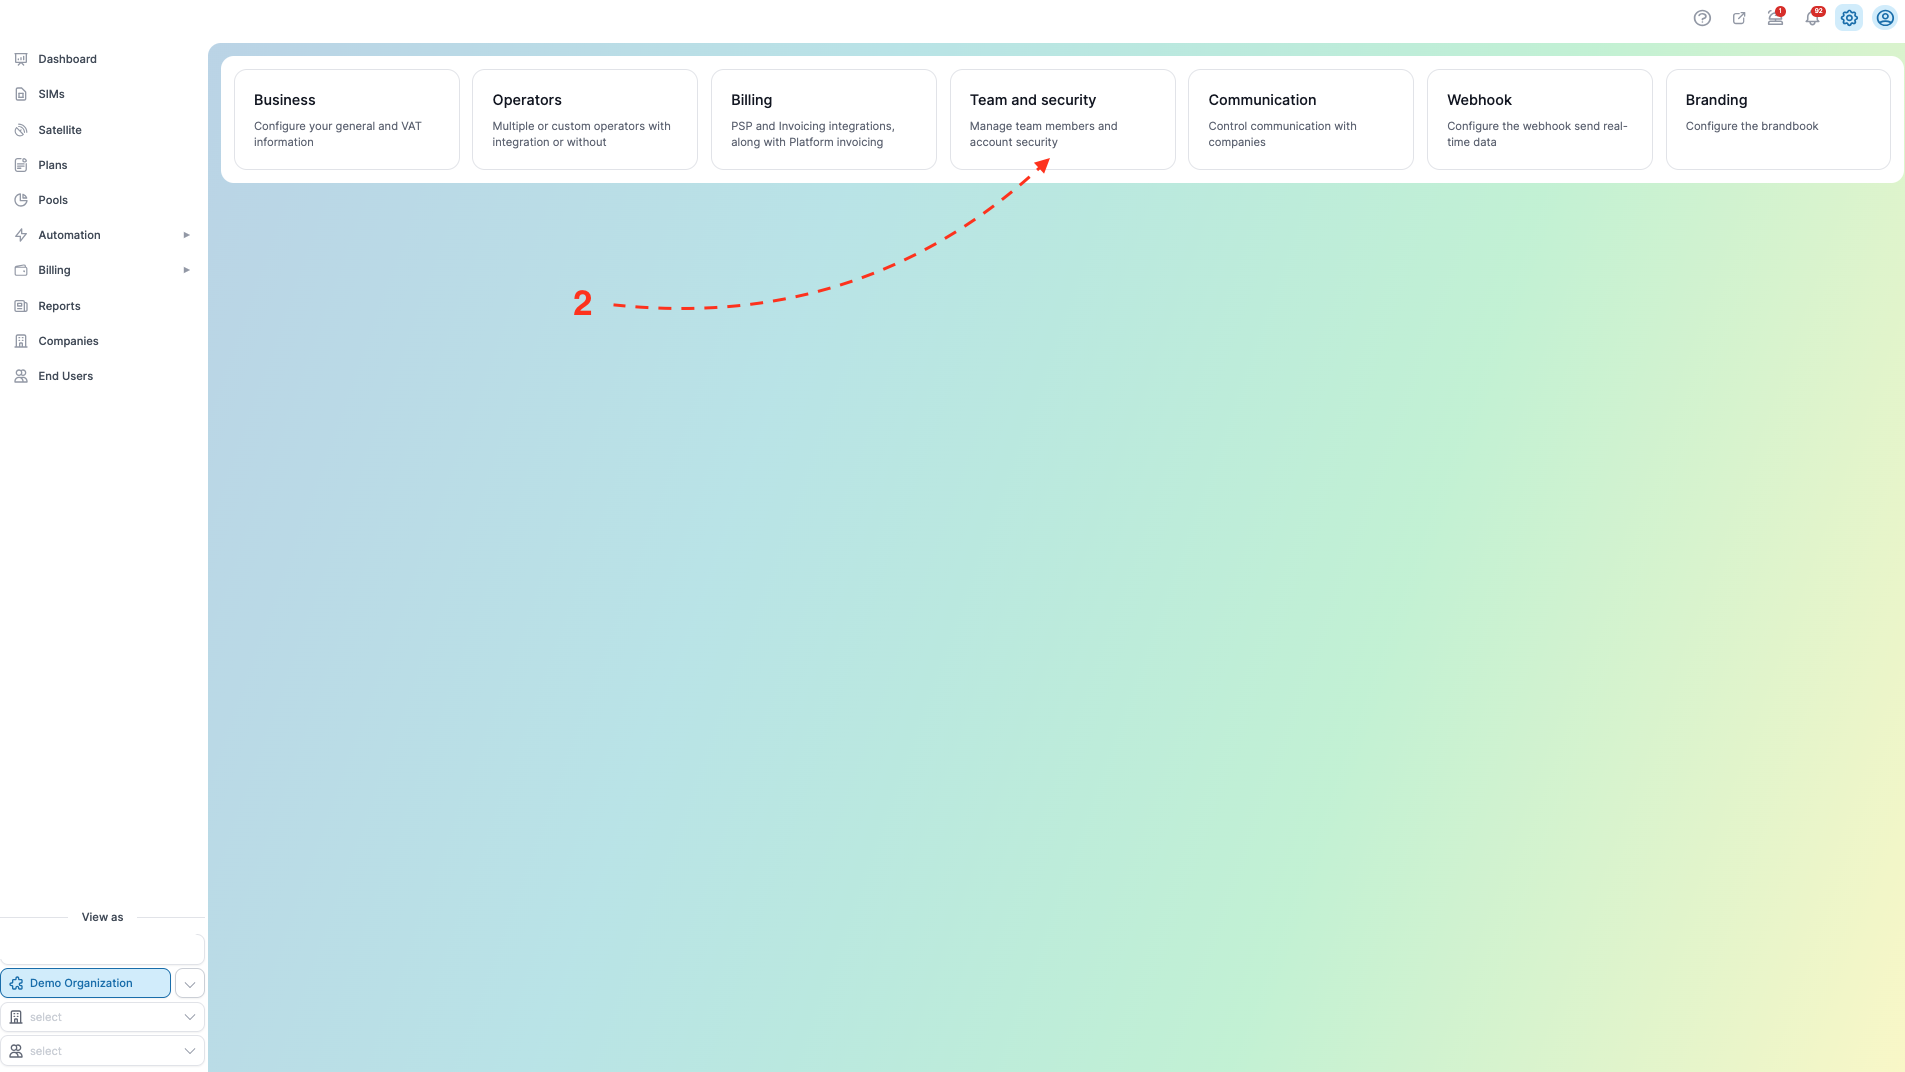
- Go to Settings.
- Click on Team and Security
- Click the '+' button on the right-hand side.
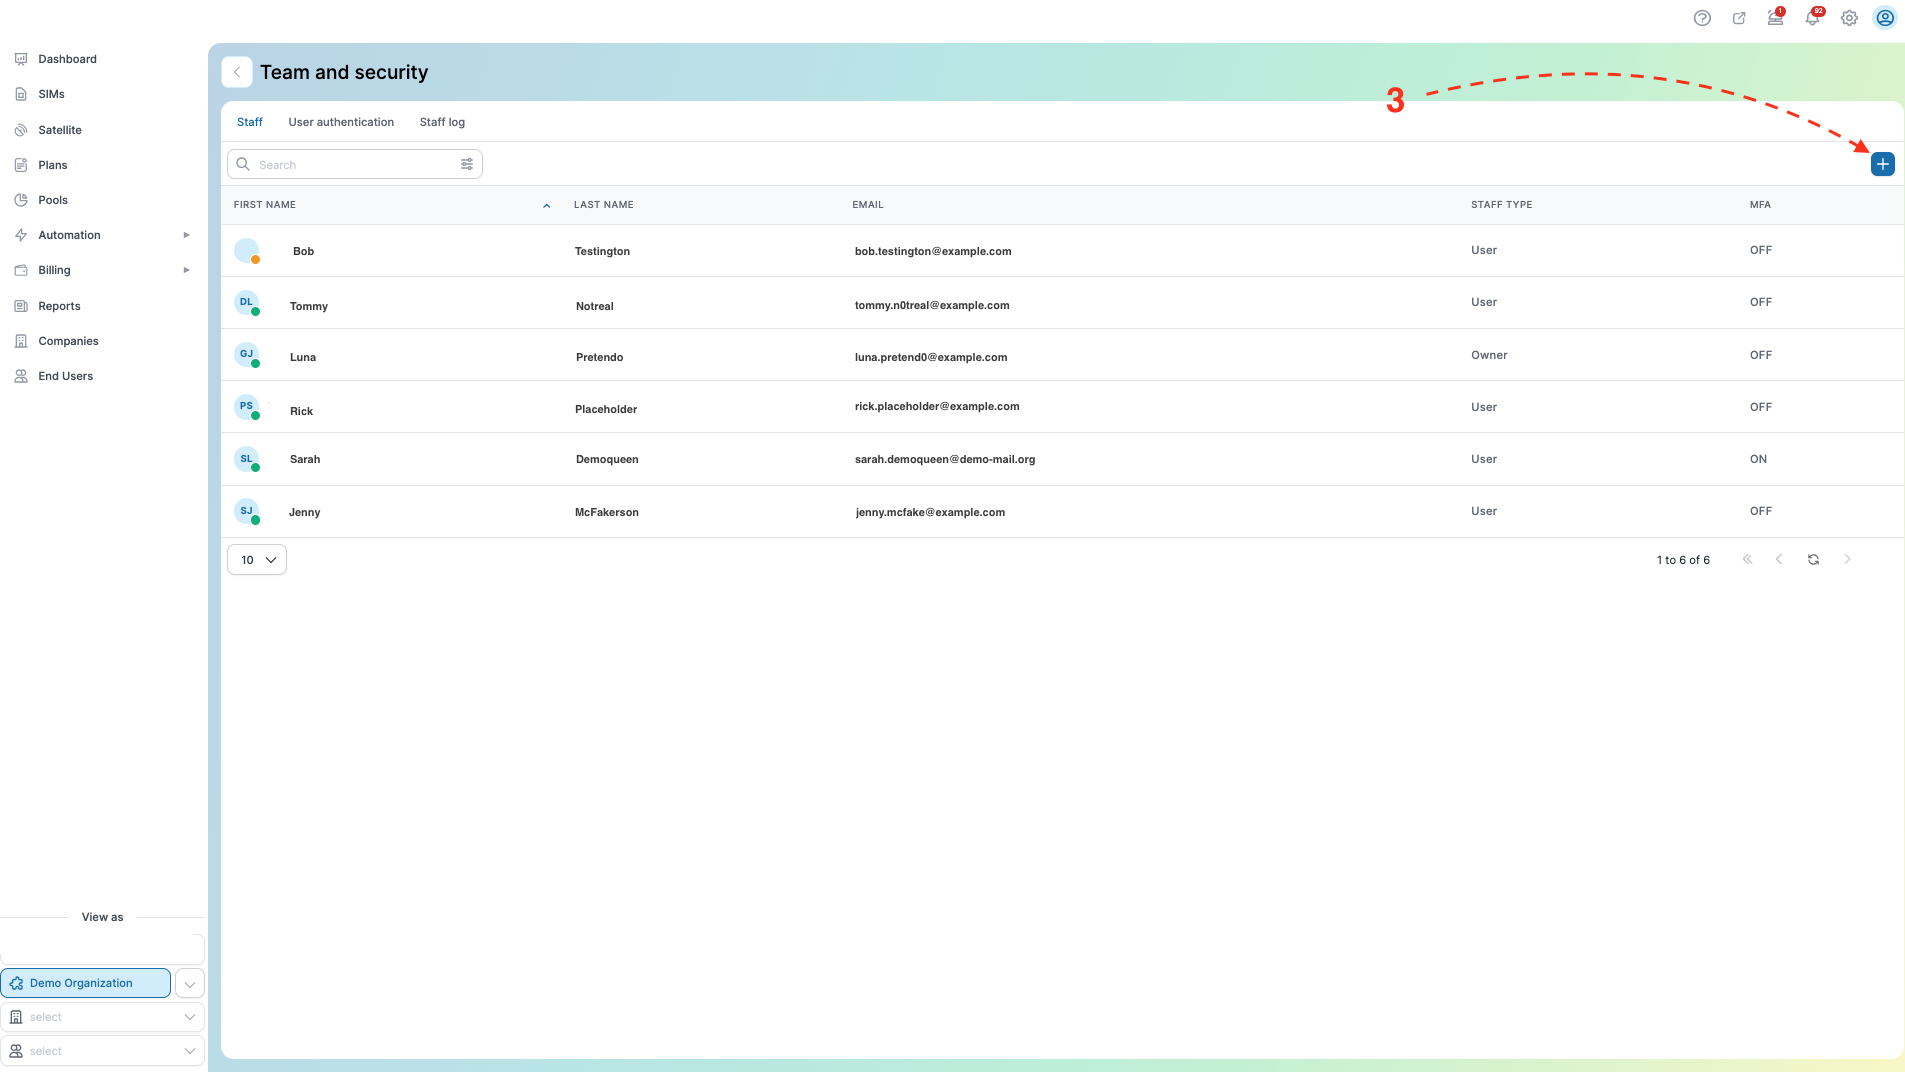
- In the 'Invite Staff' wizard, enter the email address of the person you want to invite.
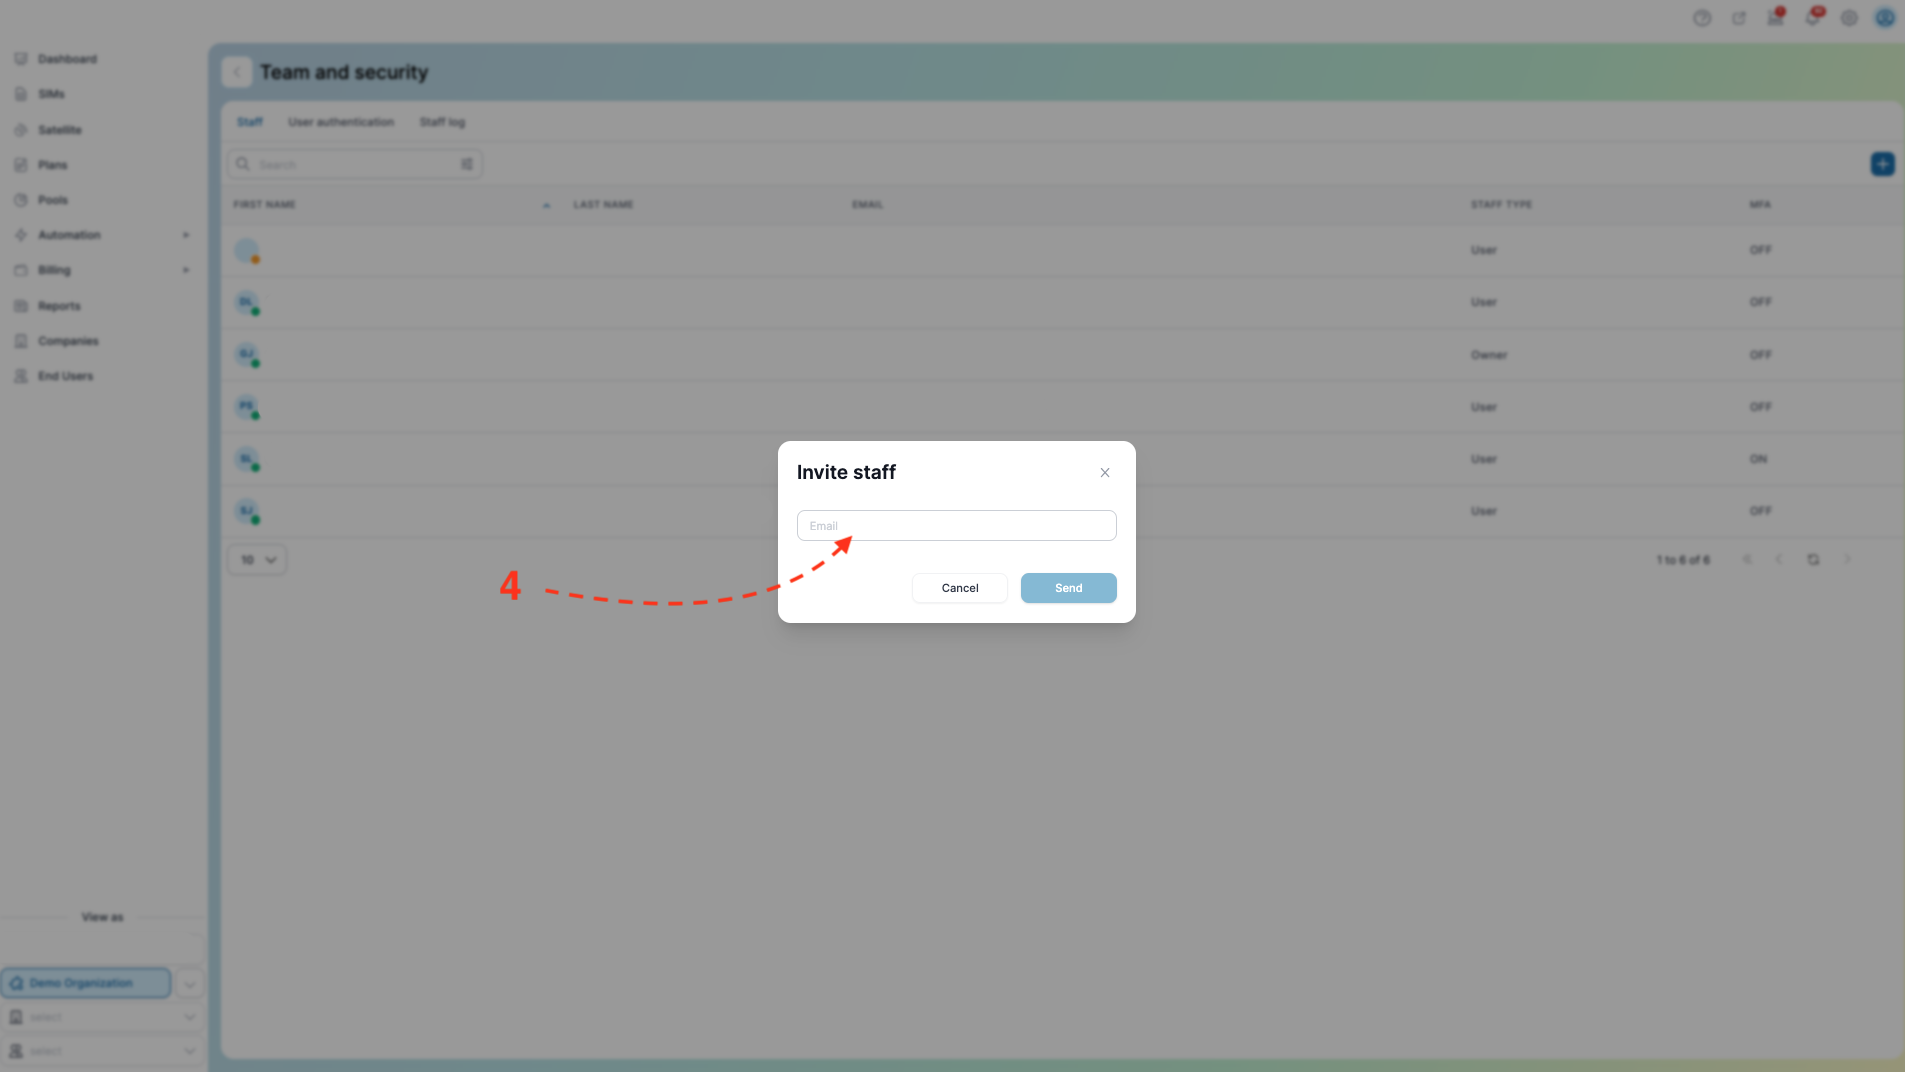
- The invited staff member will receive an email with instructions on how to create their account.
This action can be performed at any point while using the platform.
Permissions
The Staff page allows the Organization to register team members and manage their access rights on the platform. This functionality ensures that each staff member has the appropriate permissions to perform their tasks while maintaining security and control over sensitive information.
Complete the following steps:
- Go to Settings.
- Click on Team and Security
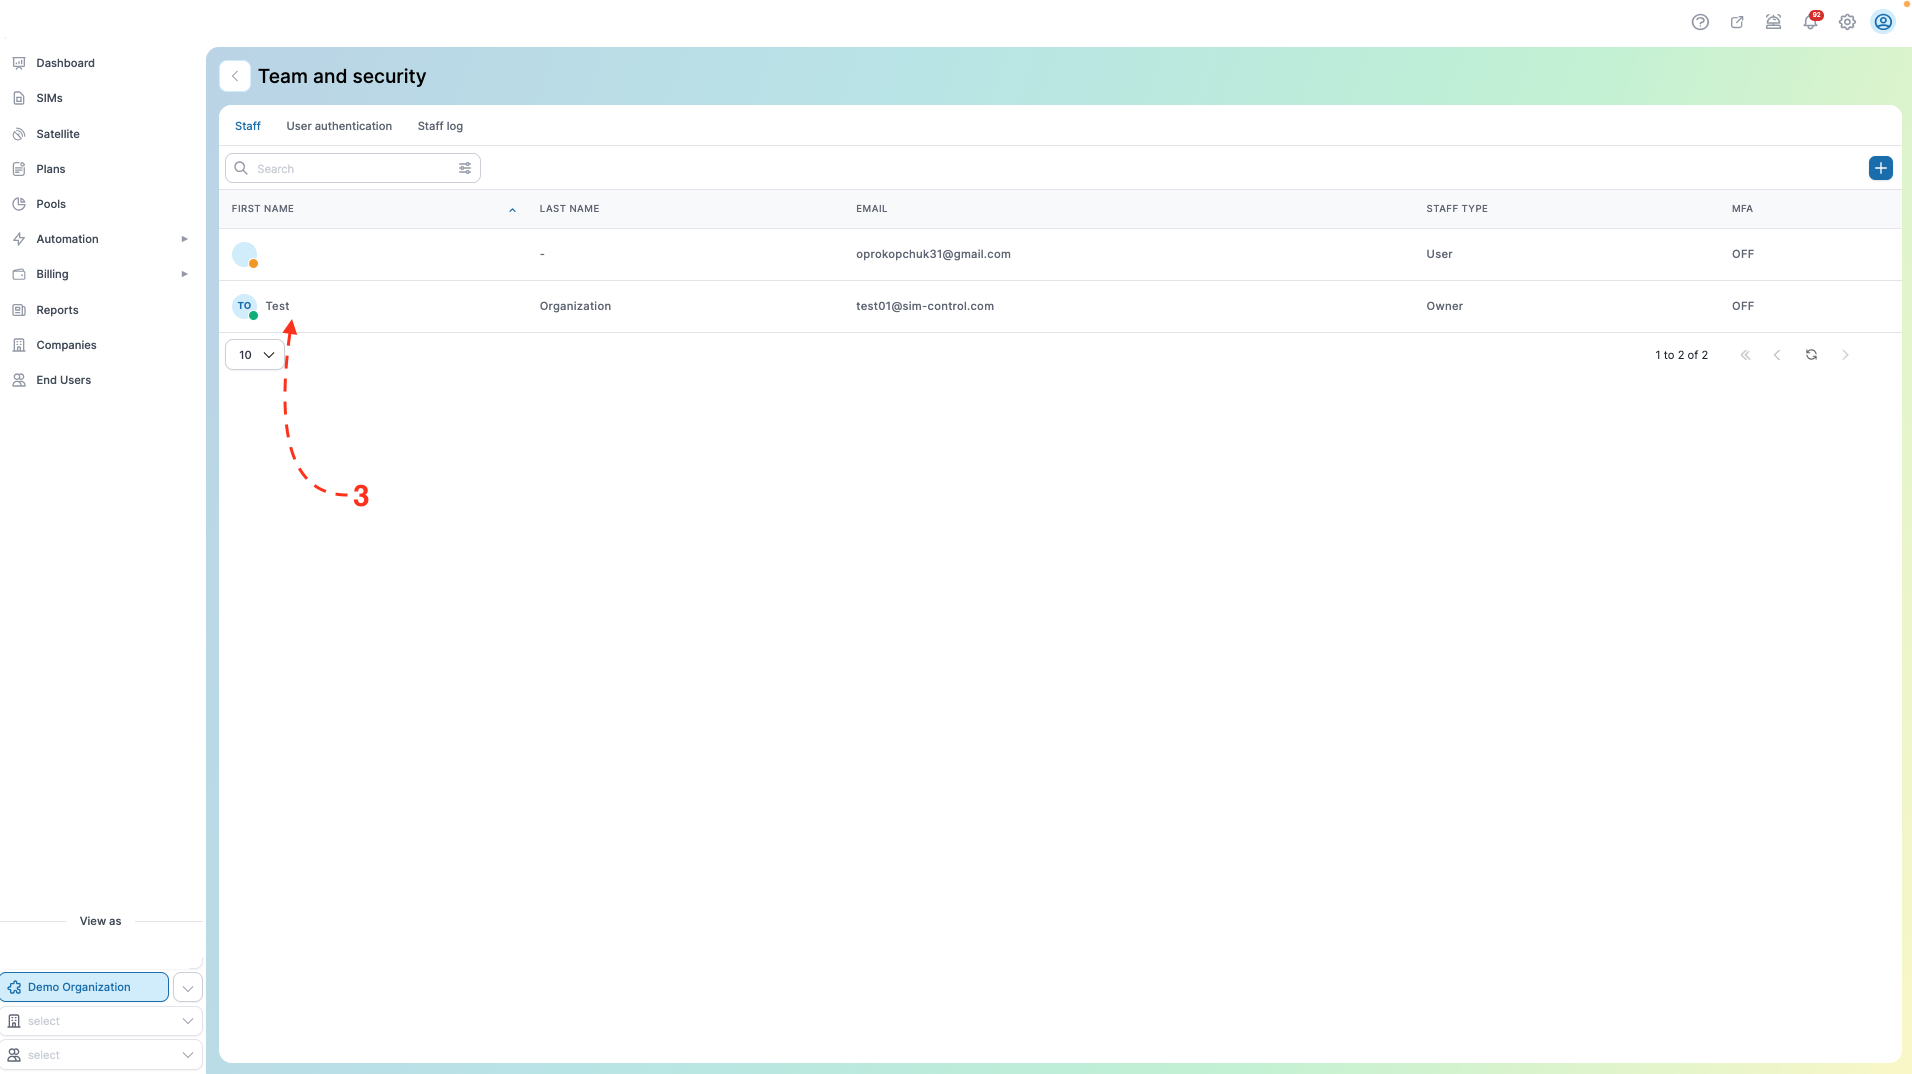
- Click on the Staff member you want to edit access for
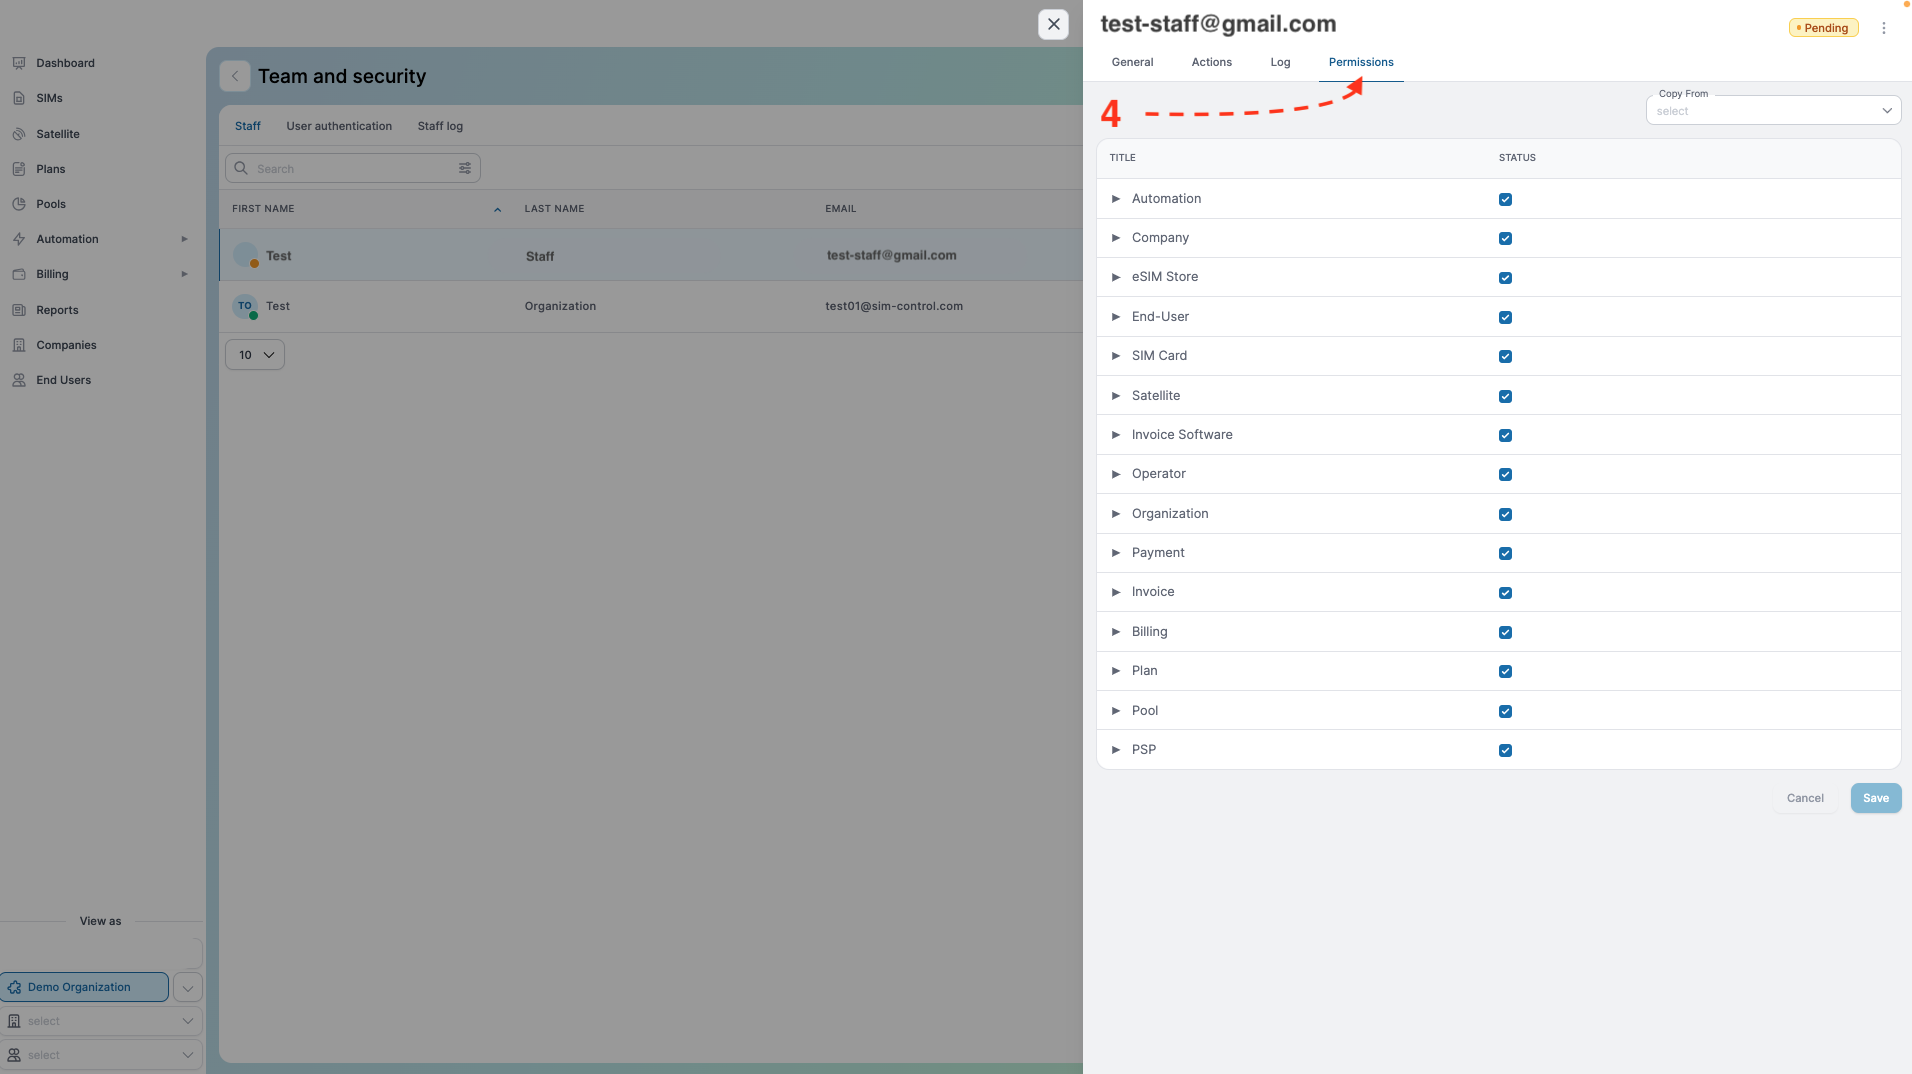
- Go to the Permissions tab and check or uncheck the appropriate box next to the relevant field.
7. Customize Columns
This action can be performed at any point while using the platform.
Complete the following steps:
- Go to the 'SIMs' button in the left sidebar of the navigation menu
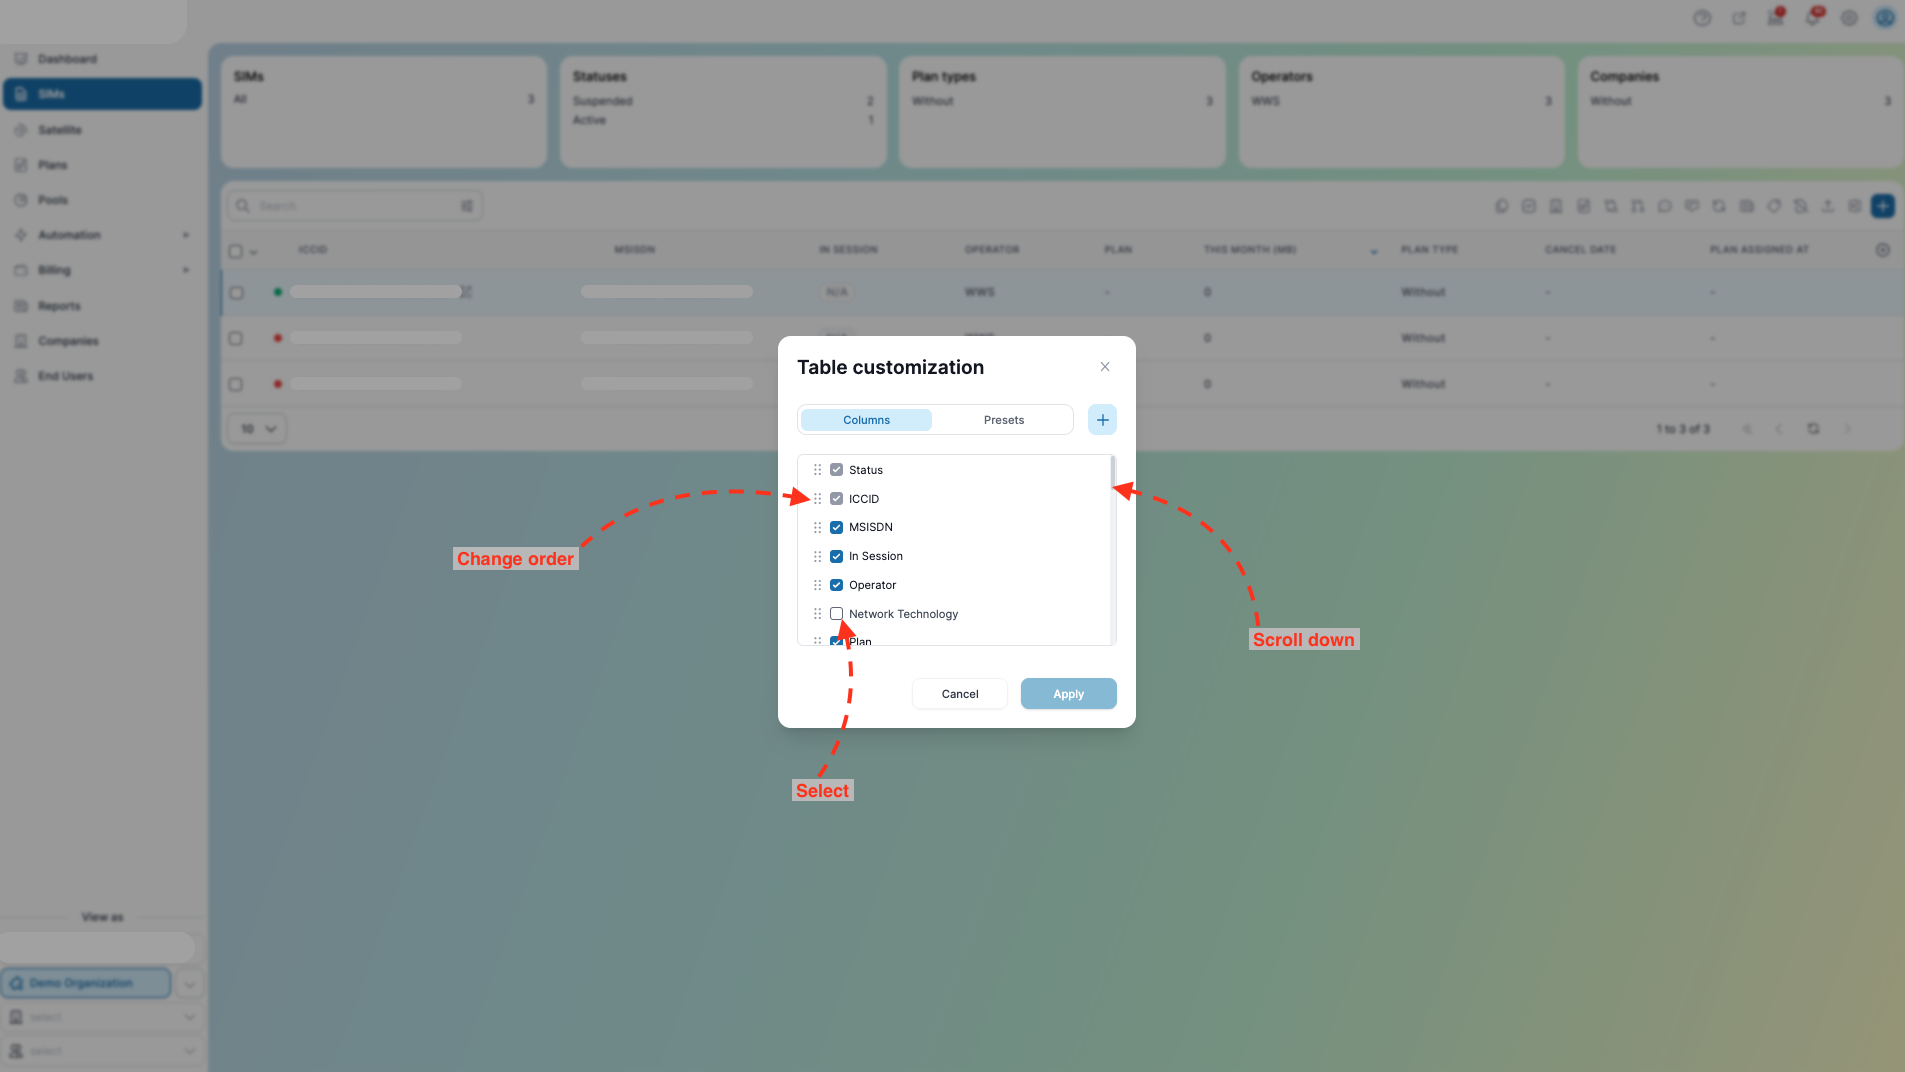
- Click the '+' button in the table header, and a wizard with a list of all column names will appear.
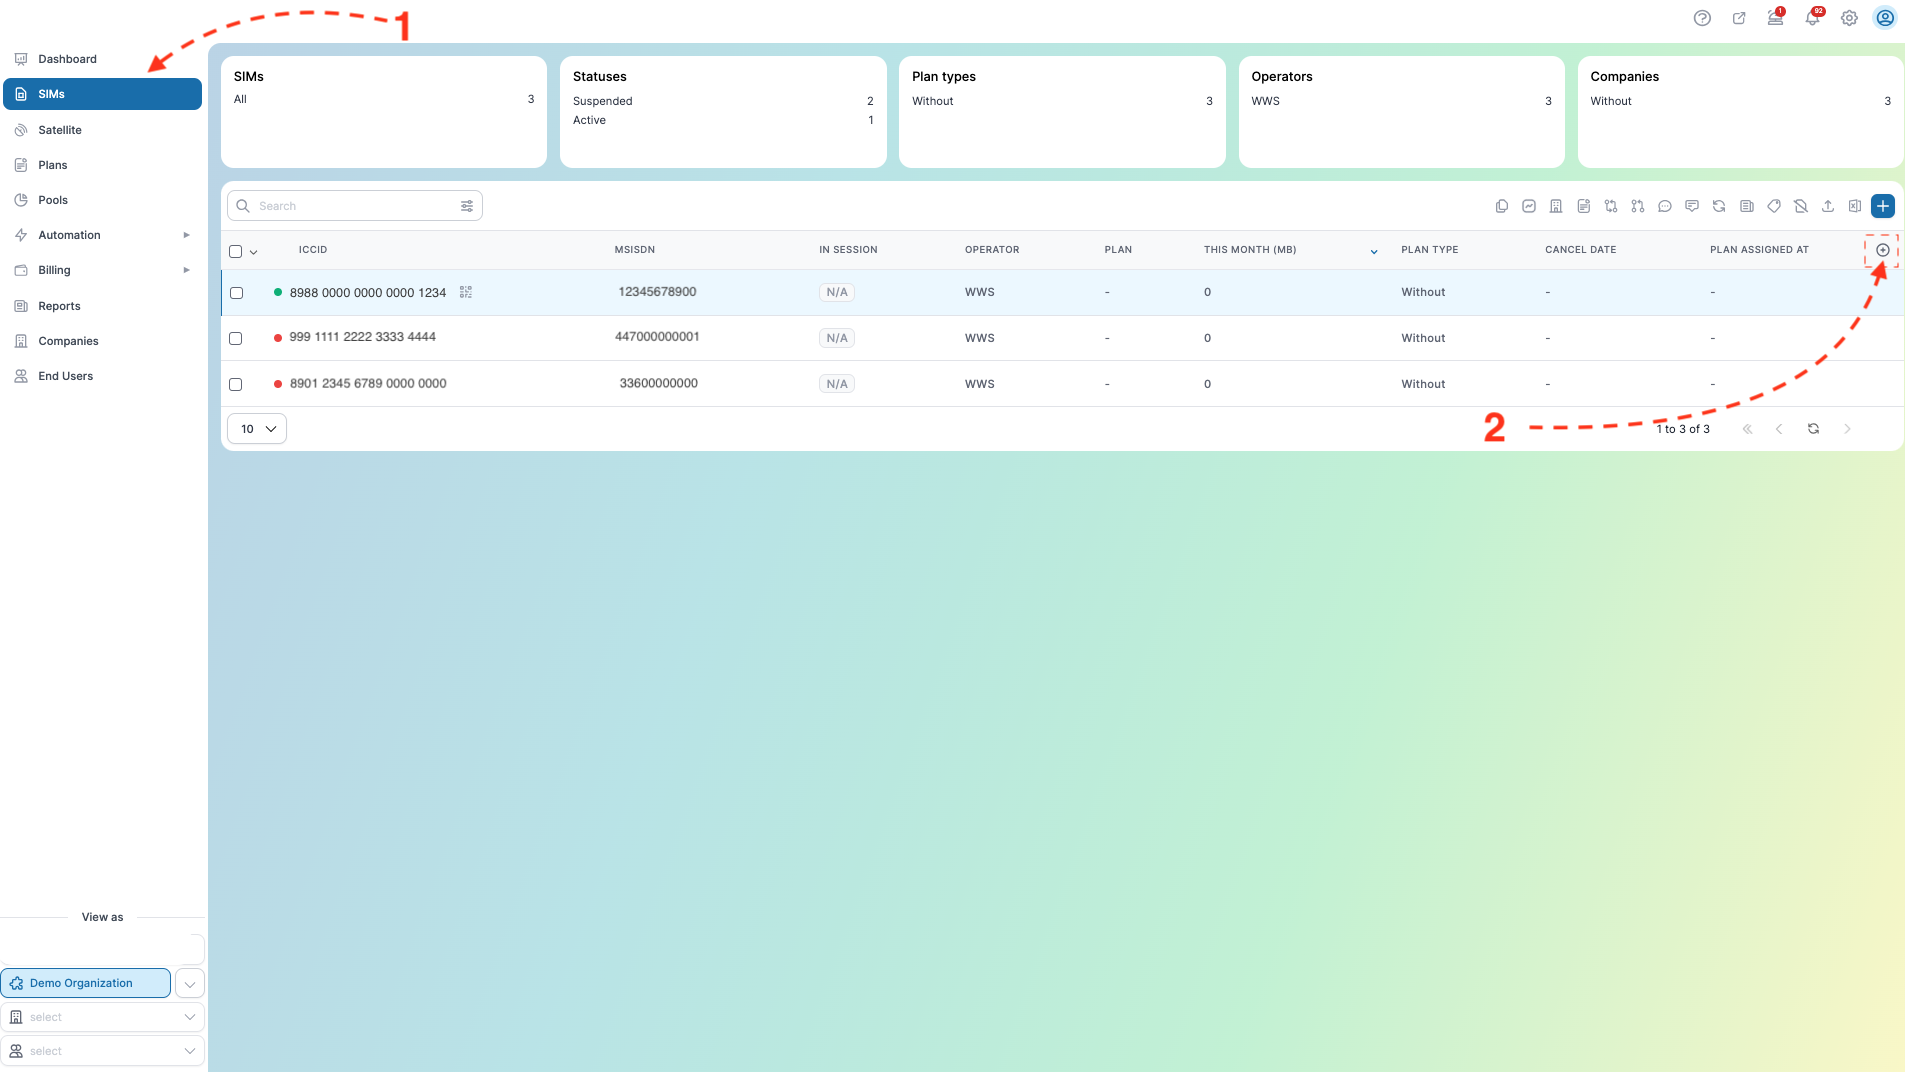
- Select the columns you want to display in the table. In the same wizard window, you can also choose the order of the columns (press and hold the dots, then drag up or down). Click Apply to save your changes.
8. Notifications
Our platform provides a few types of notifications, allowing you to stay informed about key updates and service changes. Here's how they work for different service types and how you can customize them to fit your needs.
| Type | Levels | Description |
|---|---|---|
| Notifications | Organizations Companies | Automatic alerts are sent to end users or companies. They can be categorized as mandatory and optional |
| Webhook Notifications | Organizations Companies | Automatically send real-time updates to your system through webhooks. This allows seamless integration with your internal processes. |
1. Prepaid Services Notifications
For Prepaid services, end users will receive reminders when their balance is about to expire:
- 10 days remaining: "You have 10 days left, and your balance will expire."
- 5 days remaining: "You have 5 days left, and your balance will expire."
These notifications help end users avoid service interruptions by giving them enough time to top up their accounts.
2. Subscription and PAYGO Services
For subscription and PAYGO (pay-as-you-go) services, you can choose where notifications are sent:
- Set a default email where notifications will always be delivered.
- Send notifications to specific emails within the company.
- Use the end user’s email if needed.
This ensures that both internal teams and customers are informed at the right time.
9. Communication
On this page, you, as an organization, can set up direct links to make it easier for your customers to connect with you.
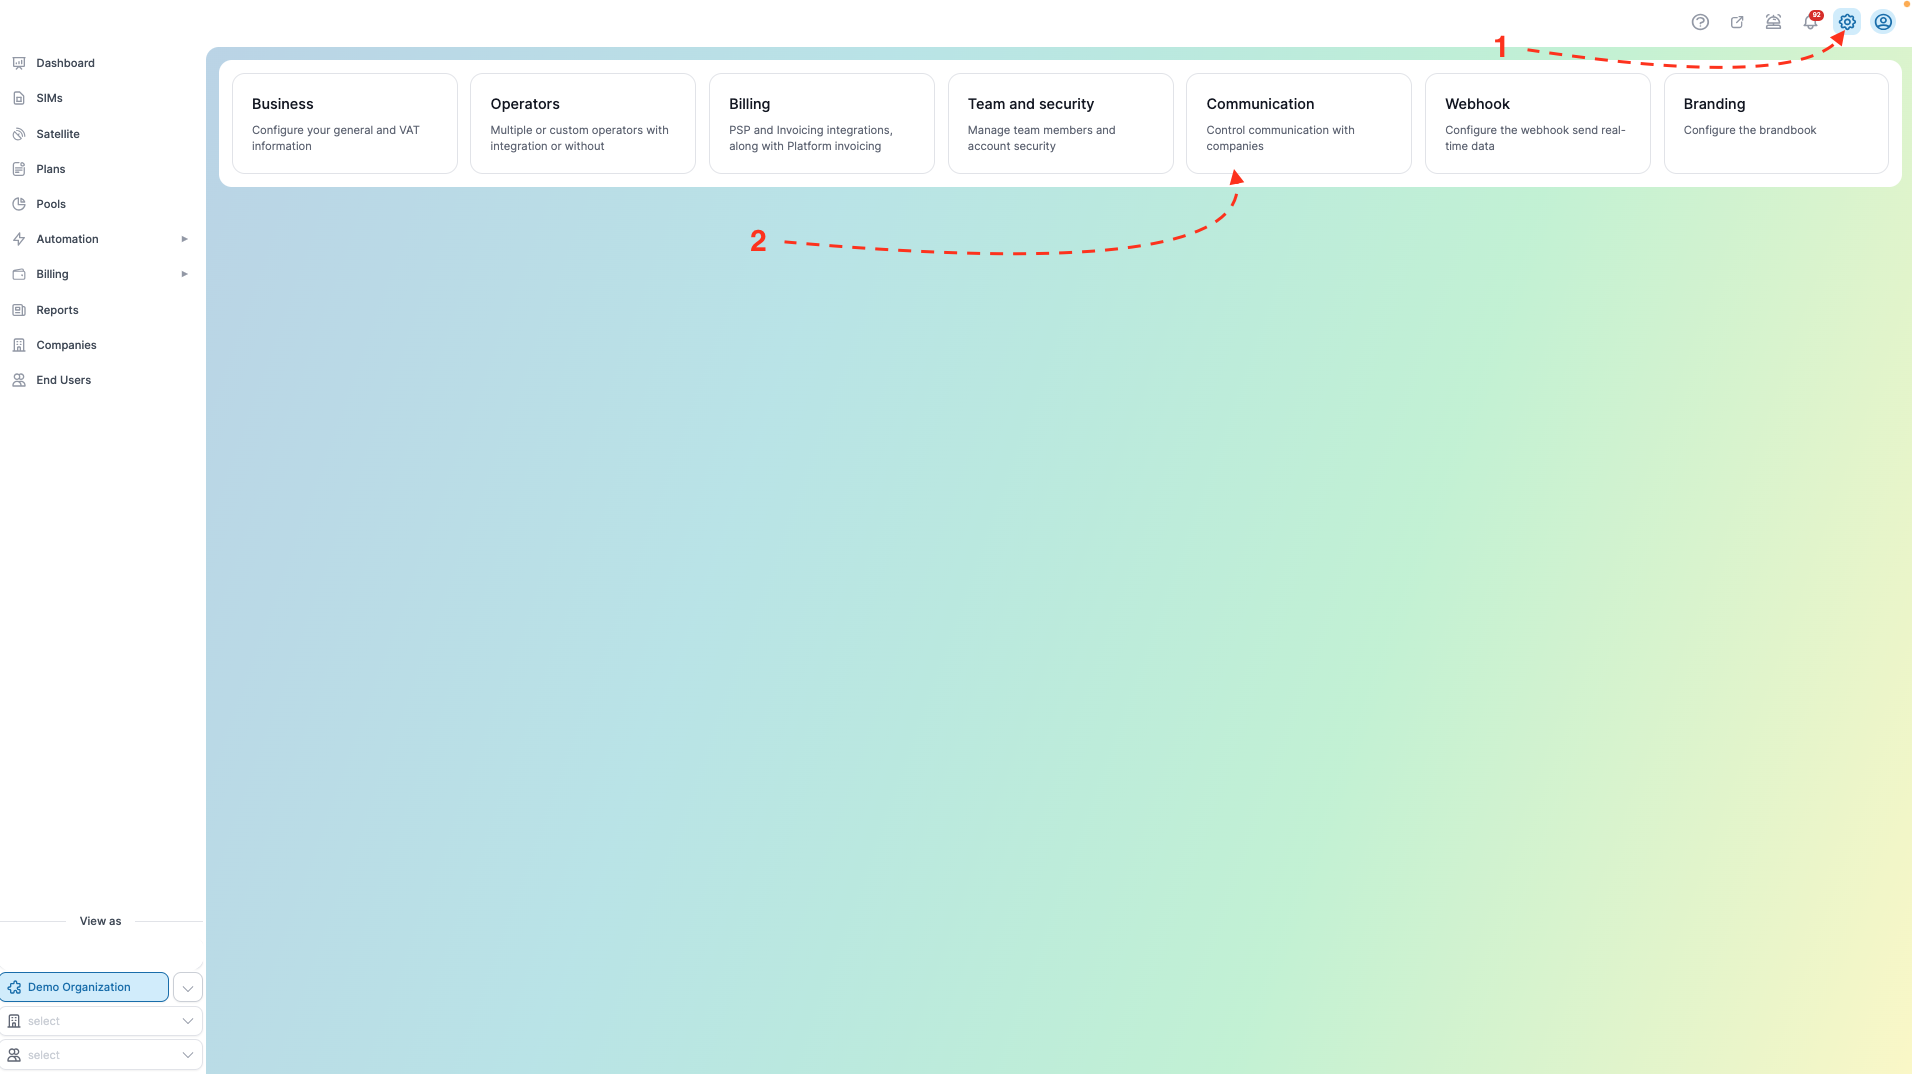
Here’s what you can do:
1. Contact Us
- Add a link to your external contact page.
- Once you set it up, your customers will see a new menu item that takes them directly to this link.
- You can easily replace or remove the link whenever needed.
2. Report an Issue
- Provide a link where your customers can report any issues.
- This could be a Google Form, a page on your website that sends requests to your email, or any other platform you prefer.
- After you set it up, your customers will see a new menu item directing them to this link.
- You’re free to change or delete the link at any time.
3. Order New SIM
- Add a link where customers can request a new SIM card.
- Once added, your customers will see a menu item that points them to this link.
- You can update or remove this link whenever you want.
4. Google Tag Manager (GTM)
Step 1: Sign up for Google Tag Manager
- Go to https://tagmanager.google.com.
- Sign in with your Google account or create a new account.
Step 2: Create a Container
Step 3: Add a Script to the Container
- In the container dashboard, click Add a new tag.
- Choose the tag type you want to use (e.g., Reamaze).
- Save the tag
Step 4: Get the Container ID
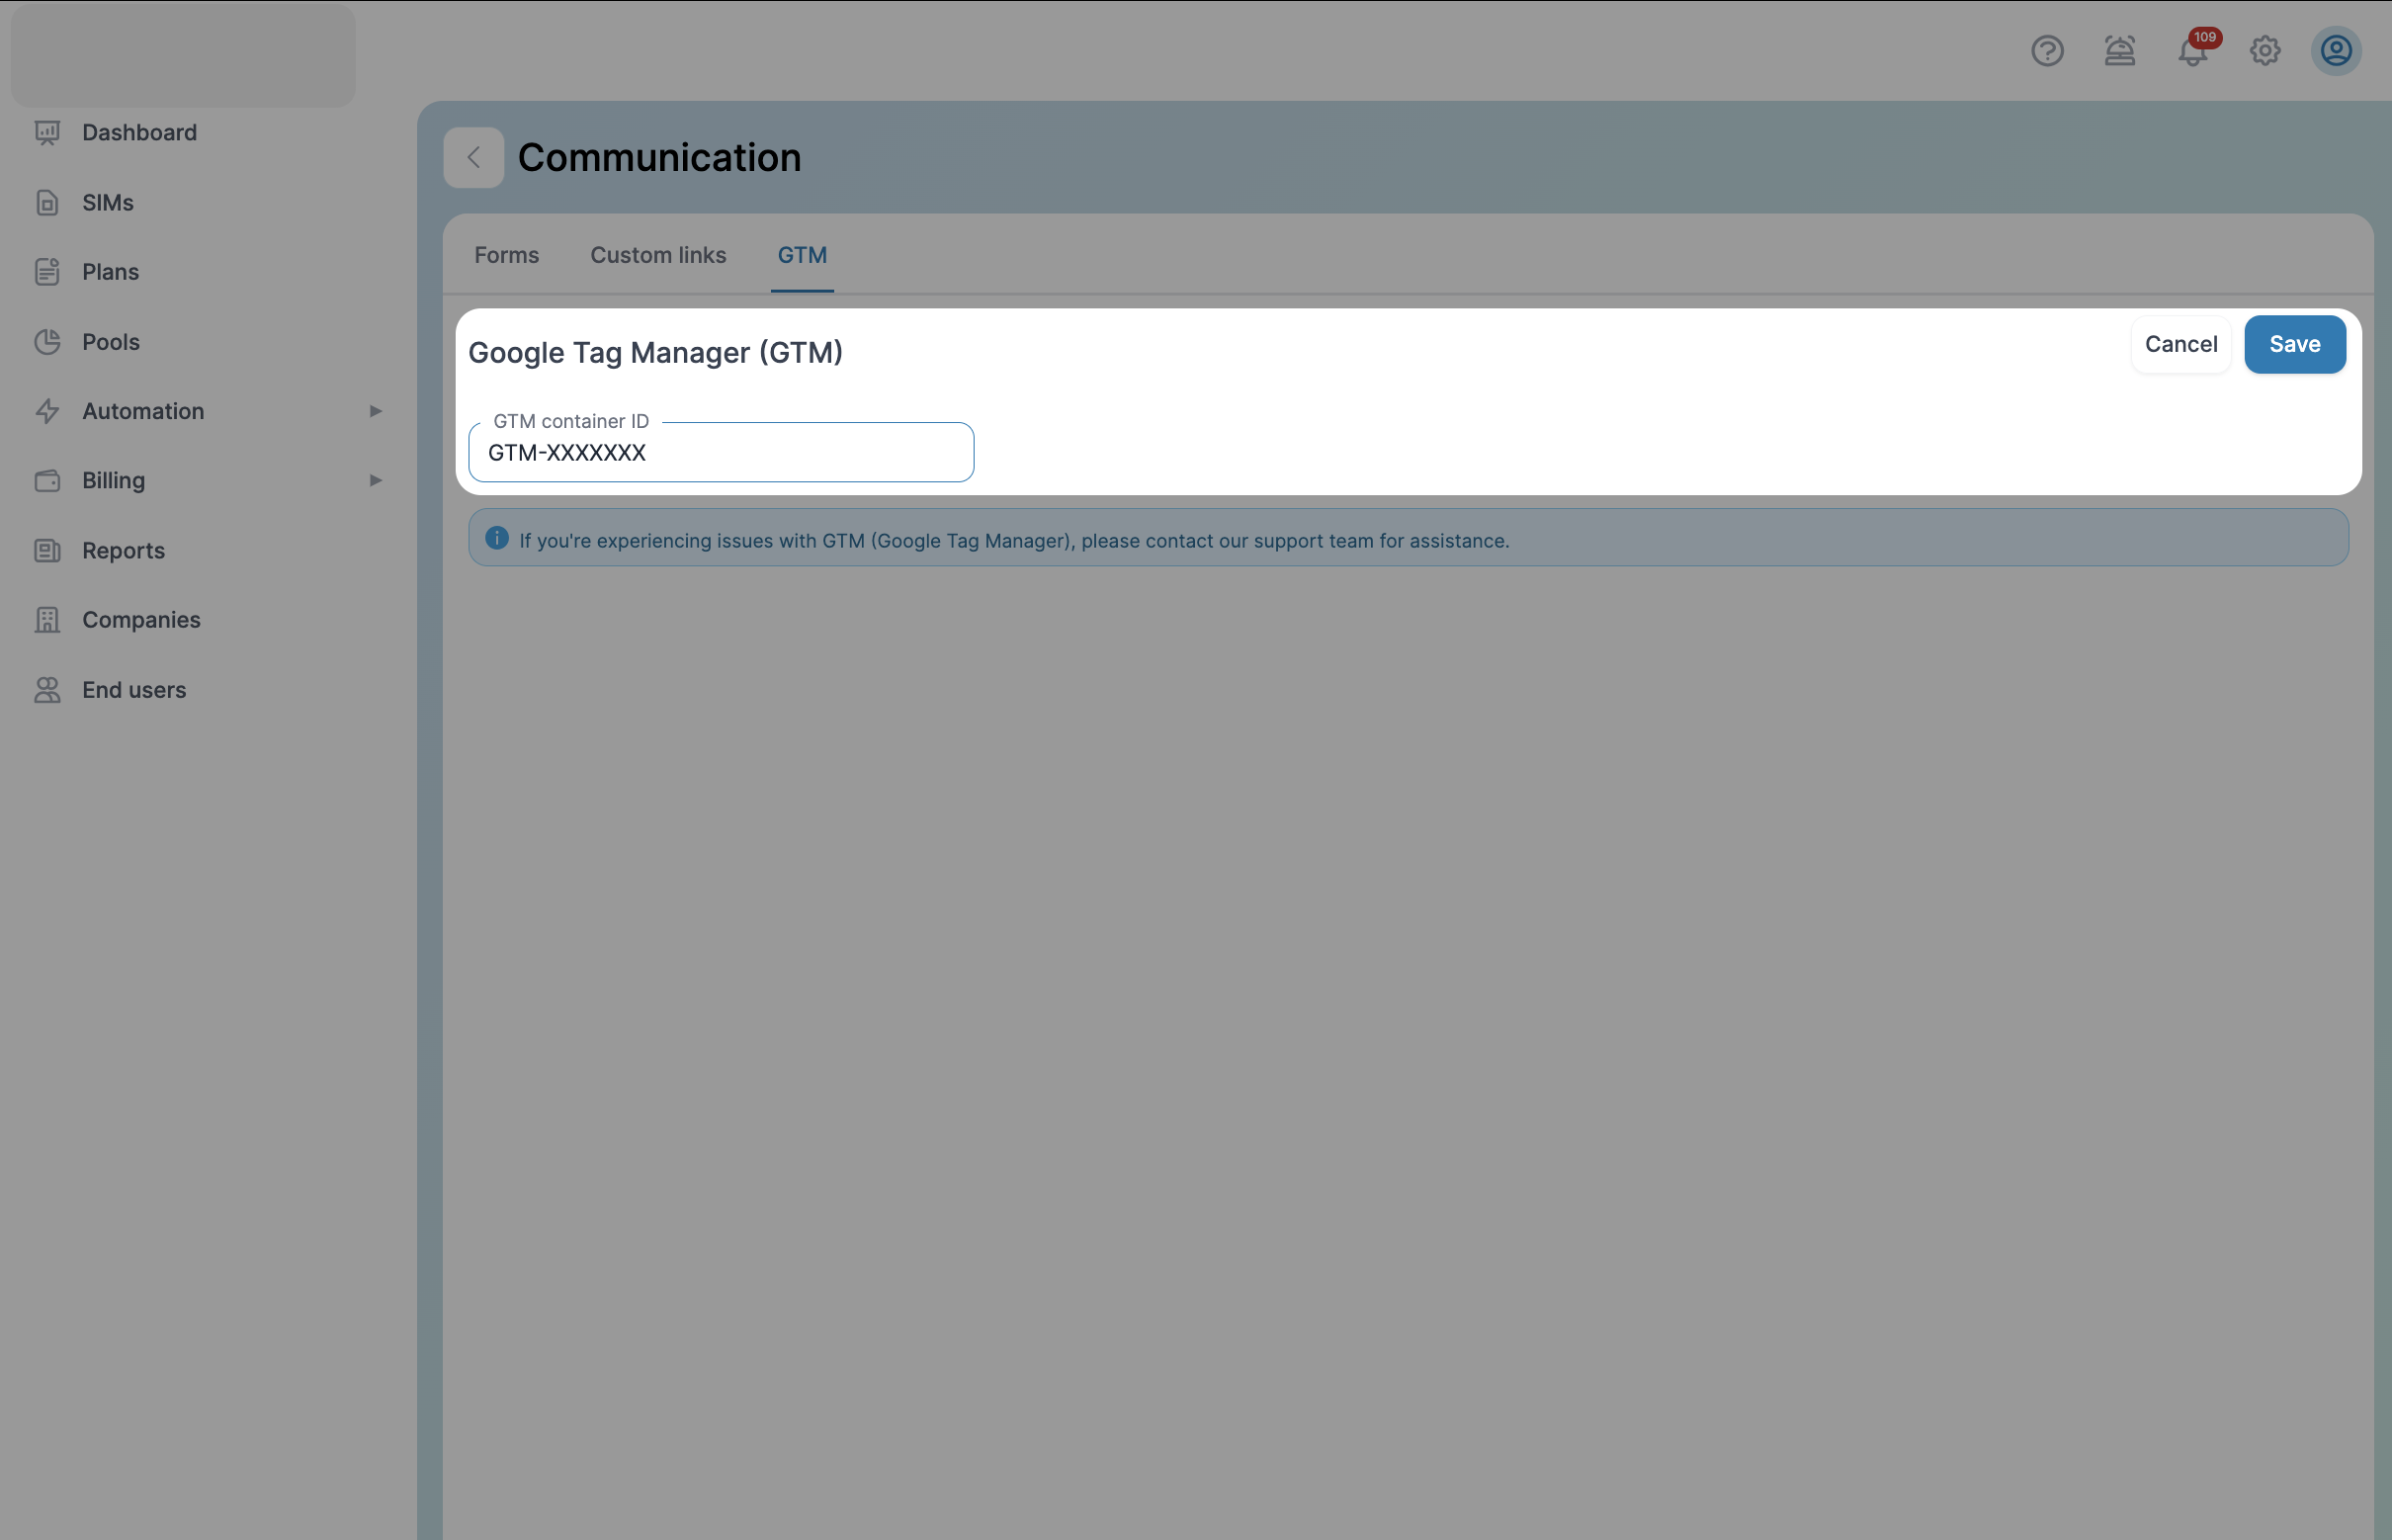
- On the container dashboard, copy the GTM-XXXXXX ID.
Step 5: Add the Container ID to the Platform
- Go to your account settings on the platform.
- Navigate to Communication → GTM tab.
- Paste the GTM container ID.
- Save the settings.
Roles on the platform
1. Organization
An Organization is the level at which contracts with operators are signed and SIM cards are issued. At this level, you can include one or multiple Companies, and it is responsible for managing all the Companies within its structure.
On this level, an Organization can:
- Add SIM cards
- Holds contracts with operators
- Adds its payment systems (Stripe, PayPal)
- Integrate SIM cards with operators or simply store information about them
- Create appropriate plans, although SIM cards do not necessarily have to be integrated with operators
An Organization can also add SIM cards without integrations. This means Organizations can use our platform as a place to store all their SIM cards.
Example:
if an Organization has 1,000 SIM cards, but the operator does not have integration with our platform or the integration has not been implemented yet, the Organization can still:
- View all their SIM cards
- Assign them to their clients
- Track which clients are using these SIM cards and which Company they belong to
2. Company
- Belongs to an Organization
- Created for business clients or virtual Companies
- Can be used to sell SIM cards to end consumers
- End Users are associated with the Company
- Can switch to the level: End User
A Company always belongs to an Organization. We cannot create a Company without an Organization. This means that a Company is a business client that belongs to an Organization.
Each Company can have its own settings, plans, and users. Even if the Organization does not have business clients (companies) and wants to sell SIM cards directly to end consumers, it still needs to create a virtual Company that will not be visible to customers but will represent, for example, a point of sale.
Example:
- An Organization has a prepaid product and wants to sell it through Amazon. To do this, the Organization needs to create a Company and name it, for instance, “Amazon Band.” Thus:
- The SIM cards sold on Amazon will be linked to this Company.
- End consumers who purchase these SIM cards will register on our platform and automatically be associated with the created Company “Amazon Band.”
3. End User
- Has login credentials (username, password, can set up 2FA)
- Is associated with a Company, which in turn is associated with an Organization
- End Users cannot configure or use rules. SIM card management rules can only be configured at the Organization or Company level
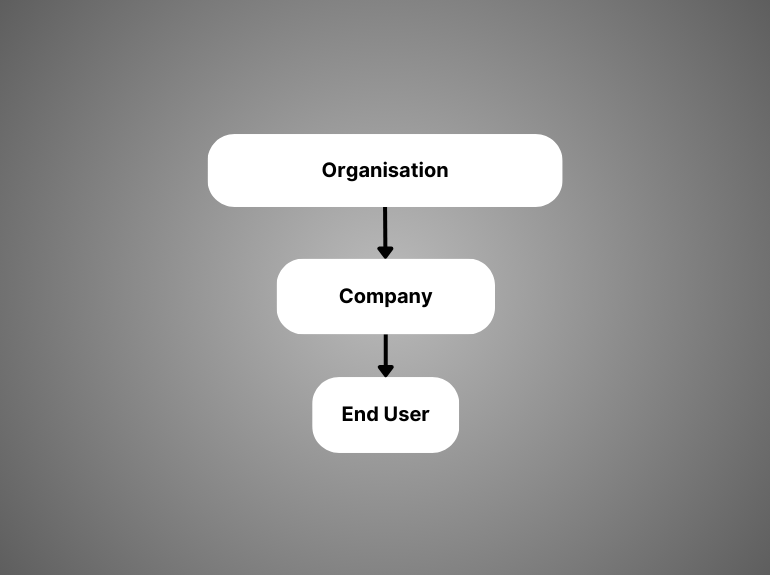
End Users are linked to a Company, and the Company is linked to an Organization.
This structure is immutable. We cannot link an end user directly to an Organization. The End User is only linked to a Company, which in turn is linked to an Organization.
Important
The platform has a clear hierarchy: there is an admin, which branches into Organizations, each Organization can see its Companies, and each Company can have End Users. This structure does not change!
Example:
An End User cannot be linked directly to an Organization. The end user is linked to a Company, and the Company is linked to an Organization.
- Organizations can see their companies
- Companies can have end users
SIMs
The SIMs page provides convenient access to essential information about each SIM card, including their statuses, SIM types, operators, associated companies, and end users.
This enables to easily tracking of data usage, remaining days on active plans, and viewing detailed information for each card, such as ICCID, operator, plan, company, and other relevant details.




Operations


Q&A
Why can't I see any usage?
There could be a couple of reasons for this. 1. The product has not been created (attach the SIM to a plan and a company) 2. Your SIM hasn't generated any usage so far.What does the Activation Ready status mean?
This status means that the SIM is active with the operator, but there has been no usage yet. Once the SIM card is used, the status will change to "Active."How do I refill?
You have two options for refilling your balance: 1. **Manual Refill** You can refill your balance manually through your account page on the Platform. Simply log in to your account and follow the prompts to add funds. 2. **Auto-Refill** Alternatively, you can set up an auto-refill option. This allows for automatic balance top-ups when your data falls below a specified threshold. To use this feature, you will need to provide a credit card on your account page. Regardless of the method you choose, your data will be added immediately in real-time upon successful completion of the refill.Dynamic Table
You can adjust the order of displayed data, add new columns from the existing list, or hide columns that are not needed. This flexibility allows you to customize the interface to meet your specific needs.
- By clicking the "+" button, you can Upload new SIM card(s) into the system
Single
Single refers to an operation performed on one object. It is triggered from the side panel of a specific SIM via the ⋮ menu.
The opposite is Bulk, which is an action performed on a selection of rows in a list.

Satellite
Satellite is a sidebar section for working with satellite terminals. It is not a separate page, but an accordion group: clicking it expands a submenu.


Operations

Dynamic Table
You can adjust the order of displayed data, add new columns from the existing list, or hide columns that are not needed. This flexibility allows you to customize the interface to meet your specific needs.
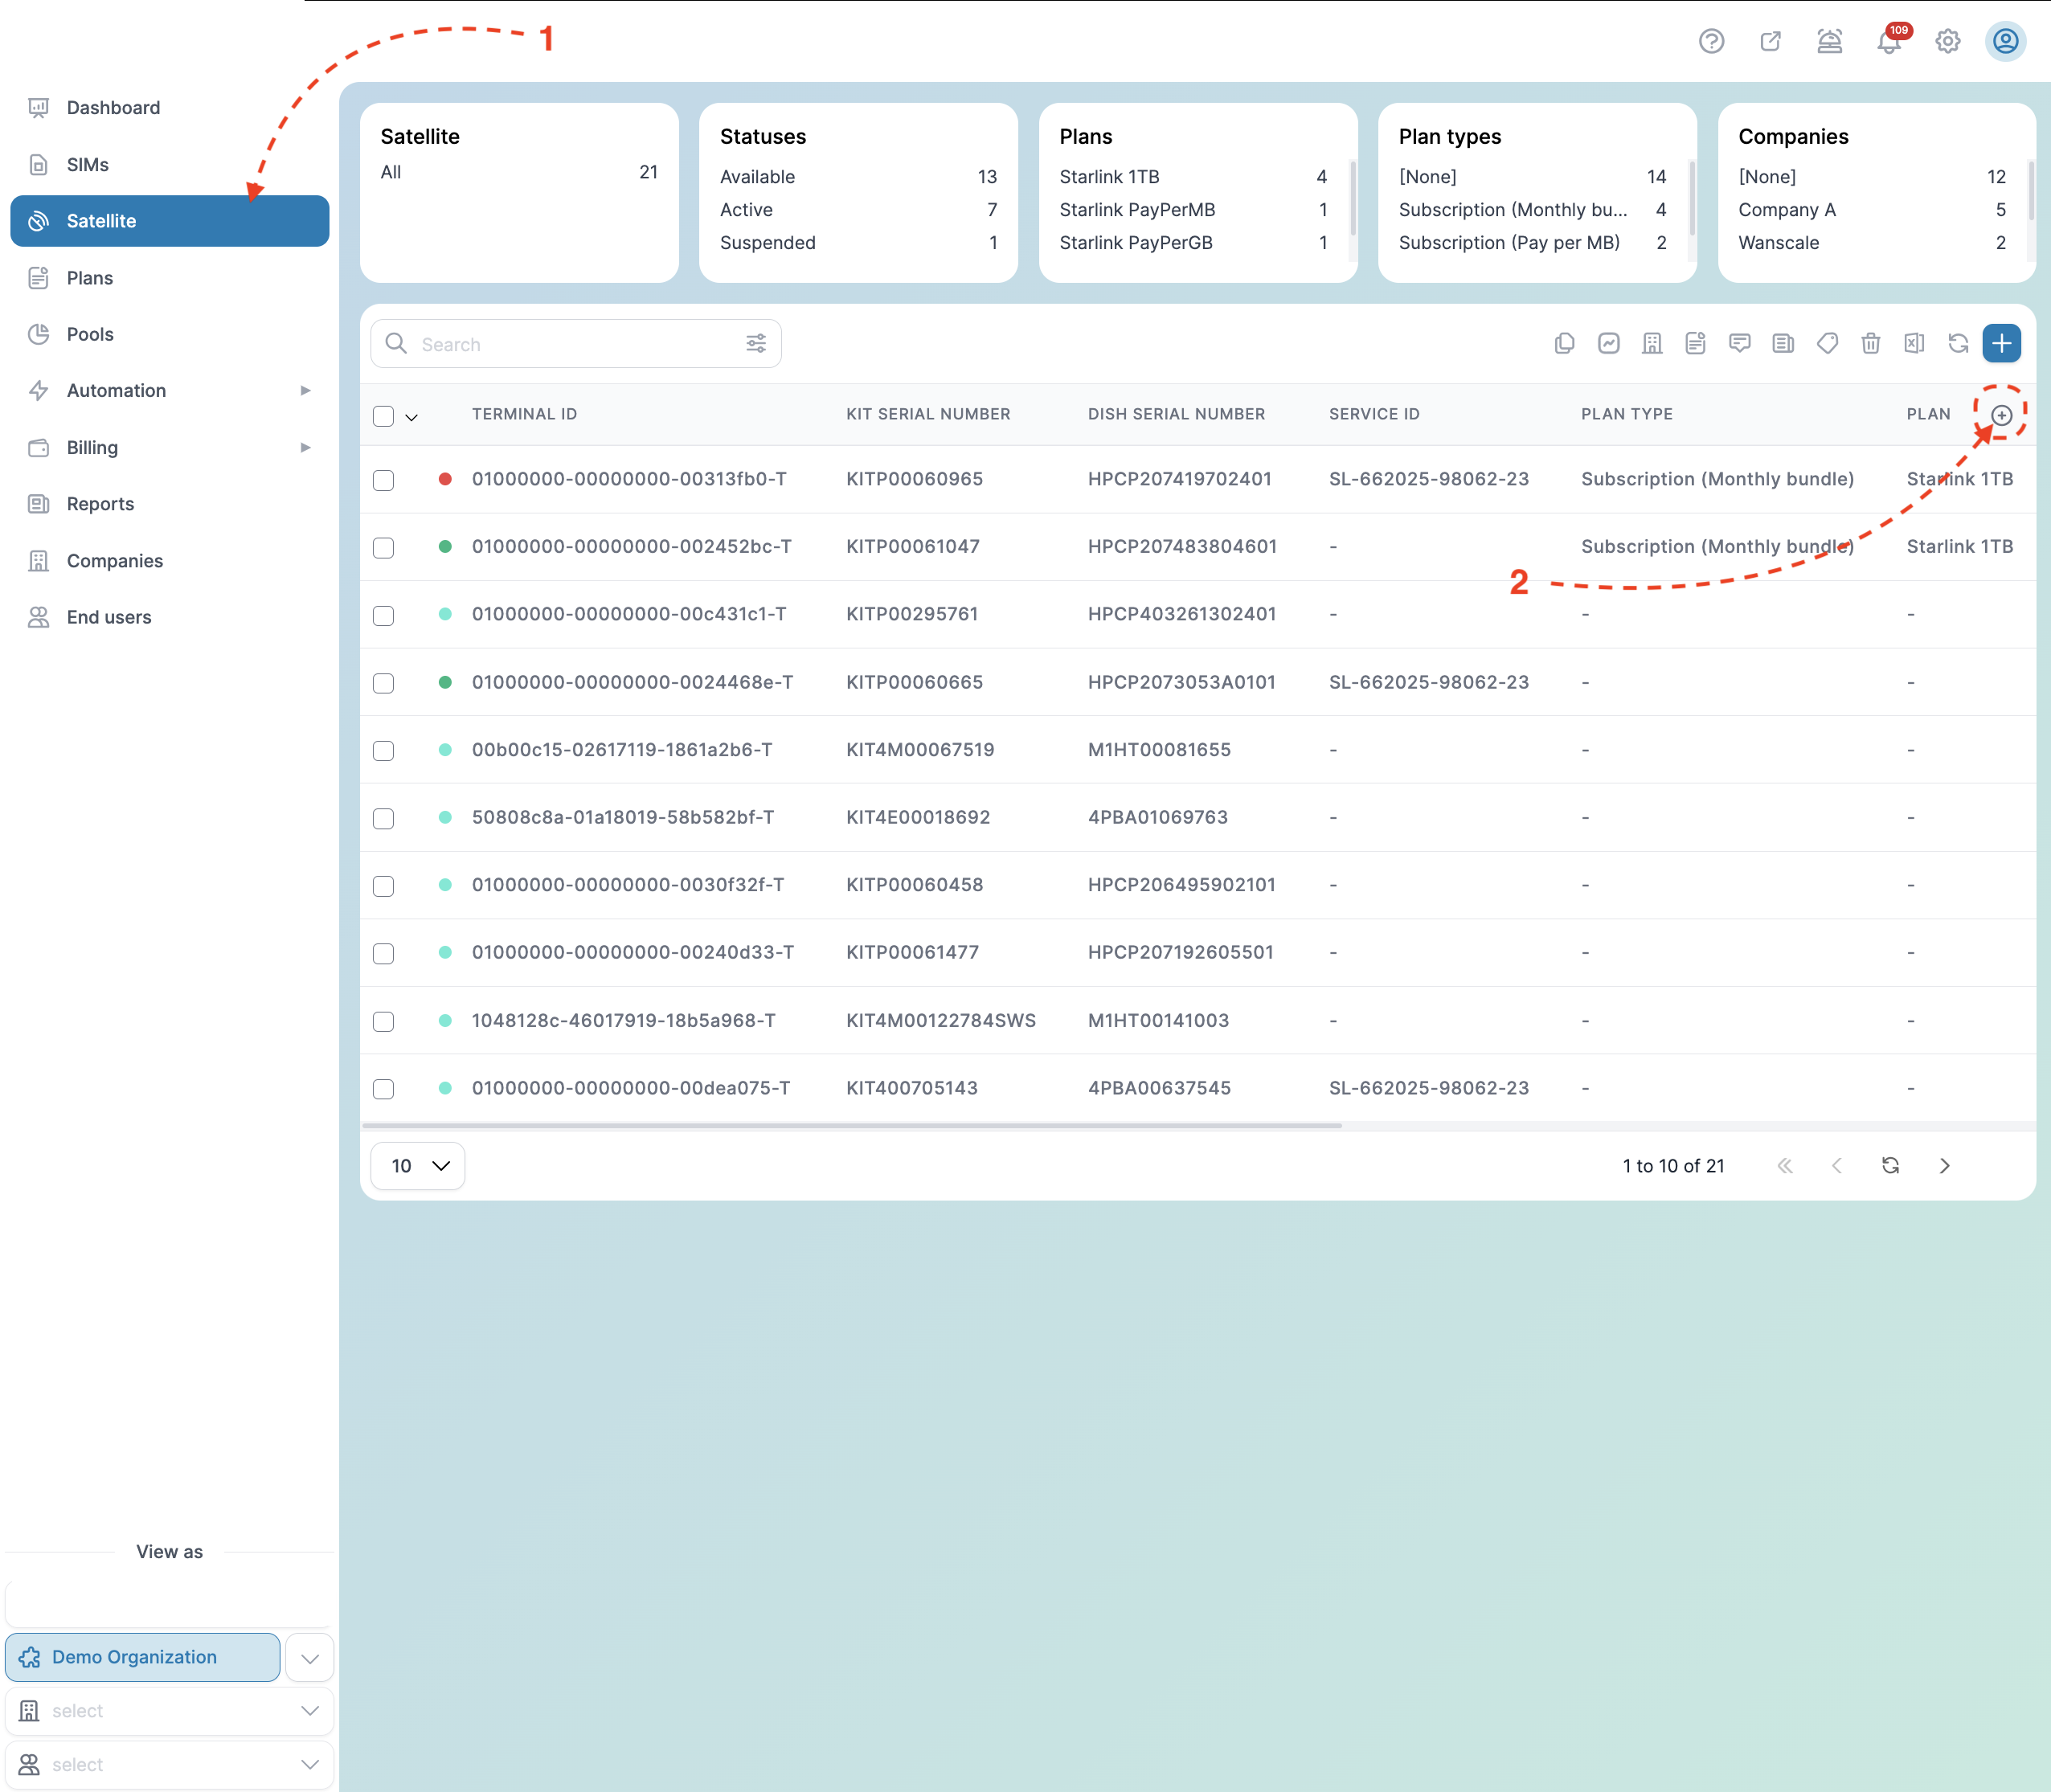
- Go to the 'Satellite' in the left sidebar of the navigation menu
- Click the '+' button in the table header, and a wizard with a list of all column names will appear.
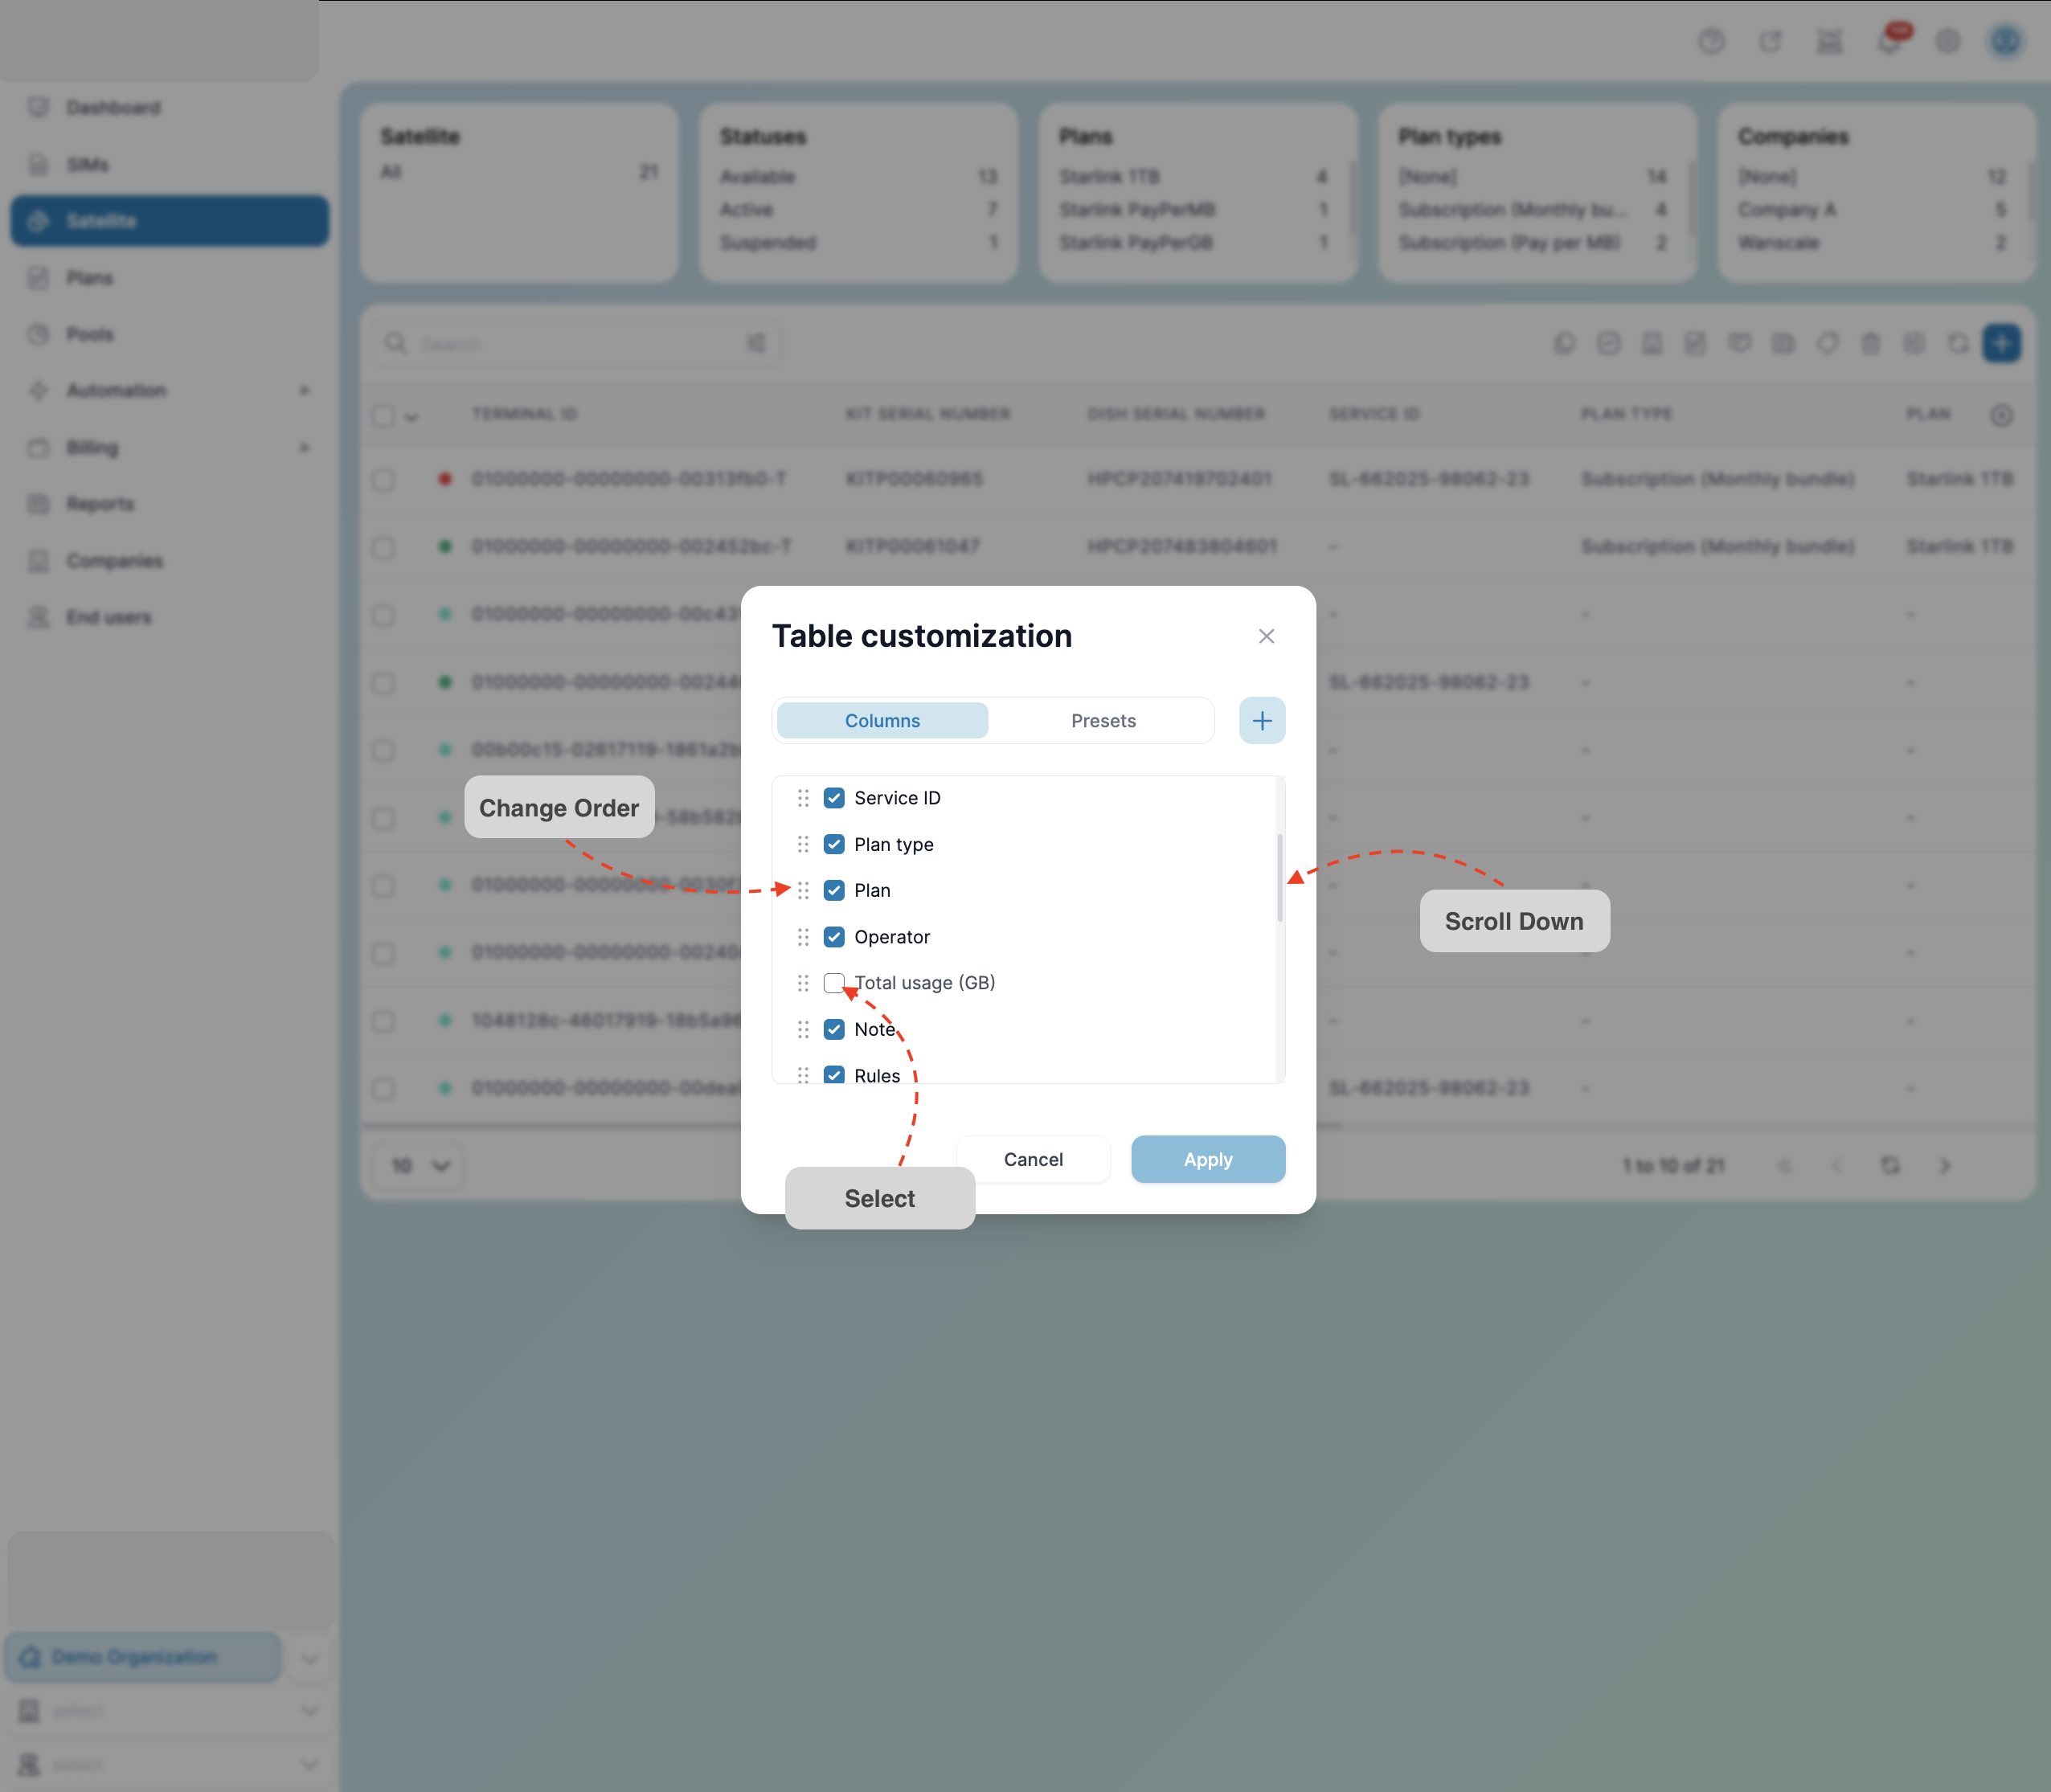
- Select the columns you want to display in the table. In the same wizard window, you can also choose the order of the columns (press and hold the dots, then drag up or down). Click Apply to save your changes.
Telemetry
General View
- Search Bar
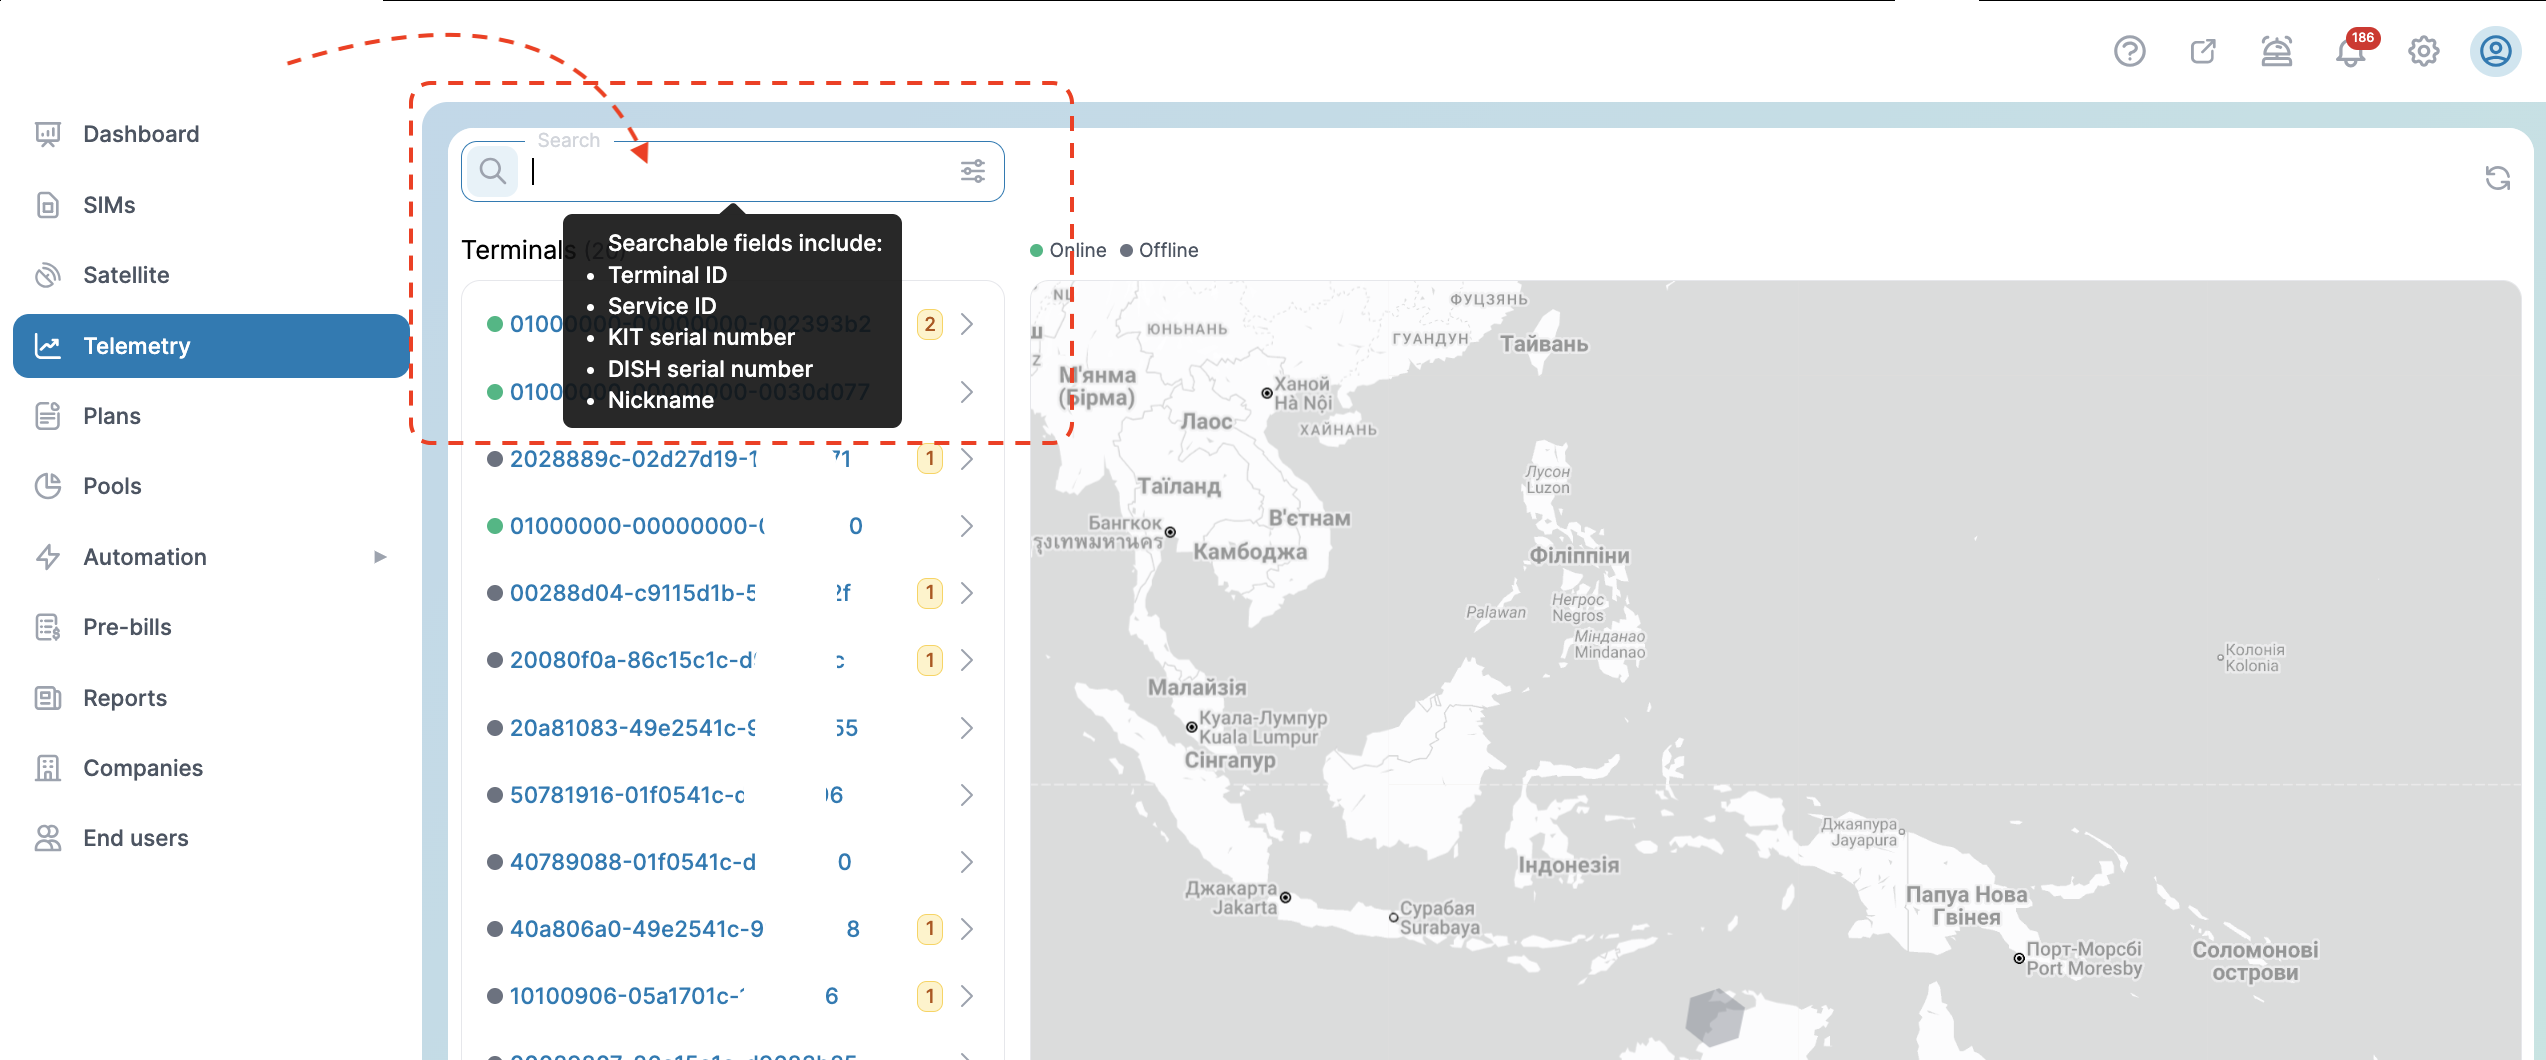
- Located at the top-left of the page.
- Allows users to quickly search for a specific terminal or SIM by ID or name.
- Filter Panel
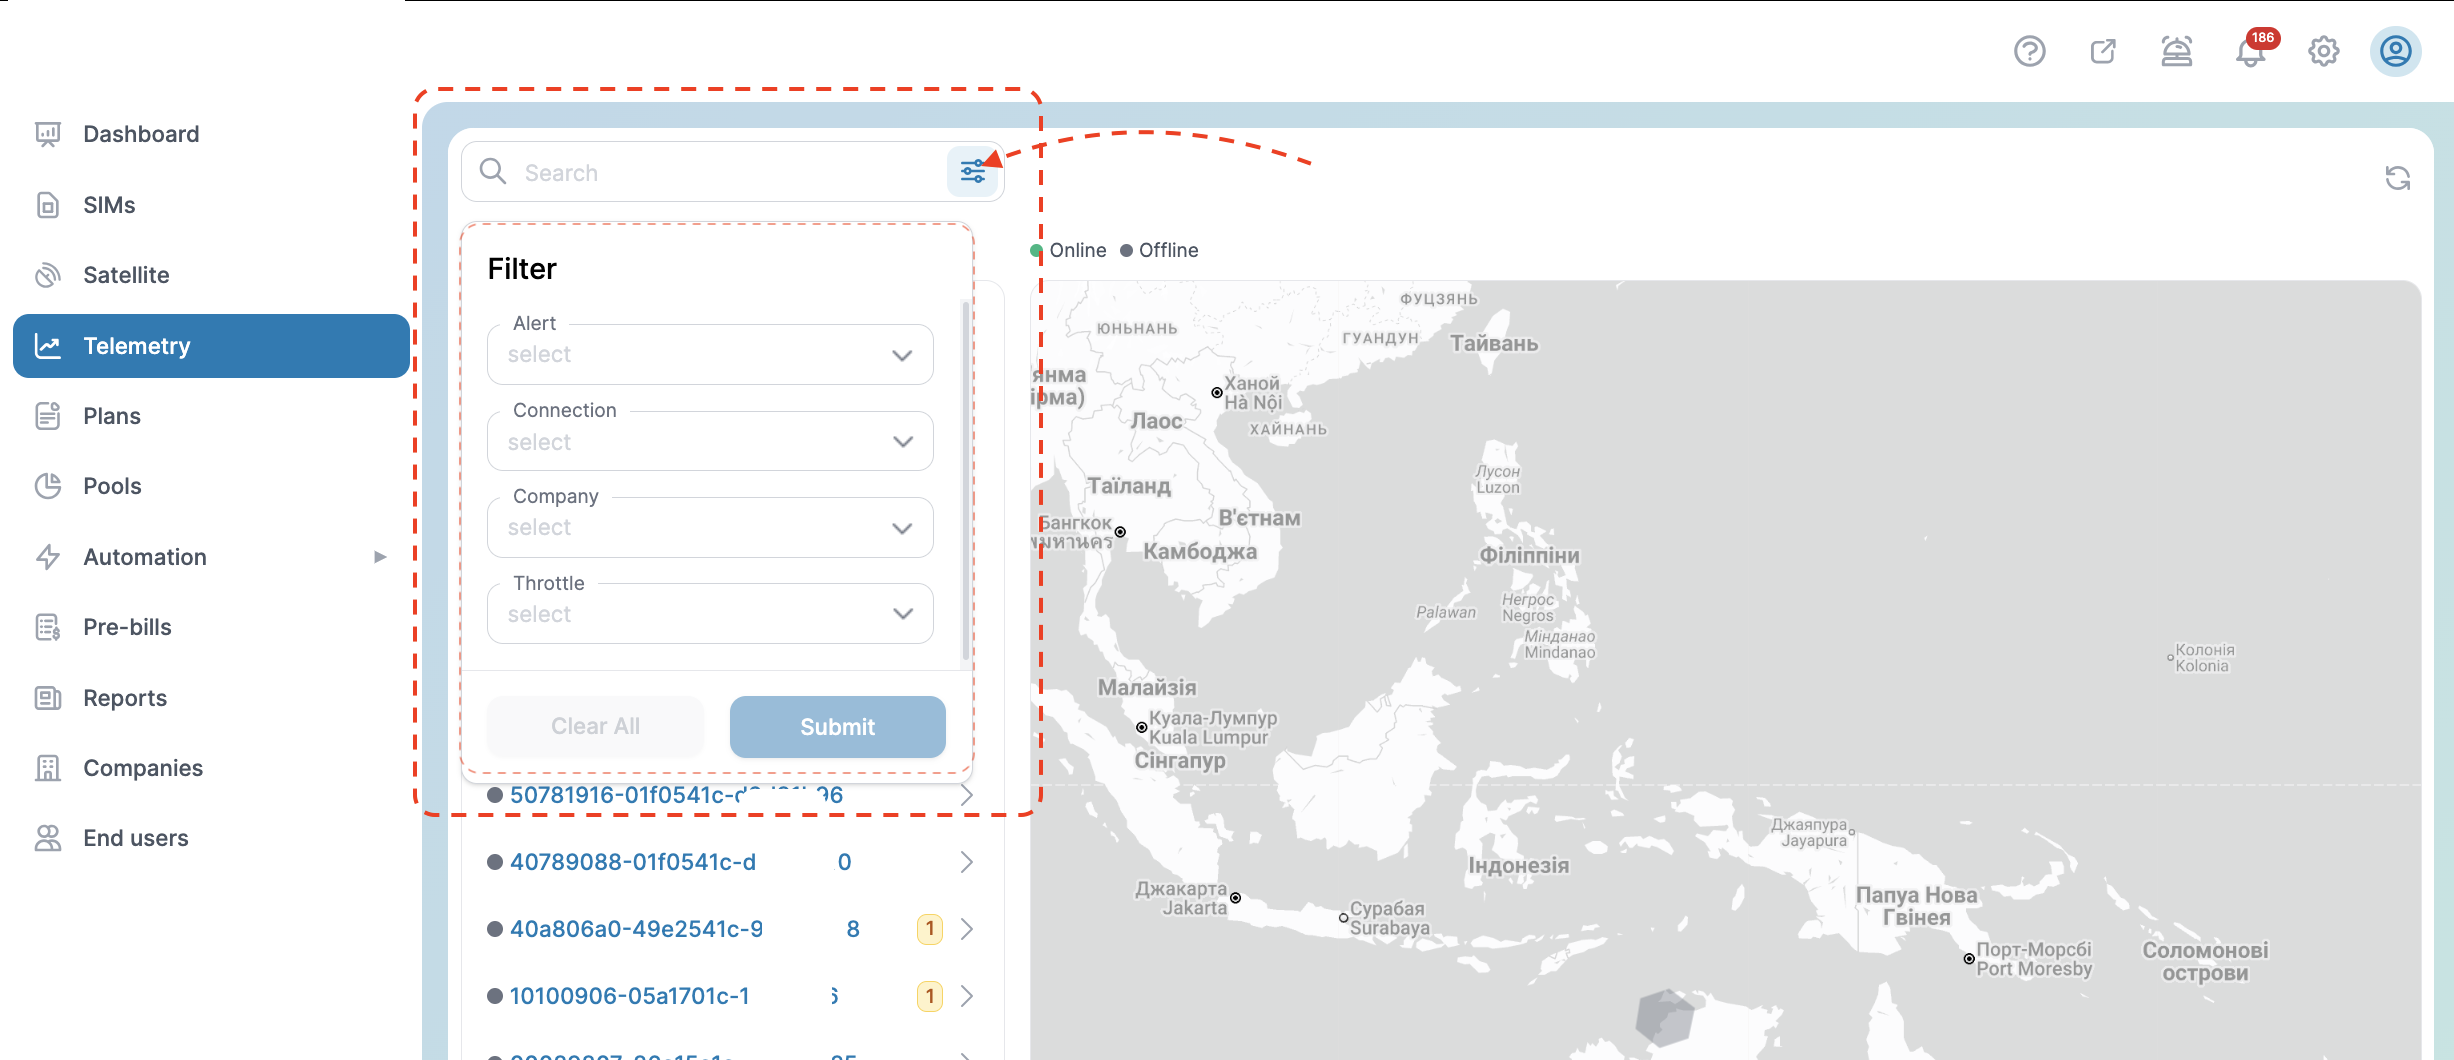
- Provides advanced filtering options to narrow down the displayed terminals.
- Available filters include:
- Alert: Filter devices by current alerts or notifications.
- Connection: Filter based on network connection status.
- Company: Filter devices associated with a specific company.
- Throttle: Filter by data usage limits or throttling status.
- Buttons:
- Clear All: Reset all applied filters.
- Submit: Apply the selected filters.
- Terminal List
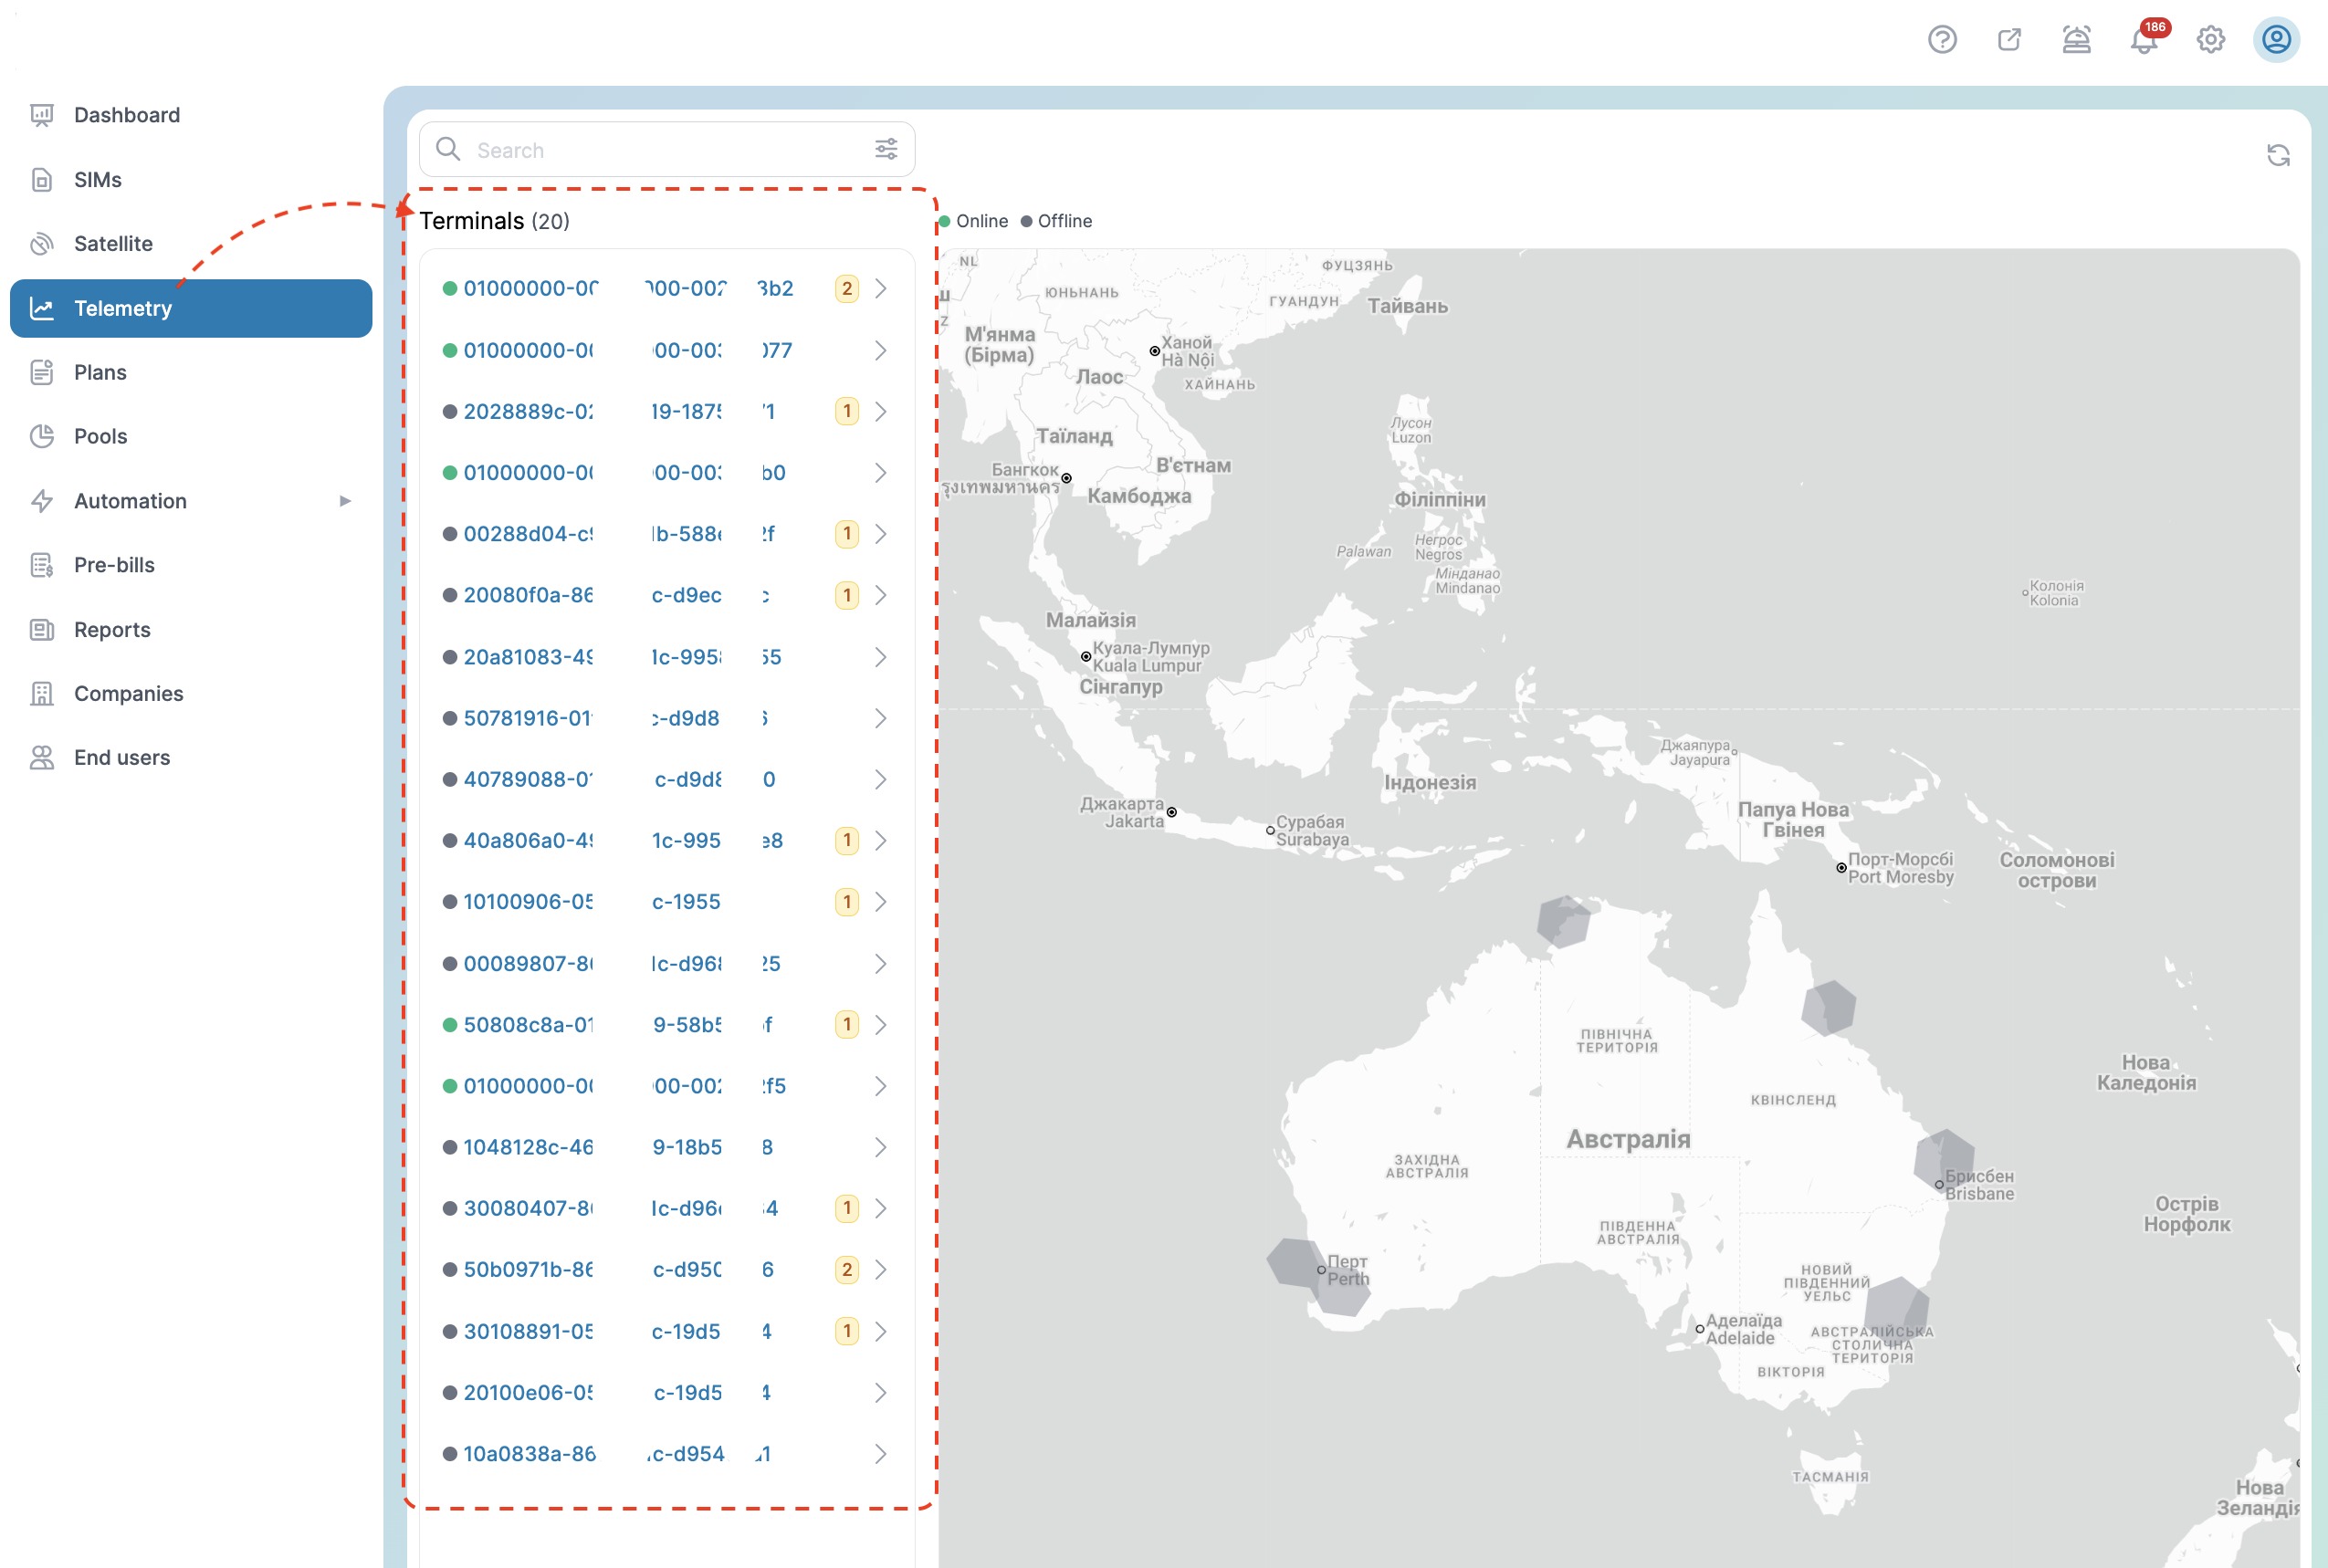
- Displayed on the left side of the page.
- Shows all terminals matching the current search or filter criteria.
- Each Terminal entry includes:
- Terminal ID: Unique identifier for each terminal or SIM.
- Status Indicator: Online (green dot) or offline (gray dot).
- Alert Count Badge: Numeric badge indicating the number of active alerts for the device.
- Map View
- Located on the right side of the page.
- Provides a geographic overview of all devices.
- Key features:
- Device Status Markers: Green for online, gray for offline.
- Hexagonal Clusters: Indicate regions with multiple devices for simplified visualization.
- Interactive map with zoom and pan capabilities to focus on specific regions.
- Sync Button
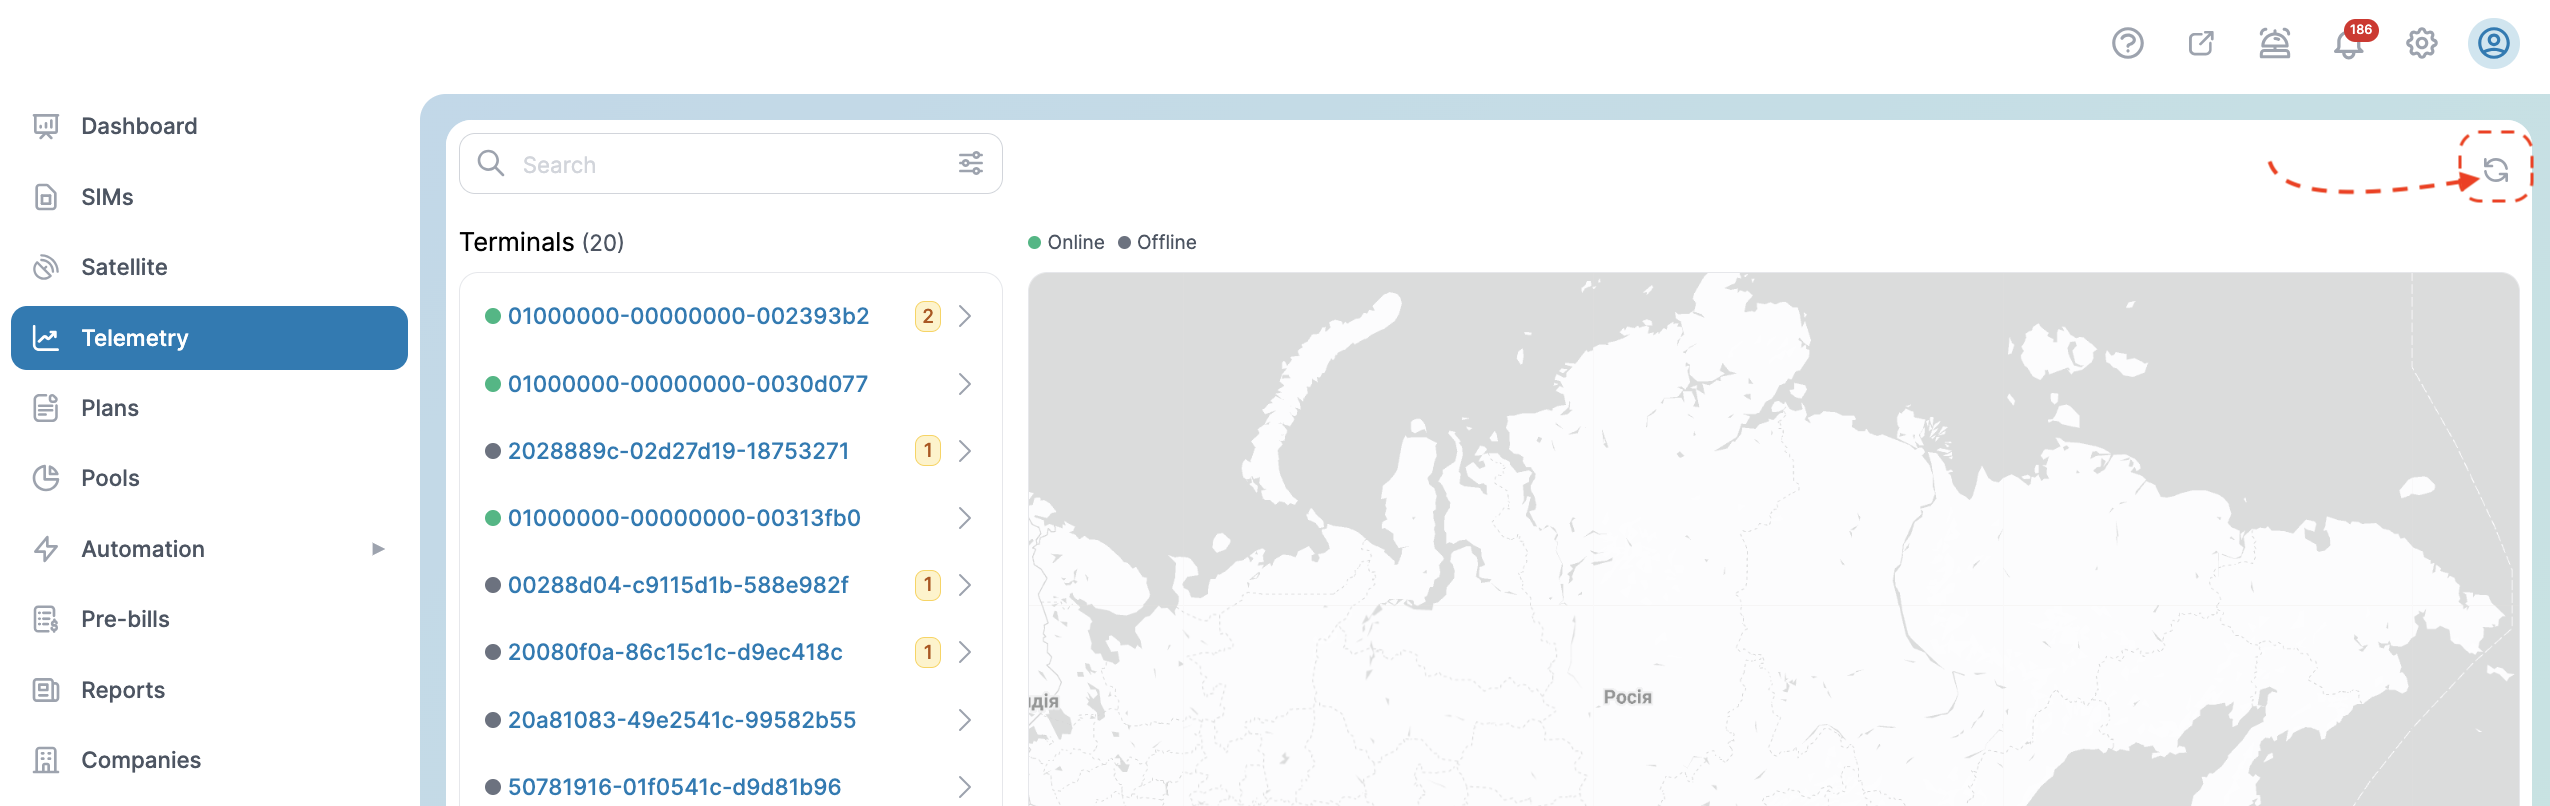
- Allows users to refresh the displayed data to ensure up-to-date terminal statuses and locations.
Telemetry Details
The page is divided into several sections: Alerts, General, a location map, and a set of telemetry charts.
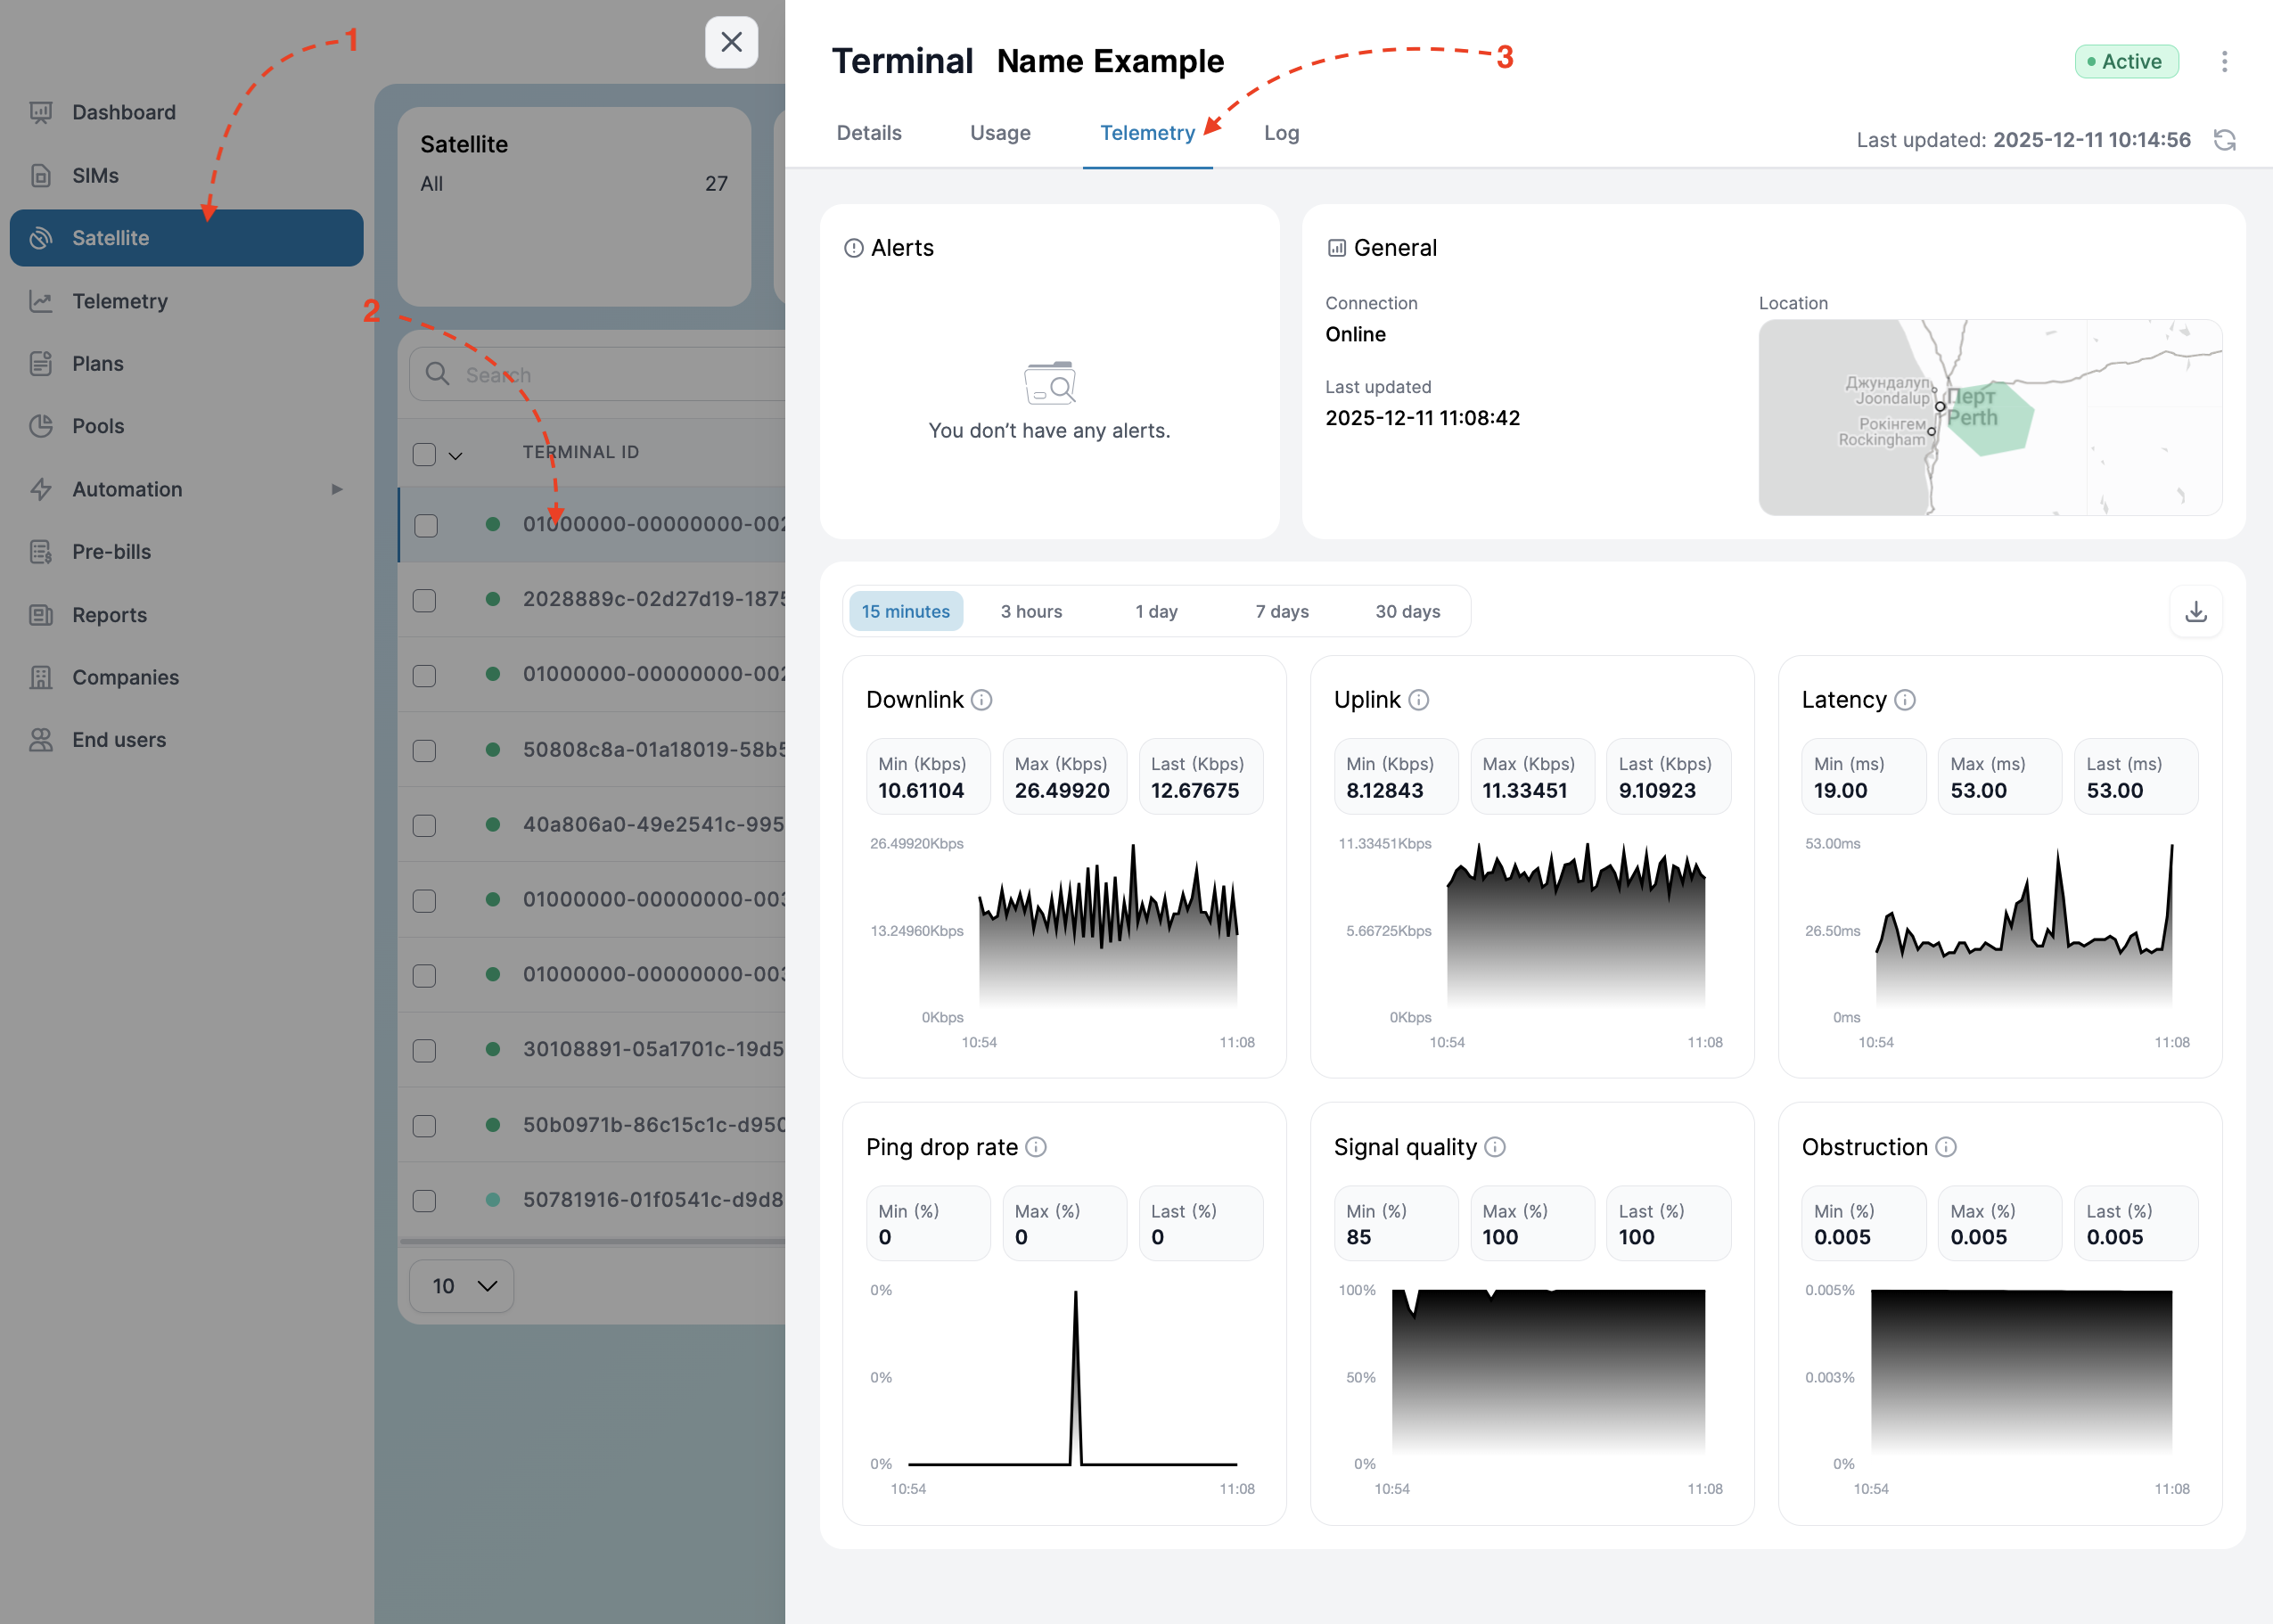
- Go to the Satellite page
- Click on the terminal to view its telemetry details
- Open the Telemetry tab
- Alerts Section
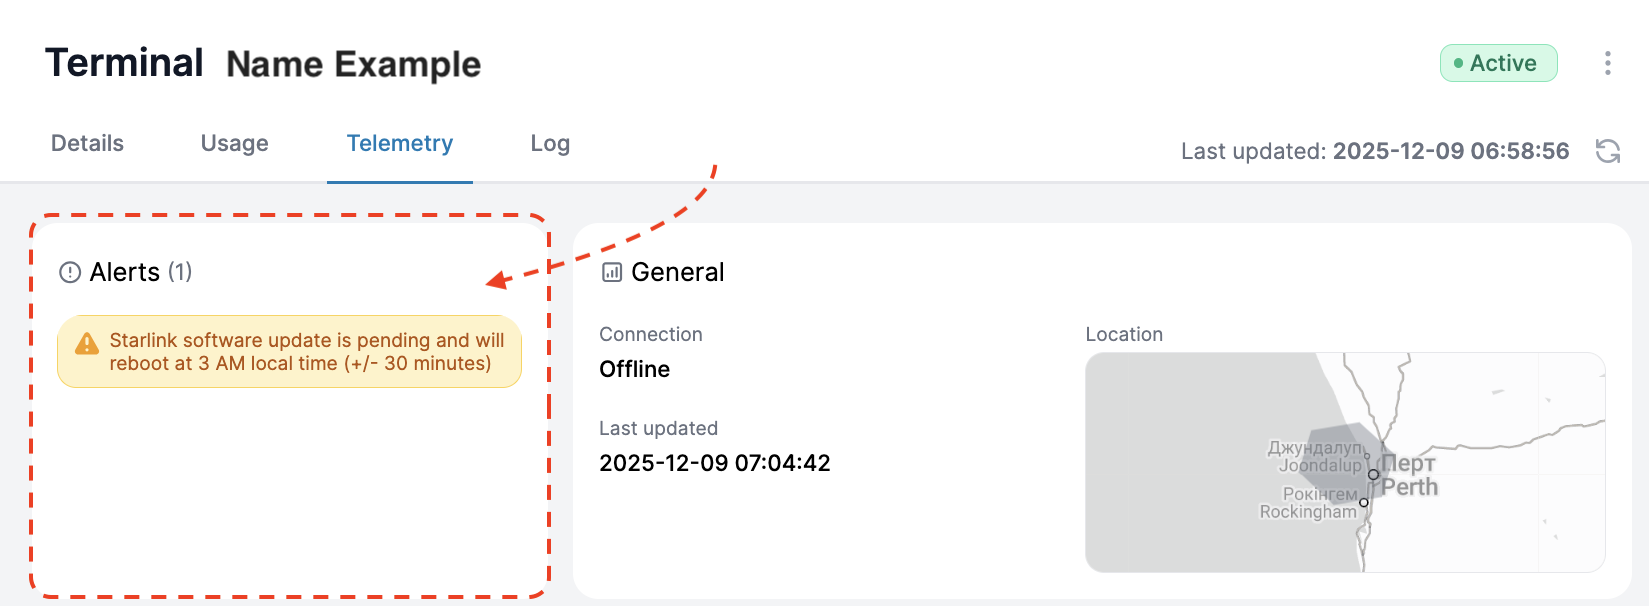
- Shows active warnings or system issues related to the terminal.
- If no alerts are present, the interface displays: “You don’t have any alerts.”
3. General Section
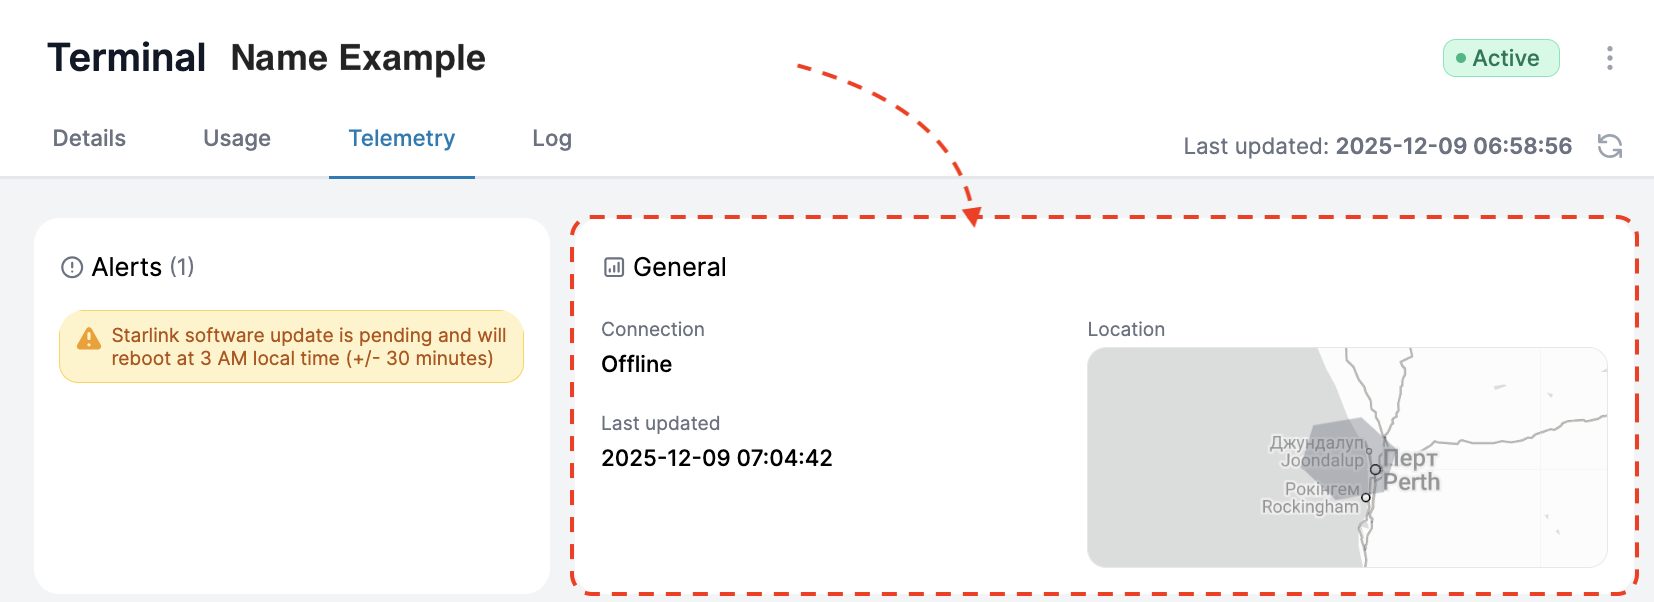
Provides essential information about the terminal’s connectivity:
- Connection: Online / Offline
- Last updated: Timestamp of the latest telemetry received
- Location: A map showing the approximate position of the terminal
4. Time Range Selector
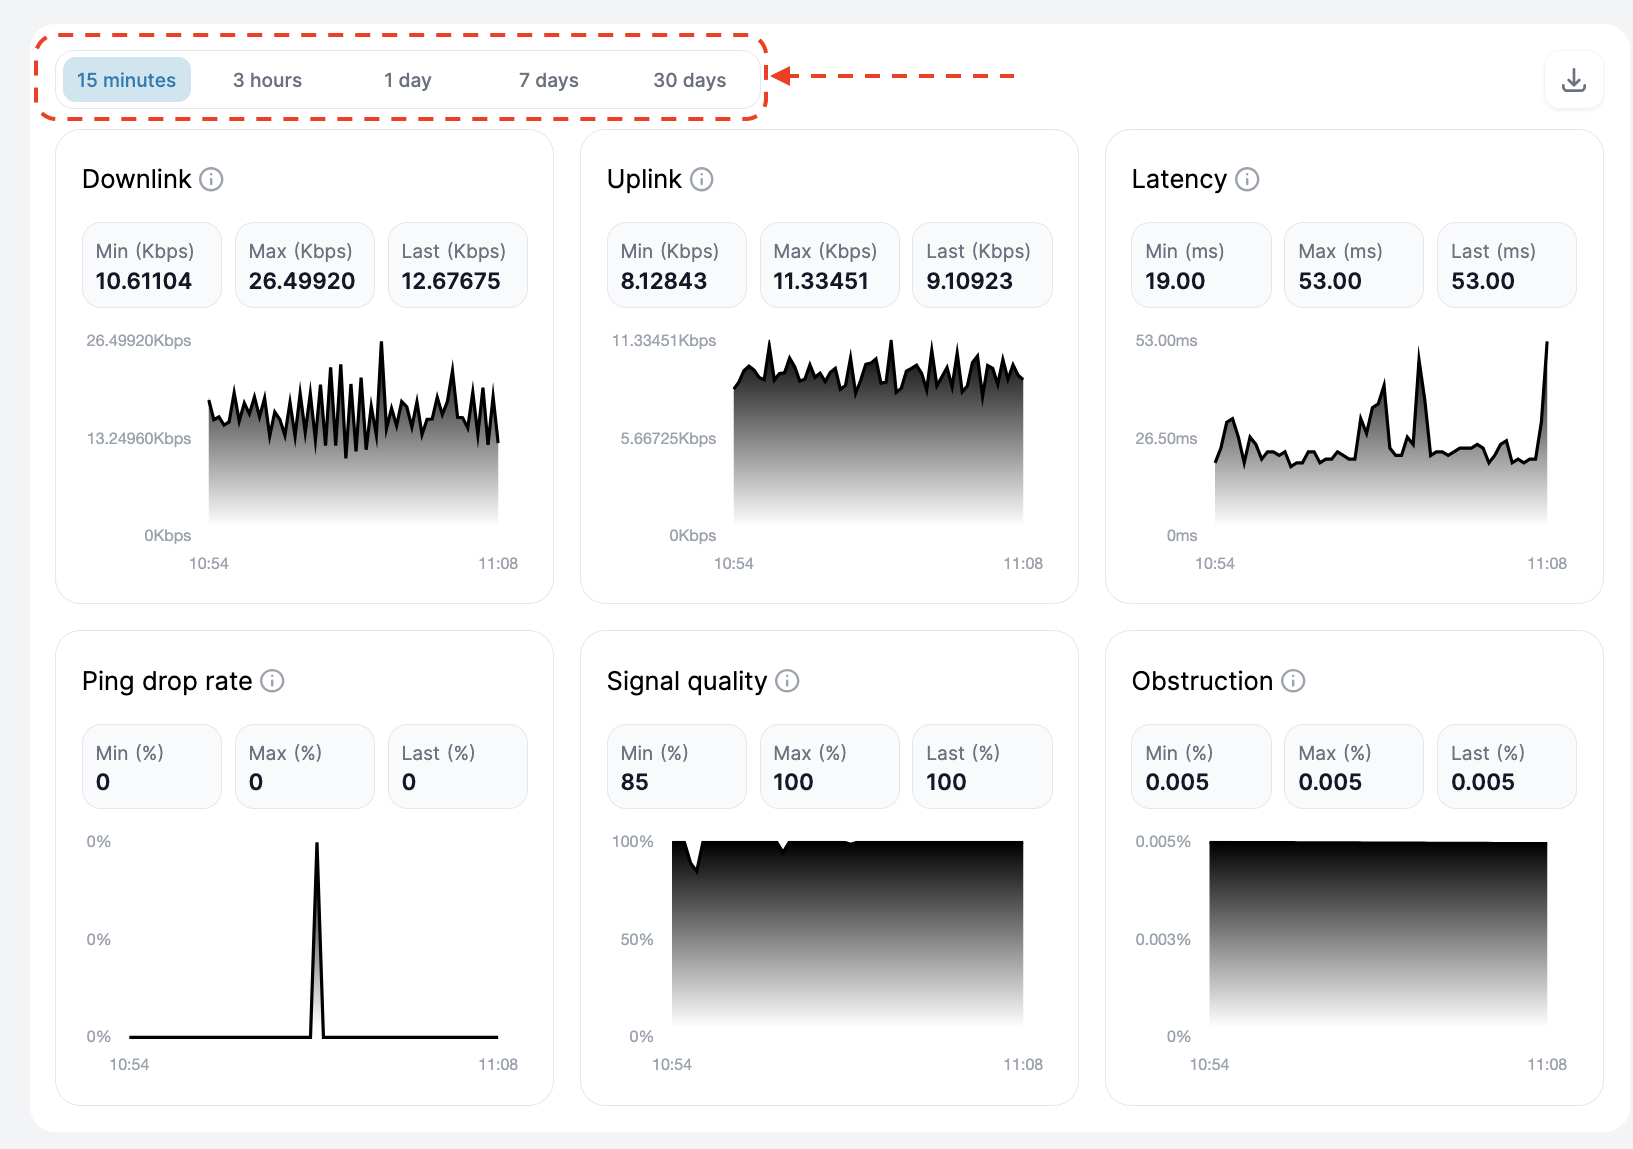
Above the charts, users can choose the time interval for displayed telemetry:
- 15 minutes
- 3 hours
- 1 day
- 7 days
- 30 days
Changing the interval updates all charts simultaneously.
- Data Export
A Download button located above the charts allows users to export telemetry data for offline analysis or reporting.
Telemetry Charts
1. Downlink (Kbps)
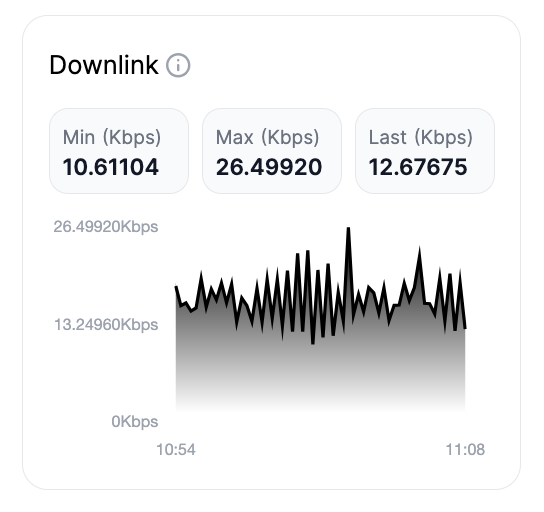
Displays the terminal’s data-receive average download speed from the satellite:
- Min — Minimum value during the selected period
- Max — Maximum value
- Last — Most recent value
- The chart visualizes the fluctuation of downlink speeds over time.
2. Uplink (Kbps)
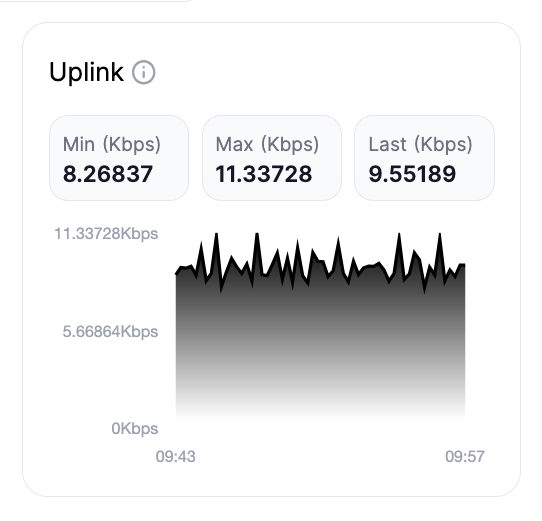
Shows the data transmission average download speed to the satellite:
- Contains the same metrics as Downlink
- The chart reflects uplink performance trends
3. Latency (ms)
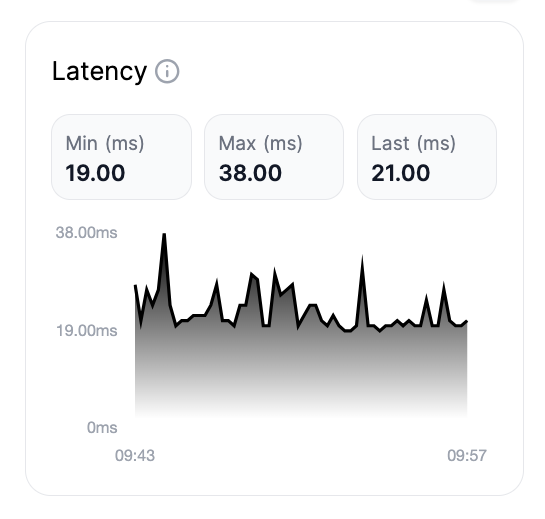
Average latency measured to the Starlink point of presence:
- Min, Max, Last
- The chart shows variation in latency over time.
4. Ping Drop Rate (%)
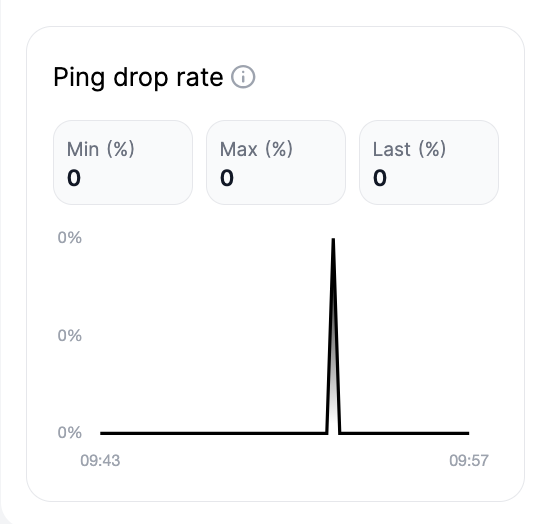
Indicates the percentage of pings that are dropped:
- A healthy connection typically shows 0%
- The chart displays packet-loss occurrences within the selected timeframe
5. Signal Quality (%)
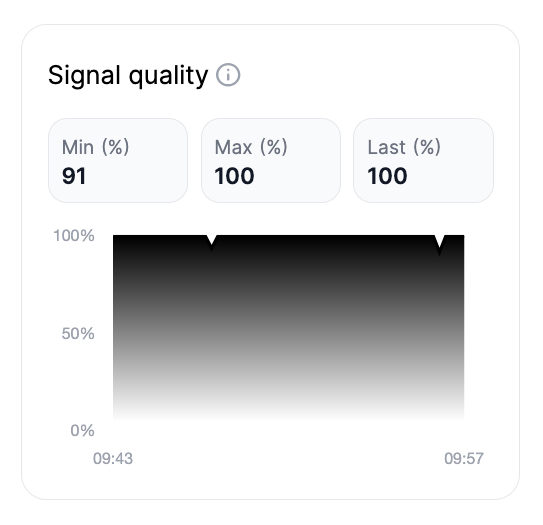
Represents the quality of the received signal:
- Ranges from 0–100%
- Visualizes overall link stability
6. Obstruction (%)
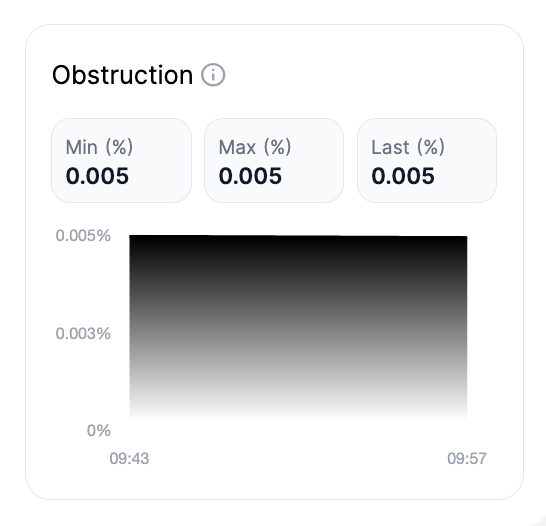
Shows the percentage of time the terminal’s view of the satellite was obstructed:
- Very low values (e.g., 0.005%) indicate minimal interference
- Useful for diagnosing signal blockages from trees, buildings, etc.
Single
Single refers to an operation performed on one object. It is triggered from the side panel of a specific Terminal via the ⋮ menu.
The opposite is Bulk, which is an action performed on a selection of rows in a list.

Terminal Swap
What it does: moves an active plan (service line) from one terminal to another. The old terminal is released and archived; the new one becomes active with the same plan.
Before you start
Make sure that:
- the old terminal is Active and has a plan assigned;
- the new terminal is already in your list, in Available status (no plan on it);
- both terminals belong to the same operator (e.g. Starlink) and the same company.
Complete the following steps:
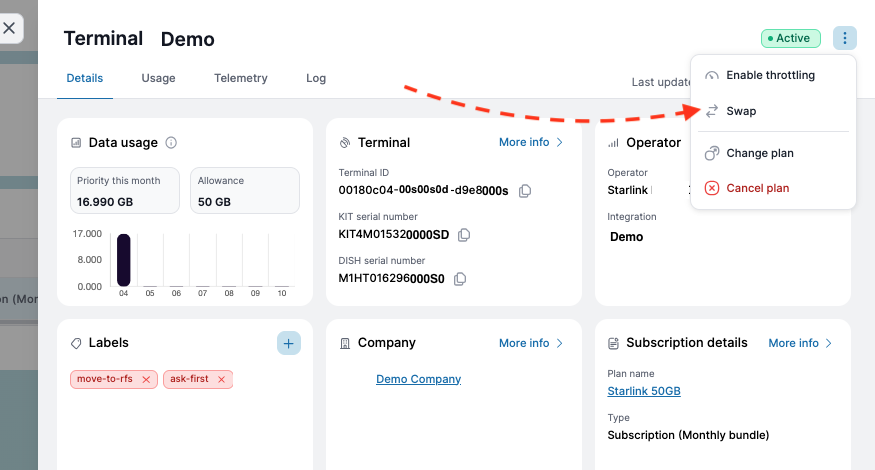
- Go to Satellite → Terminals and find the terminal you want to replace (search by Terminal ID, KIT or DISH serial number).
- Click the row — the terminal details panel opens on the right.
- In the top-right corner, click the three-dot button (⋮).
- Select Swap from the menu.
-
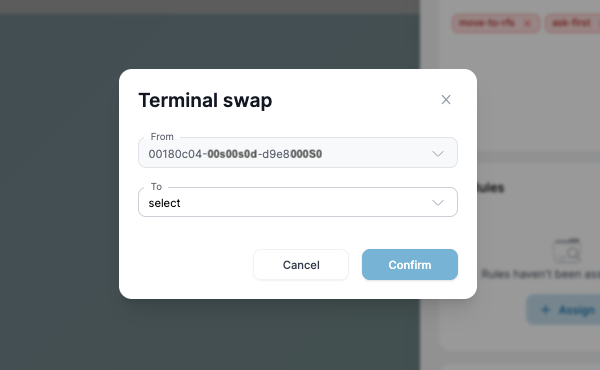
In the Terminal swap dialog:
- the From field is already filled in — this is the current terminal;
- in the To field, select the new terminal from the list.
-
Click Confirm.
What happens next
- The request goes to the operator immediately — a notice appears on the terminal card: "A device swap for this terminal is being processed."
- Processing is asynchronous: the plan is removed from the old terminal and assigned to the new one on the operator's side.
- Once complete, the new terminal becomes Active with your plan (plan name, allowance and throttling settings carry over), and the old one moves to Archived.
Refresh the page after a few minutes to see the result.
Good to know
- One swap at a time. While a swap is still being processed, a repeat request for the same terminal will not be accepted.
- Usage data does not transfer. Traffic history stays with the old terminal; the counter on the new one starts from the moment of the swap.
- If the swap fails, the most common reasons are: the new terminal already has an active plan, the old terminal is not active, or the two terminals belong to different operators.
The action cannot be undone on your own — to move the plan back, perform a reverse swap.
Change Plan
What it does: replaces the plan currently assigned to a terminal with another one. The terminal keeps working — only its plan, data allowance and billing change.
Before you start
Make sure that:
- the terminal is Active and already has a plan assigned;
- the plan you want to switch to is available for your company and operator;
- you understand the billing impact — the new plan's price and allowance take effect once the change is confirmed by the operator.
Complete the following steps:
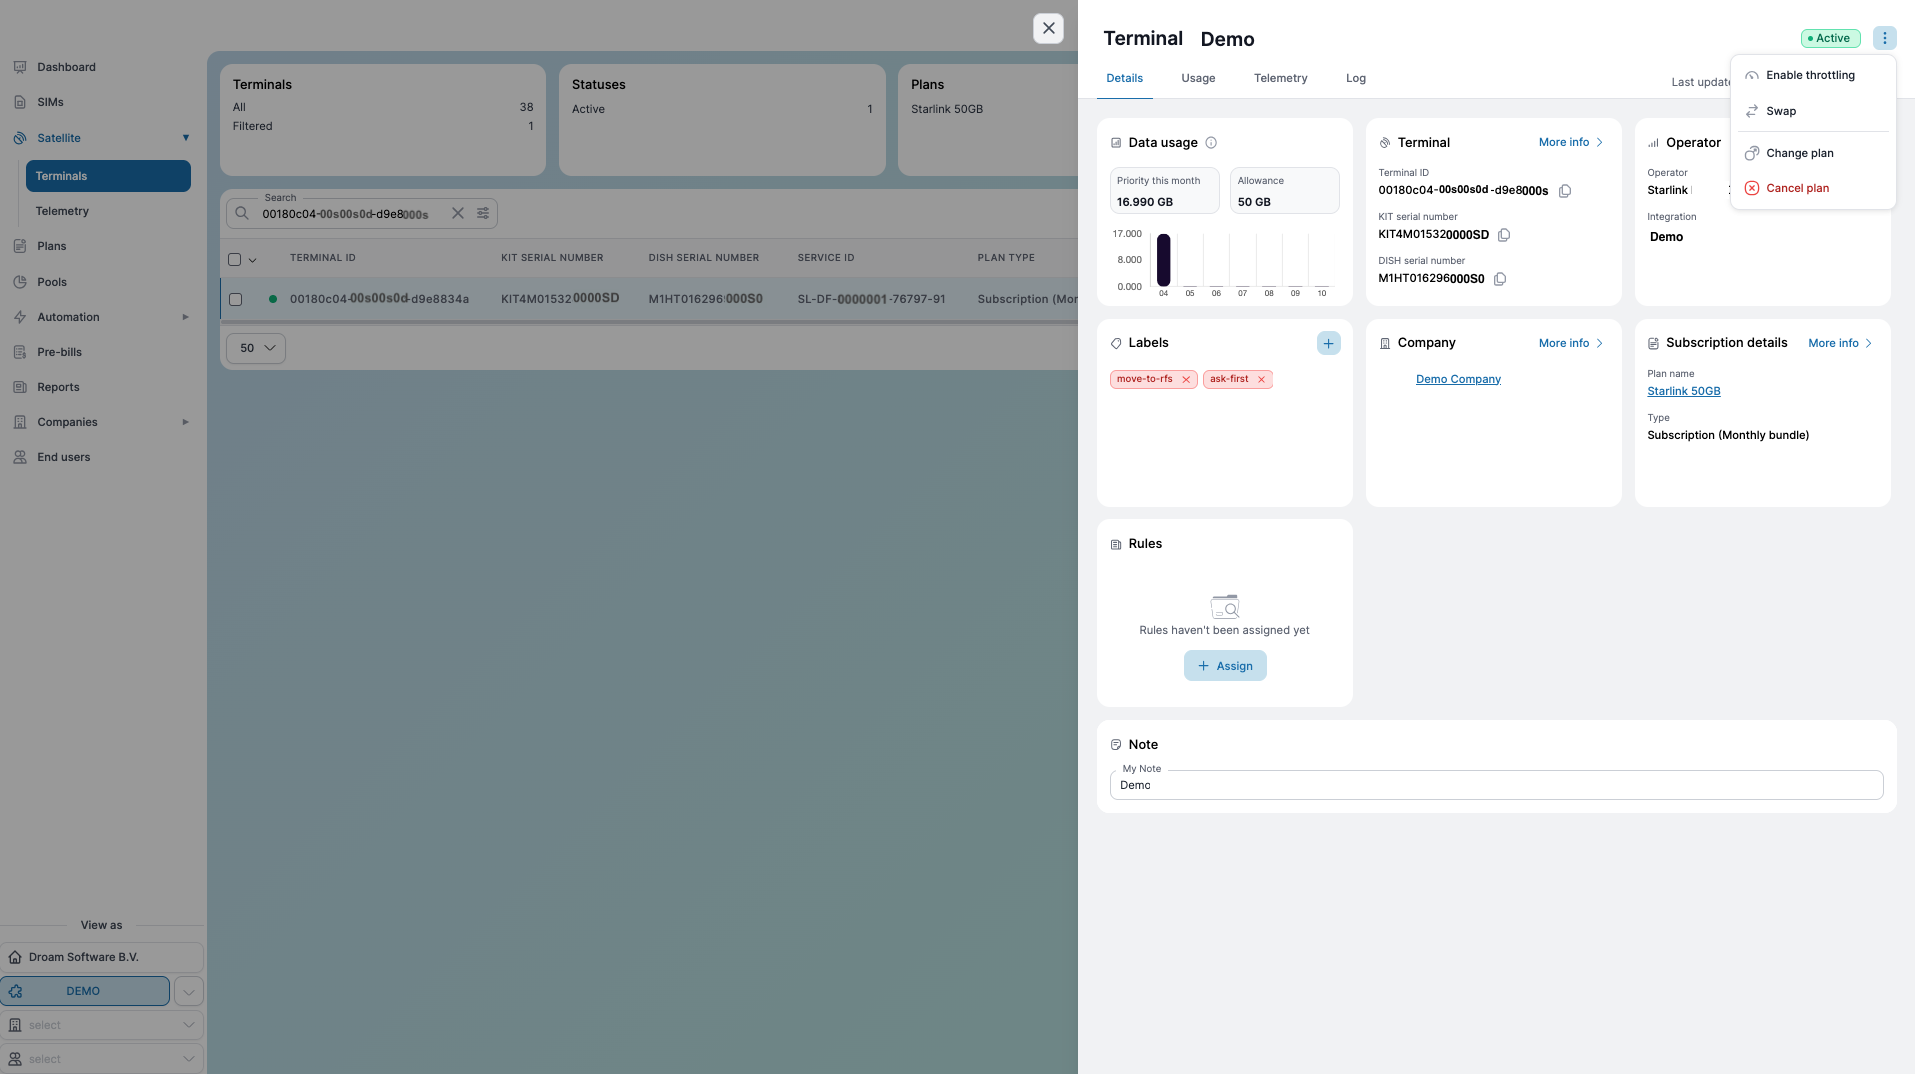
- Go to Satellite → Terminals and find the terminal (search by Terminal ID, KIT or DISH serial number).
- Click the row — the terminal details panel opens on the right.
- In the top-right corner, click the three-dot button (⋮).
- Select Change plan from the menu.
-
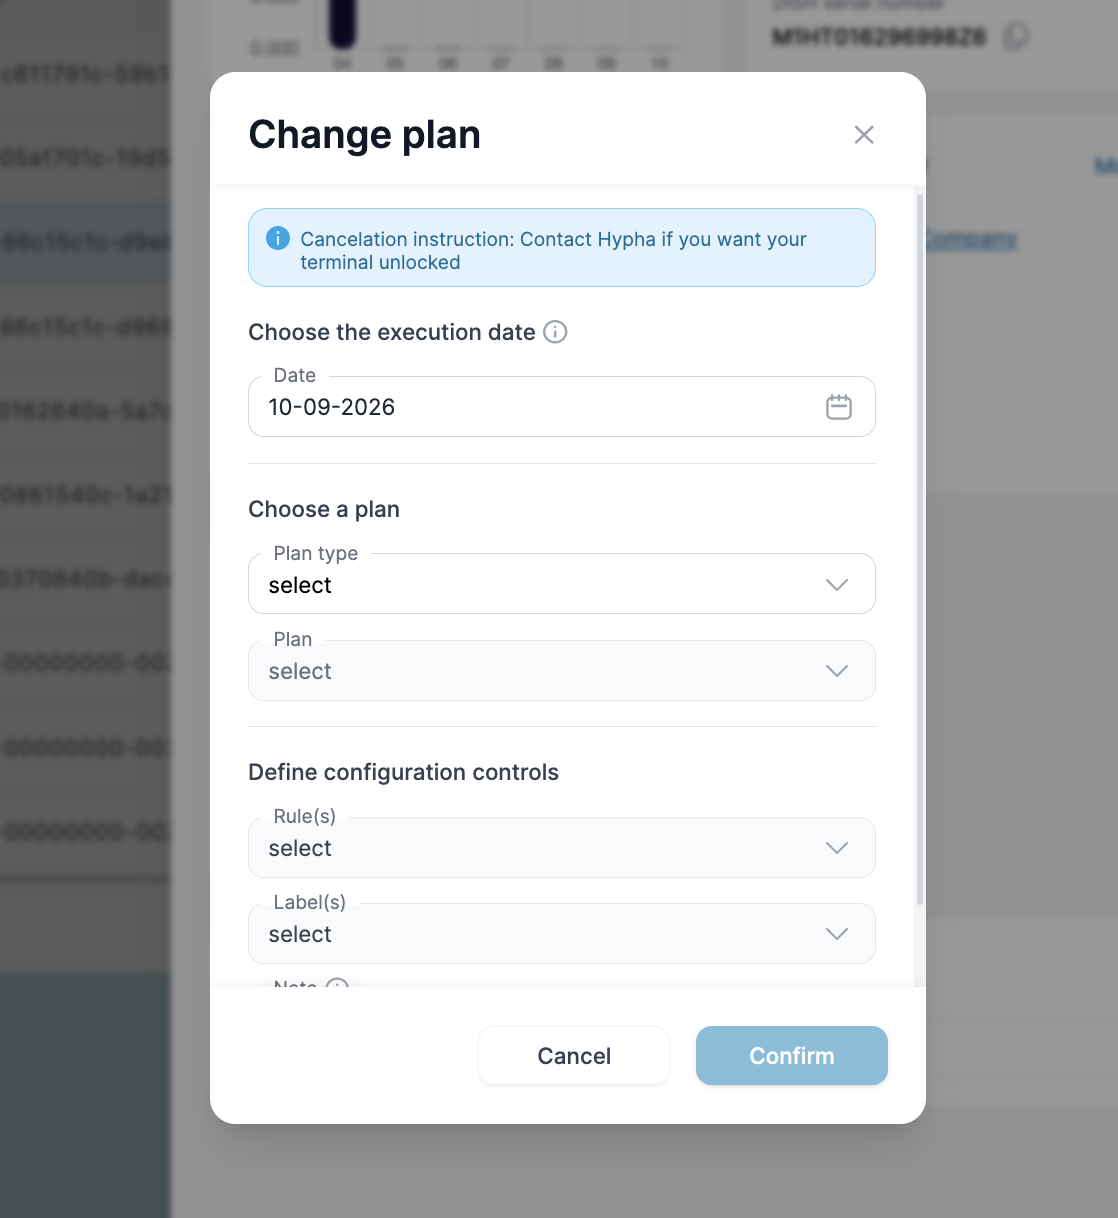
In the dialog:
- the current plan is shown for reference;
- select the new plan from the list.
-
Click Confirm.
What happens next
- The request goes to the operator immediately, and the terminal card shows that a plan change is being processed.
- Processing is asynchronous — it usually takes a few minutes.
- Once complete, the Subscription details card shows the new plan name and type, and the Data usage card reflects the new allowance.
Refresh the page to see the updated values.
Good to know
- One change at a time. While a plan change is still being processed, a repeat request for the same terminal will not be accepted.
- Usage history is kept. Traffic already consumed stays on the record; the allowance counter follows the new plan.
- Billing follows your agreement — depending on the plan type, the change may apply immediately or from the next billing period.
- If the change fails, the most common reasons are: the terminal has no active plan, the selected plan is not available for your operator, or the terminal is archived.
There is no separate undo — to go back, run Change plan again and select the previous plan.
Upload Terminals
As an organization, you can upload SIMs to the platform by following these steps:
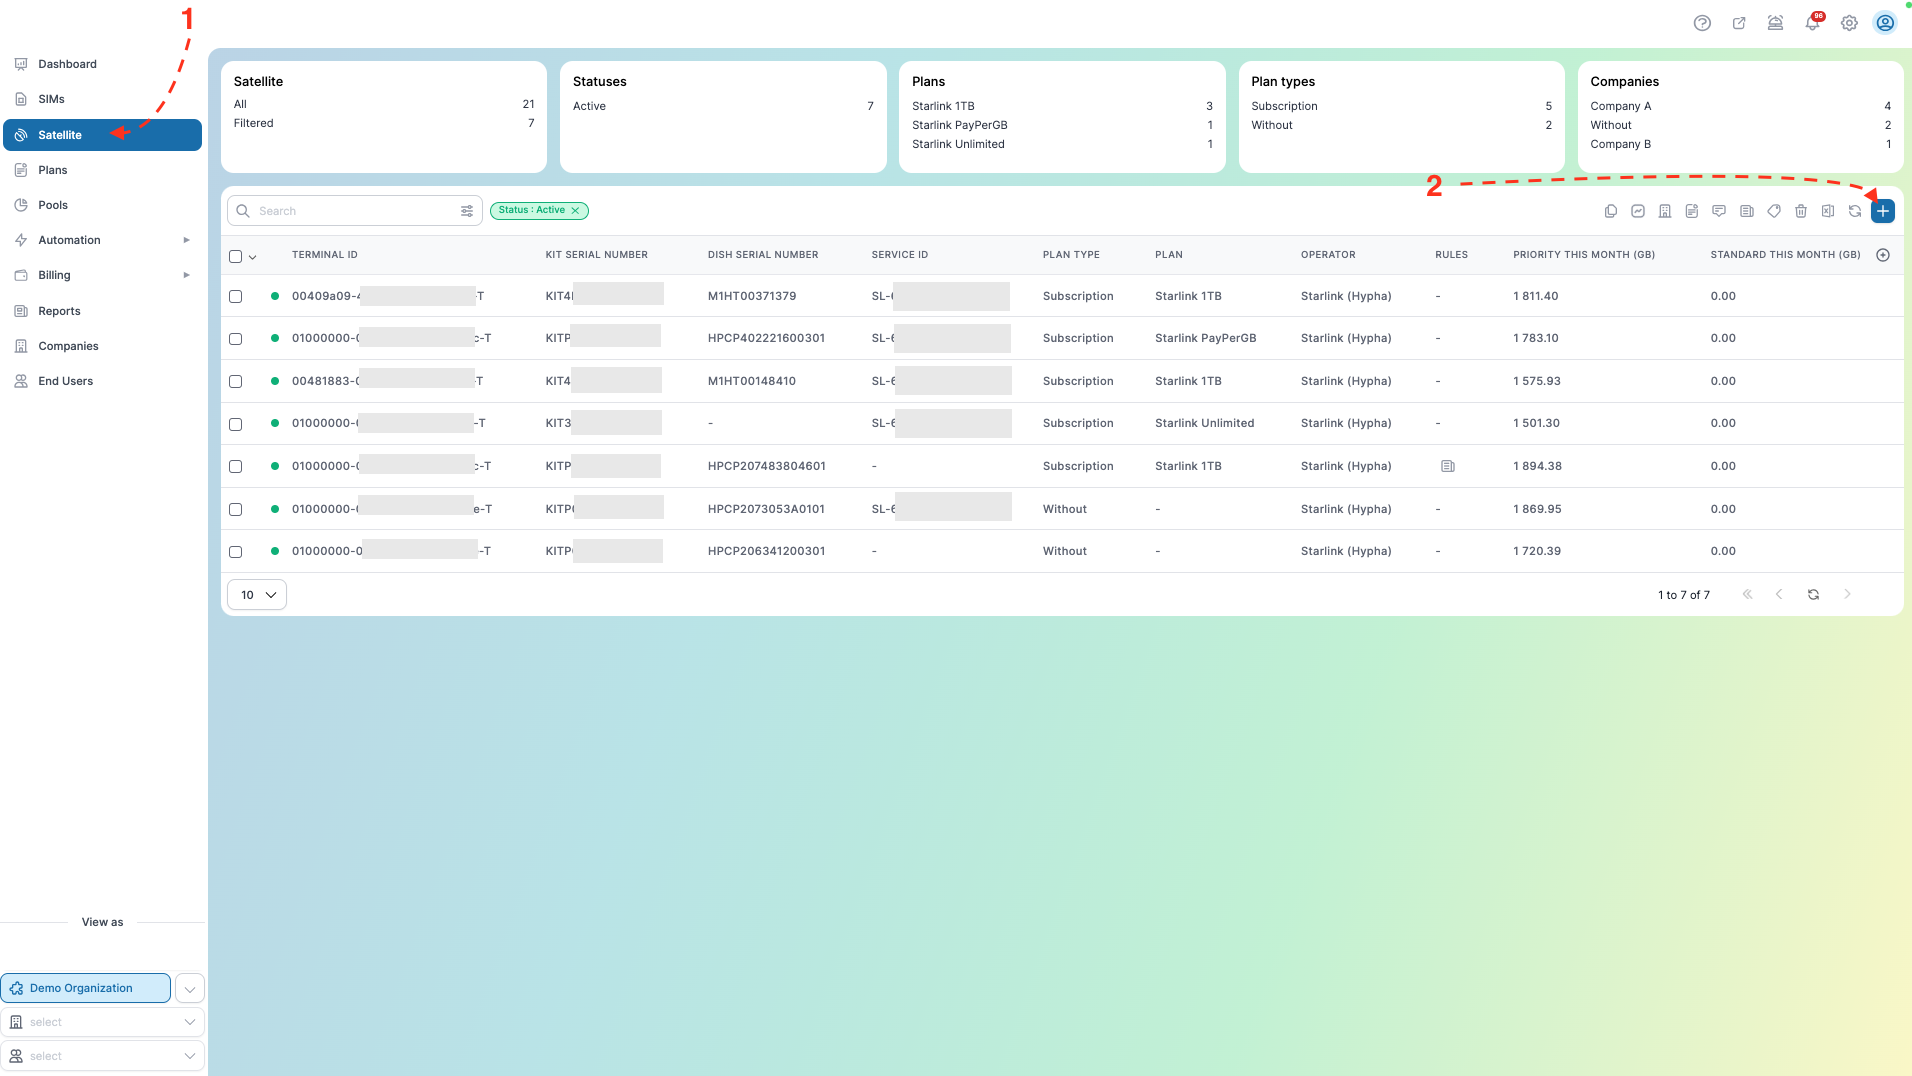
- Go to the Satellite from the menu on the left.
- Click the plus (+) button.
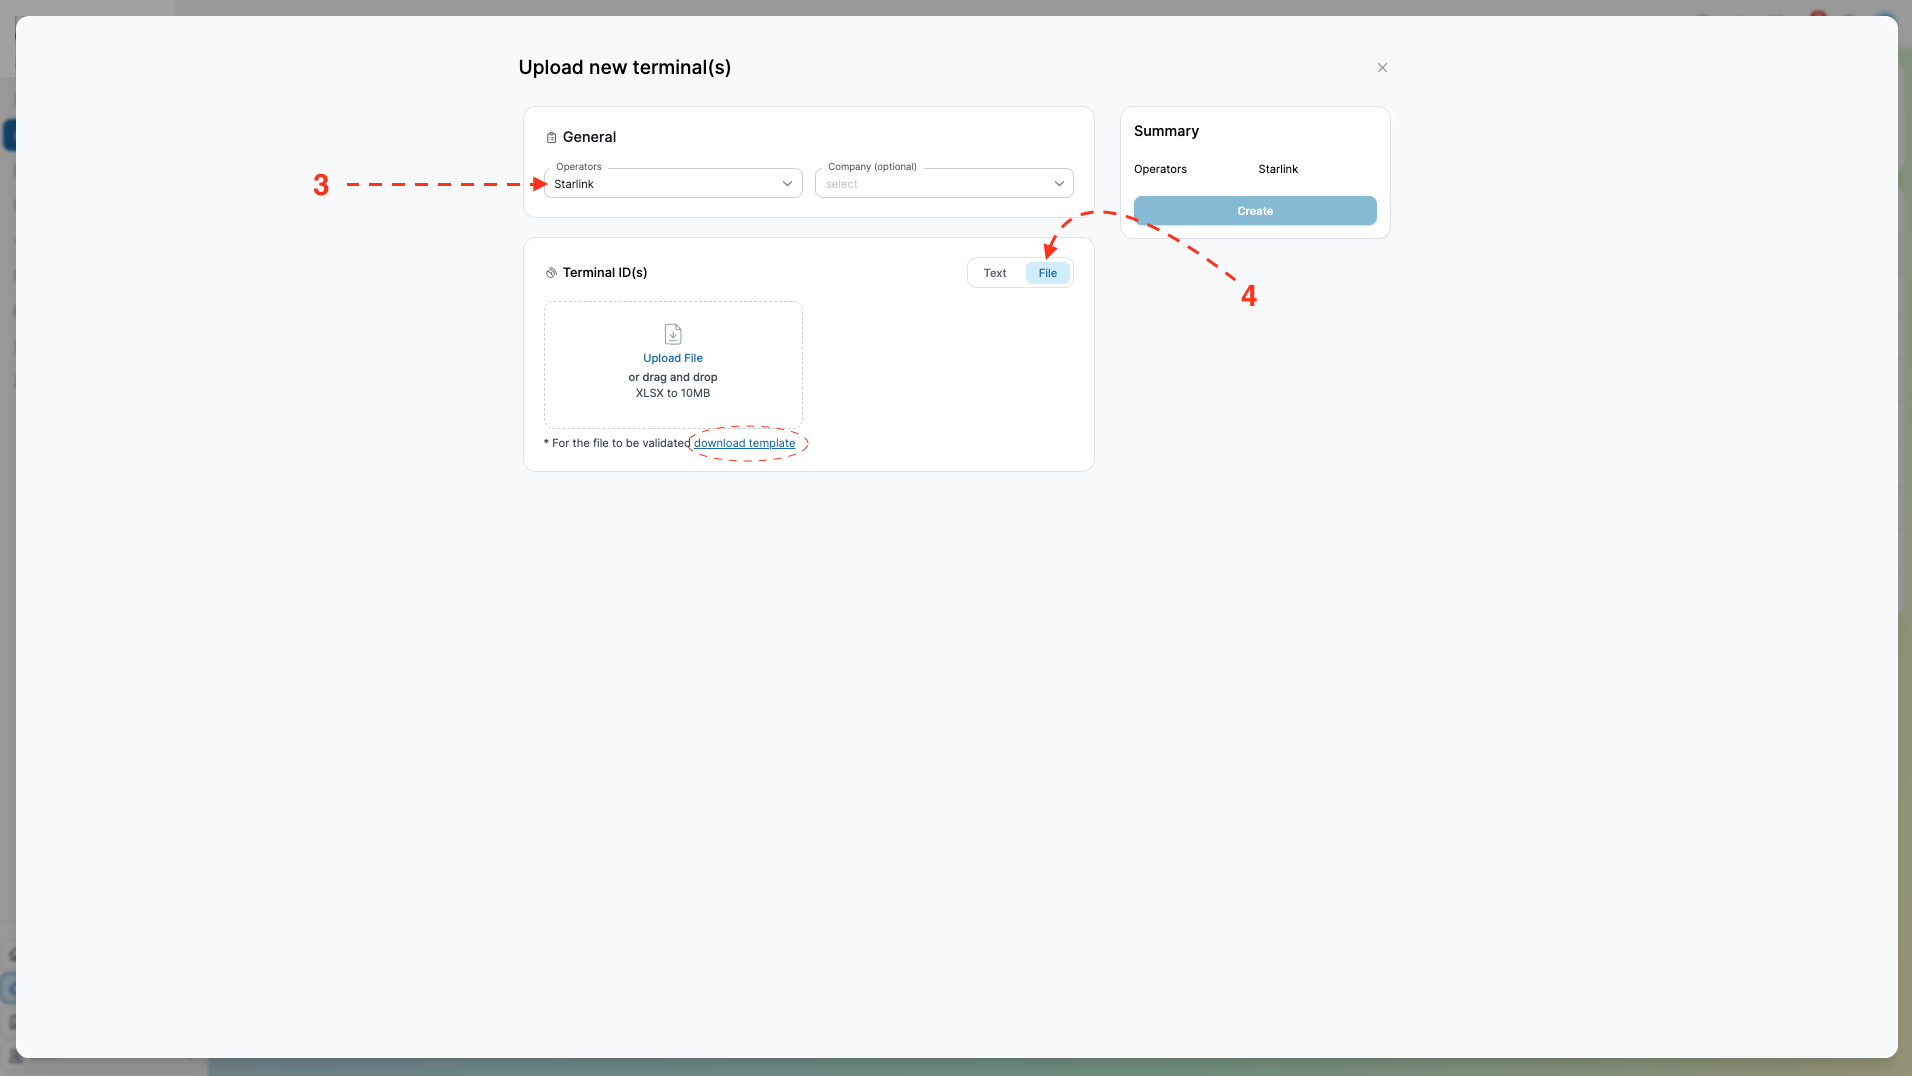
- A modal window will open. Select the Operator Starlink and the Company (optional).
- Click on "File" to upload your
.xlsxfile, then click "Create."
- A template file is also available for download to check which fields are needed for each Terminal.
The XLSX file can contain 10,000 Terminals or more. However, we recommend starting with a test upload of around 100 Terminals to ensure everything works as expected before uploading the full list.
Plans
On the Plans page, you can create and customize data bundles, assign SIM cards to Plans, and monitor Plan details. The table presents essential information about each Plan, including its name, type, associated operator, company, details, labels, and whether the Plan is prorated. You can also add preset configurations for quick and consistent Plan setup.
Types



Q&A
Why can't I select a company when creating a PAYGO plan?
The company list includes only companies that have Wallet enabled. PAYGO plans work exclusively with the Wallet feature, so if you don't have any companies with Wallet enabled, the company list will be empty when creating a PAYGO plan.Prepaid
Prepaid
- Purpose: A fixed balance valid for a defined period and monitored in real-time. Once the balance is used, the Terminal can be refilled manually or automatically.
- Validity Period: The validity period is set by the specific prepaid product (for example, 365 days), based on the validity days of the chosen plan.
- Payment Terms: One-time payment / Refill
- Payment Type: Transactions via Stripe or Invoice
- Overage: No – usage stops when the balance or remaining days reach zero.
- Activation Fee: No
- Re-fill: Yes, different balance with different price
- Auto refill of Terminal/SIM: Yes. Available for Companies
- Manual Refill of Terminal/SIM: Yes. Available for Organizations
- Refill/Autorefill with wallet: Yes
(Each refill extends the validity period of the prepaid product within the plan's validity days.)
- Prorate: No
- MRC: No
- Billing start date: The billing cycle starts when the first usage occurs, and days are counted from that point.
Additional Info
- Usage Terms:
Prepaid SIM cards have specific terms based on the operator’s contract. For example, if a SIM card remains inactive (no refills) for three years, it may be deactivated. These details vary and are specified in the operator's contract.
- Auto-Refill:
This feature automatically tops up the balance when it falls below a certain threshold (e.g., below 100 MB). The system charges either the company's card or the end user's card to the organization's account, and upon successful payment, the balance is updated instantly.
- Wallet Balance:
This option allows the client to store a larger sum in advance for auto-refills. For instance, instead of topping up multiple SIM cards frequently with small amounts, the client can deposit $1,000 to cover auto-refills as needed.
- Product Expiry:
Each Prepaid product comes with a usage term. For example, 1 GB of data may be valid for 365 days. If the balance is not refilled within that period, any remaining balance will expire. However, with every refill, the validity period extends from the refill date, ensuring the product can be used for a longer time as long as the balance is regularly topped up.
How to Create a Prepaid Plan
Complete the following steps:
- Go to the “Plans” button on your left side of the navigation menu
- On your right, press the “plus” button and choose the plan type you want to create
- When a new wizard appears, fill in all essential fields.
- If you want to make this plan available only to specific company(-ies), please activate the 'Company Designated Plan' toggle.
- Fill in all the required information in the Billing section.
IMPORTANT!
The price must be at least 1.0 when creating a plan.
Automation - Rules
The Automation Rules page allows you to create and manage rules that automate various processes. This functionality helps streamline operations, improve efficiency, and ensure that specific actions are triggered automatically based on predefined criteria.
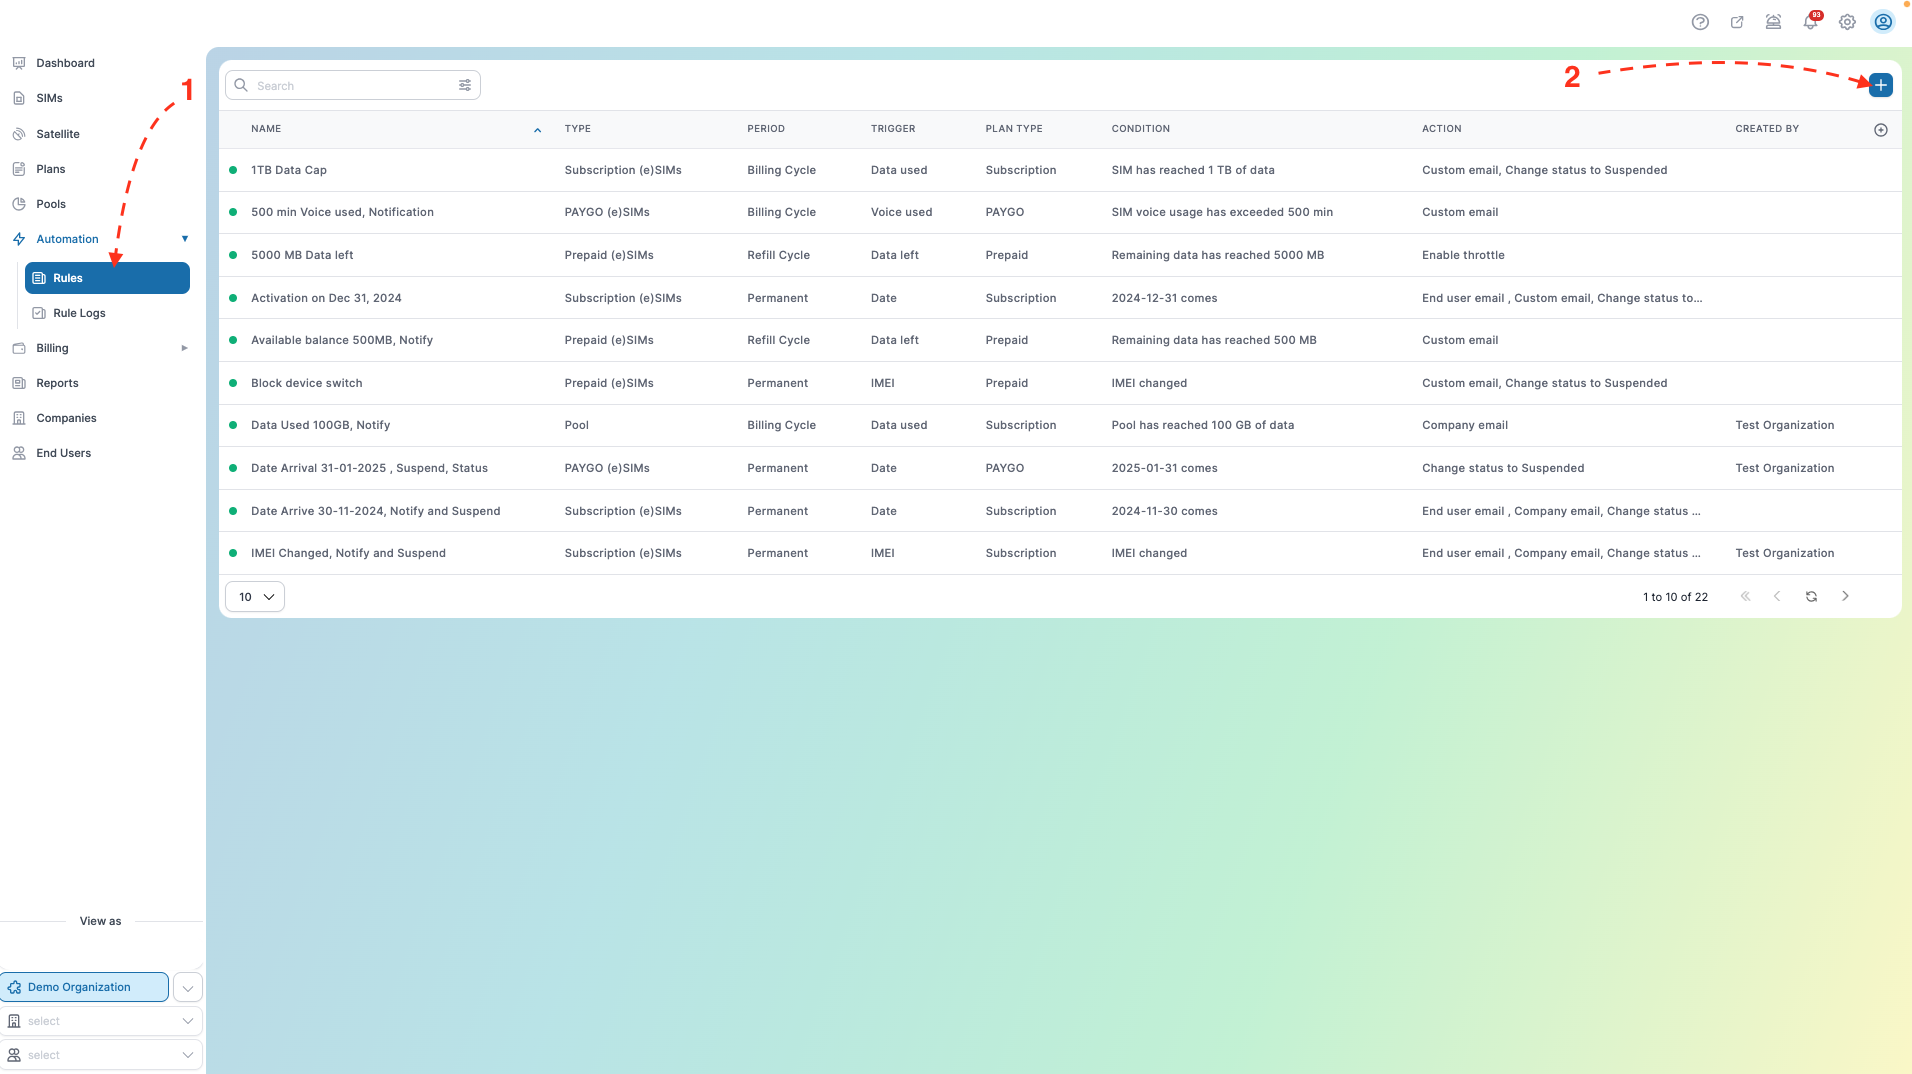
Rules are used to automate processes and consist of the following components:
- Rule Type
- Trigger
- Period
- Condition
- Value
- Actions
Each rule type comes with its own set of available triggers. Every trigger, in turn, is linked to a specific set of periods, conditions, and values. The available actions depend on the selected trigger, the account level, and user permissions.
Trigger list
| Trigger | Applies to | Triggered when |
|---|---|---|
| Status | SIM and Satellite | the status changes to the selected value (e.g., Activate/Suspend) |
| IMEI | SIM only | the IMEI changes |
| Date | SIM and Satellite | the specific date is reached (e.g., activation date, contract end date) |
| Data left | Prepaid | the remaining data balance falls to or below the specified threshold |
| Data used | Subscription, PAYGO, Pool | total data usage reaches the defined limit |
| Voice used | SIM only | voice usage reaches the specified number of minutes |
| Funds used | PAYGO only | the user has spent the defined amount of funds |
| Remaining balance | Wallet only | the wallet balance drops to the specified amount or lower. |
The rule should be triggered once the condition for the trigger is met. After that, it should perform all actions specified in the rule.
The rule should check the trigger immediately after assignment.
Action list
- Change status – Change the status of the entity to the specified one
- Suspended – Only applicable to the IMEI trigger
- Activate/Suspended
- Email notifications:
- Default account email – Send a notification email to the default account email
- Staff email – Send a notification email to the selected staff email
- Company email– Send a notification email to the default company email
- End user email– Send a notification email to the owner’s email
- Custom email(s) – Sends a notification to one or more manually specified email addresses (maximum of 5).
- Enable throttle – Sends a request to the Integrator to activate throttling (if supported by the operator).
- Push API – Send a webhook to the specified API endpoint.
Wallet
The Wallet is a prepaid balance you top up in advance, from which charges are drawn as they occur. Think of it as a float rather than a payment method: money goes in once, and purchases and refills draw from the same pool.
Wallets exist at two levels:
| Level | Where | Purpose |
|---|---|---|
| Company wallet | Company → Wallet tab | The company's own float, funding purchases across the company |
| End-user wallet | User → Finance tab | An individual user's float, for their own purchases and refills |
The Company wallet
On Organization level you can open a specific company and go to the Wallet tab, alongside Details, Staff, Pre-bill, Permissions and Log.
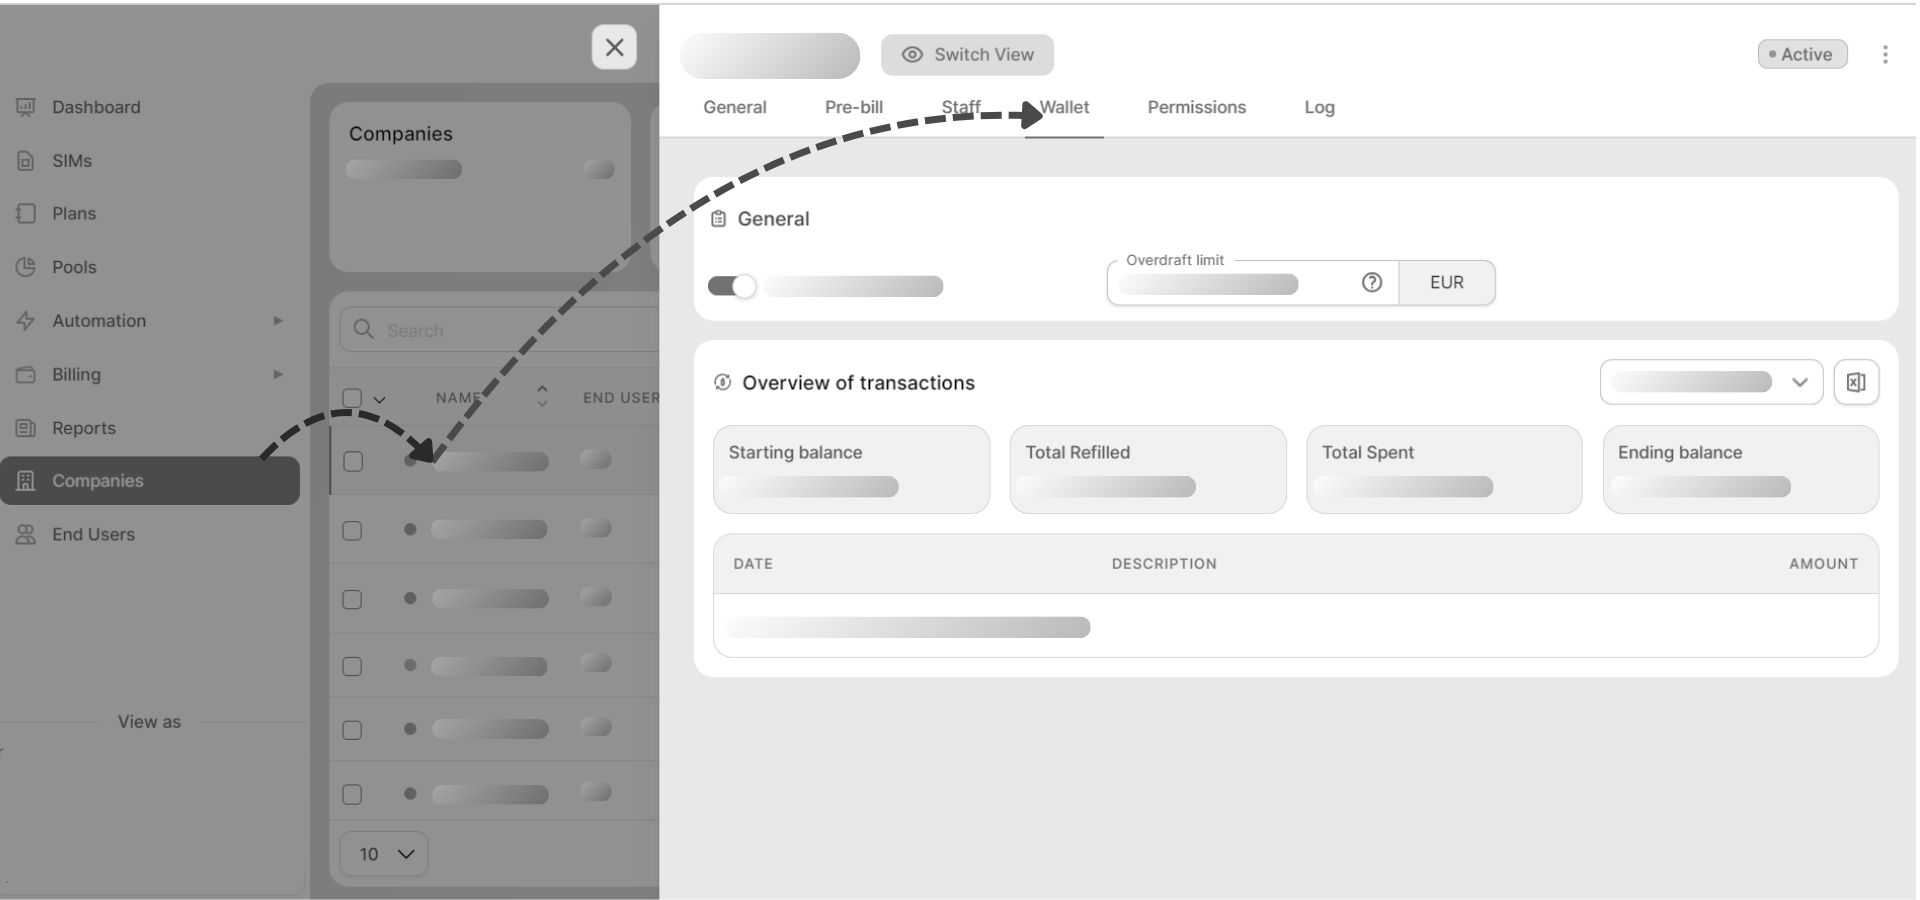
General
- Enable wallet — switches wallet functionality on or off for this company. Switching it off never deletes anything: the balance and full transaction history are preserved for when you switch it back on.
- Manual refill — adds funds to the wallet directly. This is the main way money goes in.
- Minimum balance — the threshold at which new purchases stop. As the screen says: once the wallet balance reaches the threshold, no new purchases will be made. You set the amount in the wallet's currency.
This is the setting people most often misread, so to be precise: it is not a cap on spending, it is the floor.
- Positive (e.g.
500.00) — a reserve that must stay in the account. Purchases stop before the balance falls below 500; that last 500 is untouchable. - Negative (e.g.
−500.00) — a permitted deficit. The company can go to −500 before purchases are blocked. - Zero — strict prepaid: spend down to zero, no further.
available to spend = current balance − minimum balance
A negative balance acts as a buffer for usage-based charges after the balance reaches zero, while new purchases are blocked when there are insufficient funds.
Manage rules
Automated rules tied to the remaining balance, each removable with ✕. A typical setup uses two — an early warning and an urgent one, for example at 500.00 EUR and 300.00 EUR remaining.
Each rule fires when the balance falls to its threshold and can notify people by email or call a webhook. Two rules at different levels works well: the first says plan a top-up, the second says do it now.
The End-user wallet
Open the user and go to the Finance tab.
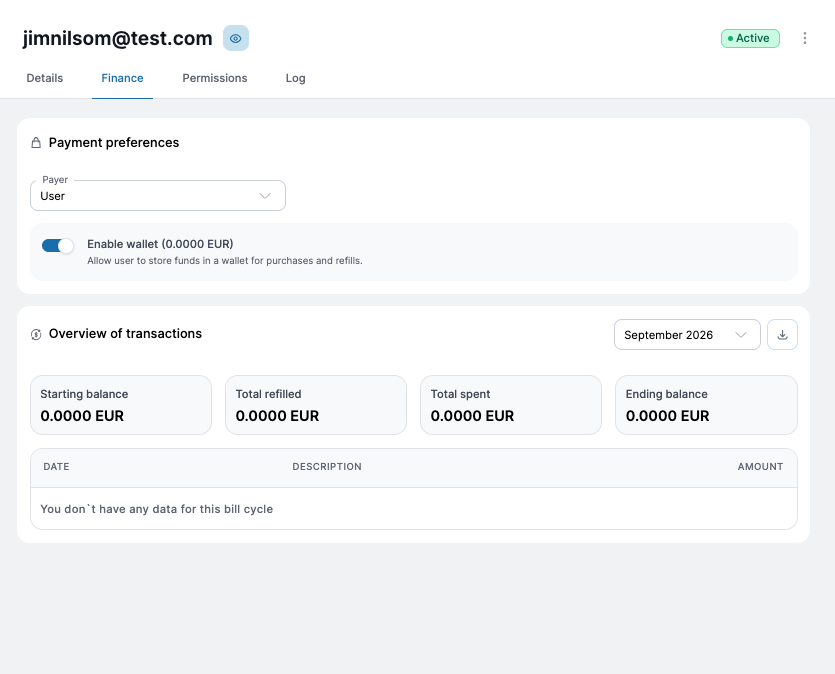
Payment preferences
Payer — the single most important setting on this screen. It decides who actually pays when this user makes a purchase:
| Option | Who pays | When to use it |
|---|---|---|
| Me | The company, directly | You fund everything centrally; the user makes no payments at all |
| User | The user, with their own payment method | The user is a paying customer and settles their own purchases |
| User from my wallet | The user initiates, but it is charged to your wallet | The user picks what they need, you carry the cost |
The third option is the one worth understanding properly. The user drives the purchase — chooses a bundle, triggers a refill — but the money comes out of the company wallet, not theirs. It is the right choice when you want to delegate the decision without delegating the payment.
PAYGO — company wallet only
On PAYGO there is no user selection. The Payer dropdown is not offered, and an end user cannot hold or spend from a wallet. Only the company can use the wallet.
The reason is structural: PAYGO is metered continuously rather than purchased as a bundle, so there is no "buy a refill" moment for a user to act on. Charges simply accrue against the company the SIMs sit under.
If you need per-customer isolation on PAYGO
Create a separate Company for each customer. Each Company gets its own Wallet tab, its own Minimum balance, its own rules and its own transaction history — so one customer's balance and usage never affect another's.
Organization
   └── Company  (one per customer)
          └── Wallet  (isolated balance)
                 └── SIMs
This gives you exactly the isolation the user-level wallet would have provided on Prepaid, with a clean monthly statement per customer.
The trade-off is administrative: more Companies to manage, each needing its wallet enabled, funded and ruled. For a handful of PAYGO customers that is straightforward; if you are planning hundreds, talk to us about the structure before you start creating accounts.
Setup checklist
For a company:
- Confirm the currency — it is fixed once the wallet is enabled.
- Switch on Enable wallet.
- Set the Minimum balance.
- Make a first Manual refill.
- Add at least two balance rules at different thresholds.
- Check the Ending balance before assigning SIMs or plans.
For each user under it (Prepaid / Day Pass only):
- Set the Payer — Me, User, or User from my wallet.
- Switch on Enable wallet if the user will hold their own funds.
Overview of transactions
Pick a period from the selector (e.g. September 2026) and use the download button to export the statement. The same four tiles appear at both company and user level:
| Tile | What it tells you |
|---|---|
| Starting balance | What was in the wallet at the start of the period |
| Total refilled | Everything added during the period |
| Total spent | Everything drawn down during the period |
| Ending balance | Where things stand now |
Starting + Refilled − Spent = Ending, which makes this the fastest sanity check on a month. Amounts show four decimal places, because usage charges are often fractions of a currency unit.
Transaction history
Date, Description (an eSIM purchase, a refill, a usage charge) and Amount, negative for charges. On a fresh or inactive wallet you will see "You don't have any data for this bill cycle" — that is normal, not an error.
Use the Overview tiles to notice something is off, and the history to find out what.
Webhooks
This section briefly describes the concept of webhooks and how to use them with the platform. It provides basic terms and definitions related to the topic of webhooks, as well as the main entities and examples of payloads that your application can receive.





End User Model
End User Model - is an extended model from Account Model for show platform end user parameters. The fields of the End User model are presented in the table (Table 4.3), with an example below (Listing 4.2).
Table 4.3 - Fields of End User Model
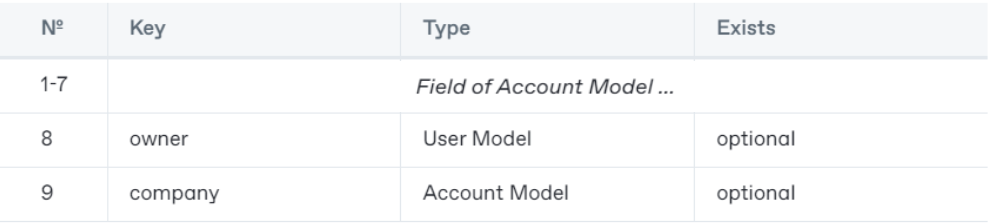
Listing 4.2 - Example of End User Model (JSON)
{
     "uuid":                    "ff472de7-59b2-425d-96ec-9d1ff4bab684",
     "name":                    "Example End User",
     "status":                  {...//Status Model},
     "currency_code":           "EUR",
     "email_for_notification":  "email.notif@gmail.com",
     "vat_number":              "1234567890",
     "address":                 {...//Account Address Model},
     "owner":                   {...//User Model},
     "company":                 {...//Account Model}
}
Settings
The Settings page provides access to essential configuration options for managing your account and platform functionality.








Account Settings
The Account Settings page serves as a comprehensive hub for managing essential information related to your account. This section is organized into four key areas: Billing Info, Address Info, Contact Info, and Default Settings.
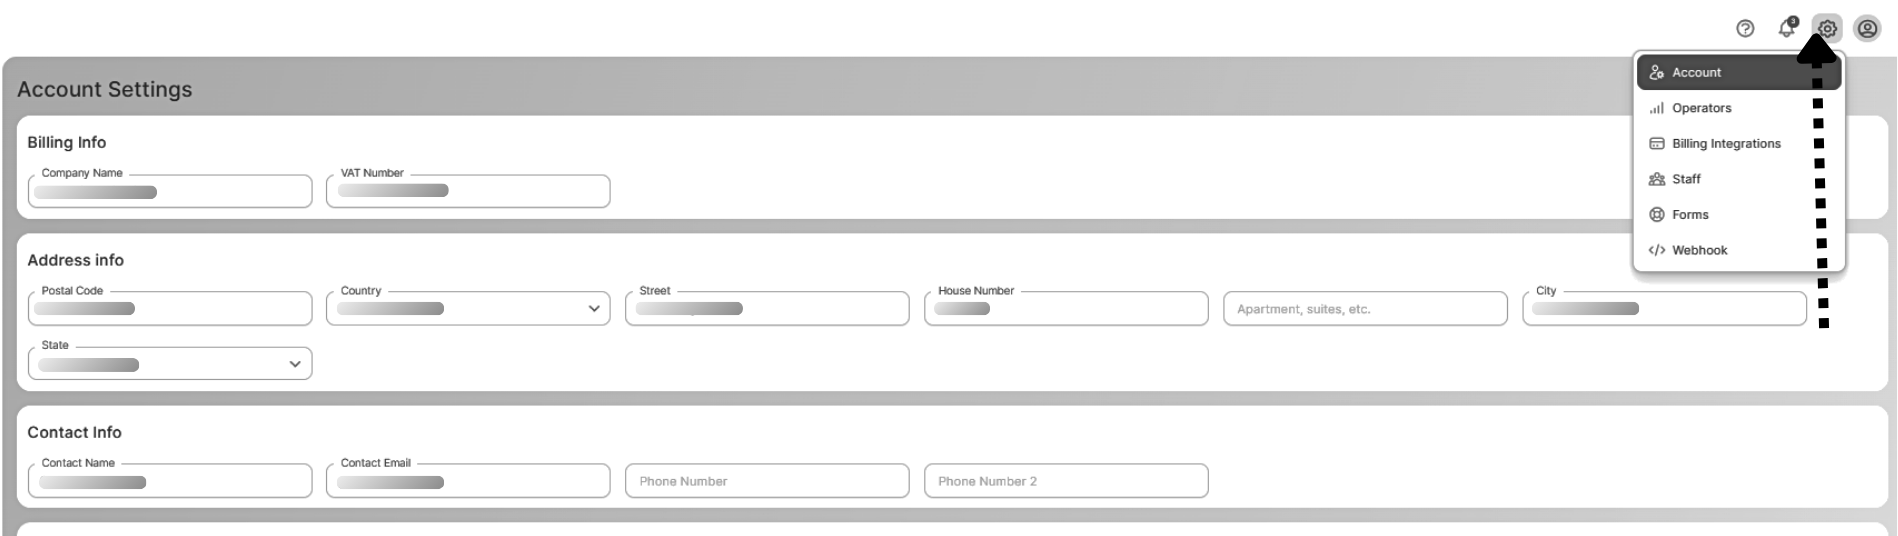
1. Billing Info
In the Billing Info section, users can enter and update their company’s financial details. This includes:
- Company Name: The official name of your organization as it appears on billing statements and legal documents.
- VAT Number: A unique identification number assigned to your business for value-added tax purposes, necessary for invoicing and tax compliance.
This information is crucial for ensuring accurate billing and compliance with financial regulations.
2. Address Info
The Address Info section allows users to provide their organization's physical address for billing and communication purposes. The fields include:
- Postal Code: The postal code for your business location, ensuring accurate mail delivery.
- Country: The country where your organization is located.
- Street: The street address of your business.
- House Number / Apartment: Specific house or apartment number to pinpoint your location.
- City: The city where your organization operates.
- State: The state or region of your business address, if applicable.
Having accurate address information is essential for effective communication and service delivery.
3. Contact Info
The Contact Info section is designed to maintain up-to-date contact information for the primary point of contact within your organization. This includes:
- Contact Name: The name of the person responsible for managing account-related inquiries.
- Contact Email: The email address for the primary contact, ensuring prompt communication regarding account matters.
- Phone Number: The primary phone number for reaching the contact person.
- Phone Number 2: An optional secondary phone number for additional contact methods.
This section ensures that communication is streamlined and that support can be provided efficiently.
4. Default Settings
The Default section allows users to set preferences for their account. This includes:
- Currency: The default currency is set so that you don't have to select it repeatedly when creating a plan.
- Email for Notifications: The email address designated to receive notifications related to account activity, such as billing alerts, service updates, and other important communications.
Team and Security
The Staff page allows the Organization to register team members and manage their access rights on the platform. This functionality ensures that each staff member has the appropriate permissions to perform their tasks while maintaining security and control over sensitive information.
Complete the following steps:
- Go to Settings.
- Click on Team and Security
- Click on the Staff member you want to edit access for
- Go to the Permissions tab and check or uncheck the appropriate box next to the relevant field.
1. Automation (Allow / Restrict)
This section governs the automation rules for staff. Administrators can set permissions for various actions related to automation:
- Rule: Control access to automation rules by allowing or restricting staff from:
- Add: Create new automation rules.
- View: Access existing rules.
- Edit: Modify existing rules.
- Delete: Remove rules from the system.
2. Company (Allow / Restrict)
This section focuses on permissions related to company management:
- Payment Method: Manage payment methods for the company by allowing or restricting actions to:
- Add: Introduce new payment methods.
- View: Access current payment methods.
- Delete: Remove existing payment methods.
- Staff: Control access to staff management features:
- Add: Create new staff profiles.
- View: Access staff information.
- Edit: Modify staff profiles.
- Delete: Remove staff members.
- Log: View action logs of staff activities.
- Permissions: Manage individual permissions for staff.
- Reset: Reset staff passwords.
- Webhook: Set permissions for webhook management:
- View: Access existing webhooks.
- Update: Modify webhook settings.
3. eSIM Store (Allow / Restrict)
In this section, administrators can control access to the eSIM store:
- View: Allow or restrict staff from viewing eSIM offerings.
- Update: Enable or disable staff from updating eSIM inventory or pricing.
4. End-User (Allow / Restrict)
This section manages permissions related to end-user management:
- Add: Create new end-user profiles.
- View: Access end-user details.
- Edit: Modify existing end-user profiles.
- Delete: Remove end-users from the platform.
- Permissions: Manage permissions for end-users.
- Payment Method: Control access to end-user payment methods:
- Add: Create new payment methods.
- View: Access current payment methods.
- Delete: Remove payment methods.
- Staff: Manage staff assigned to specific end-users with similar permission controls as listed above.
5. SIM Card (Allow / Restrict)
This section governs the management of SIM cards:
- Add: Create new SIM card entries.
- View: Access details of existing SIM cards.
- Edit: Modify SIM card information.
- Delete: Remove SIM cards from the system.
- Actions: Control various SIM card actions, including:
- Assign/Unassign Company: Manage company assignments for SIM cards.
- Assign/Unassign End-User: Manage end-user assignments.
- Assign/Unassign Plan: Link SIM cards to specific plans.
- Assign/Unassign Rule: Apply automation rules to SIM cards.
- Assign/Unassign Label: Tag SIM cards for better organization.
- Cancel Location: Manage location settings for SIM cards.
- Change Status: Modify the status of SIM cards.
- Send SMS: Control SMS functionality for SIM cards.
- SIM Swap: Manage SIM swapping procedures.
- Update Note: Add notes to SIM card records.
- Manual Refill: Perform manual refills for prepaid SIM cards.
6. Satellite (Allow / Restrict)
T
his section governs the management of Terminals:
- Add: Create new invoice templates.
- View: Access existing invoices.
- Edit: Modify invoice details.
- Delete: Remove invoices from the system.
- Actions: Control various SIM card actions, including:
- Assign/Unassign Company: Manage company assignments for Terminals.
- Assign/Unassign Plan: Link Terminals to specific plans.
- Assign/Unassign Label: Tag Terminals for better organization.
- Change Status: Modify the status of Terminals.
- Update Note: Add notes to Terminal records.
7. Invoice Software (Allow / Restrict)
This section controls access to invoice management features:
- Add: Create new invoice templates.
- View: Access existing invoices.
- Edit: Modify invoice details.
- Delete: Remove invoices from the system.
- Parameters: Set permissions for viewing and editing invoice parameters.
7. Operator (Allow / Restrict)
Manage telecom operator details:
- Add: Create new operator profiles.
- View: Access information about existing operators.
- Edit: Modify operator details.
- Delete: Remove operators from the system.
8. Organization (Allow / Restrict)
This section allows control over organizational settings:
- View: Access organization details.
- Edit: Modify organizational information.
- Staff: Manage staff related to the organization with similar permissions as outlined in previous sections.
- Webhook: Manage webhooks specific to the organization.
9. Payment (Allow / Restrict)
This section controls access to payment management:
- View: Allow or restrict staff from accessing payment details.
10. Billing (Allow / Restrict)
Manage billing settings and permissions:
- View: Access billing information.
- Edit: Modify billing settings.
- Advance Billing Enable: Control whether advance billing options are available.
- Create: Allow or restrict staff from creating billing entries.
11. Plan (Allow / Restrict)
Control access to service plans:
- Add: Create new service plans.
- View: Access details of existing plans.
- Edit: Modify plan information.
- Delete: Remove plans from the system.
12. Pool (Allow / Restrict)
Manage access to resource pools:
- Pool: Control permissions for adding, viewing, editing, and deleting resource pools.
13. PSP (Allow / Restrict)
Manage Payment Service Provider settings:
- Add: Create new PSP entries.
- View: Access details of existing PSPs.
- Edit: Modify PSP information.
- Delete: Remove PSPs from the system.
Billing Integrations
The Billing Integrations page is designed to manage and monitor financial transactions through integrated payment service providers (PSPs) and invoicing systems.
1. PSPs (Payment Service Providers)
This section provides an overview of transaction data from various payment service providers integrated into the platform. For each PSP, you can view both monthly and total transaction details, presented in EUR and transaction count.
1) Stripe
- To set up the integration with Stripe, you will need to enter your Key and Secret.
- Follow up on the instructions below
- Open your Stripe Dashboard and navigate to the "Developers" page. Find "Webhooks" in the tabs list and select it. Click the designed button to add an endpoint URL, then enter the following URL:
https://<your-platform-url>/webhook/d813177c-51af-4836-8ab7-0c146ad6a886/stripe - For next step, add the events to listen to by selecting the following list of 9 events:
- charge.refunded
- charge.succeeded
- charge.updated
- setup_intent.succeeded
- source.canceled
- source.chargeable
- payment_intent.succeeded
- payment_method.attached
- payment_method.detached
- Save these settings by clicking the "Add endpoint" button to complete the Stripe webhook setup.
2) PayPal
To integrate with PayPal, you will need to provide the following details:
- Endpoint
- Username
- Password
- Checkout
- Signature
3) Cardknox (pending)
To integrate with Cardknox, you will need to provide the X-key
4) Mollie
To integrate with Cardknox, you will need to provide the API Key
If you plan to use only Subscription - PSP is not needed
2. Invoice Integration
This section allows you to add and manage third-party invoicing systems to streamline your billing process. By clicking the “+” button, you can integrate with supported invoicing platforms:
- WeFact: A cloud-based invoicing system.
- Xero: A popular accounting software for small businesses.
Once integrated, these systems allow for automated invoice generation and management, enhancing billing efficiency on the platform.
You as an Organization can connect all your products there and on the platform using SKU, and customers using Identifier.
Important
If a Company or End User wants to make a payment, they can only use the payment methods linked by the organization. If the organization has not linked any payment systems, it means that the company and end user cannot make any payments (it all depends on the product type being used).
VAT
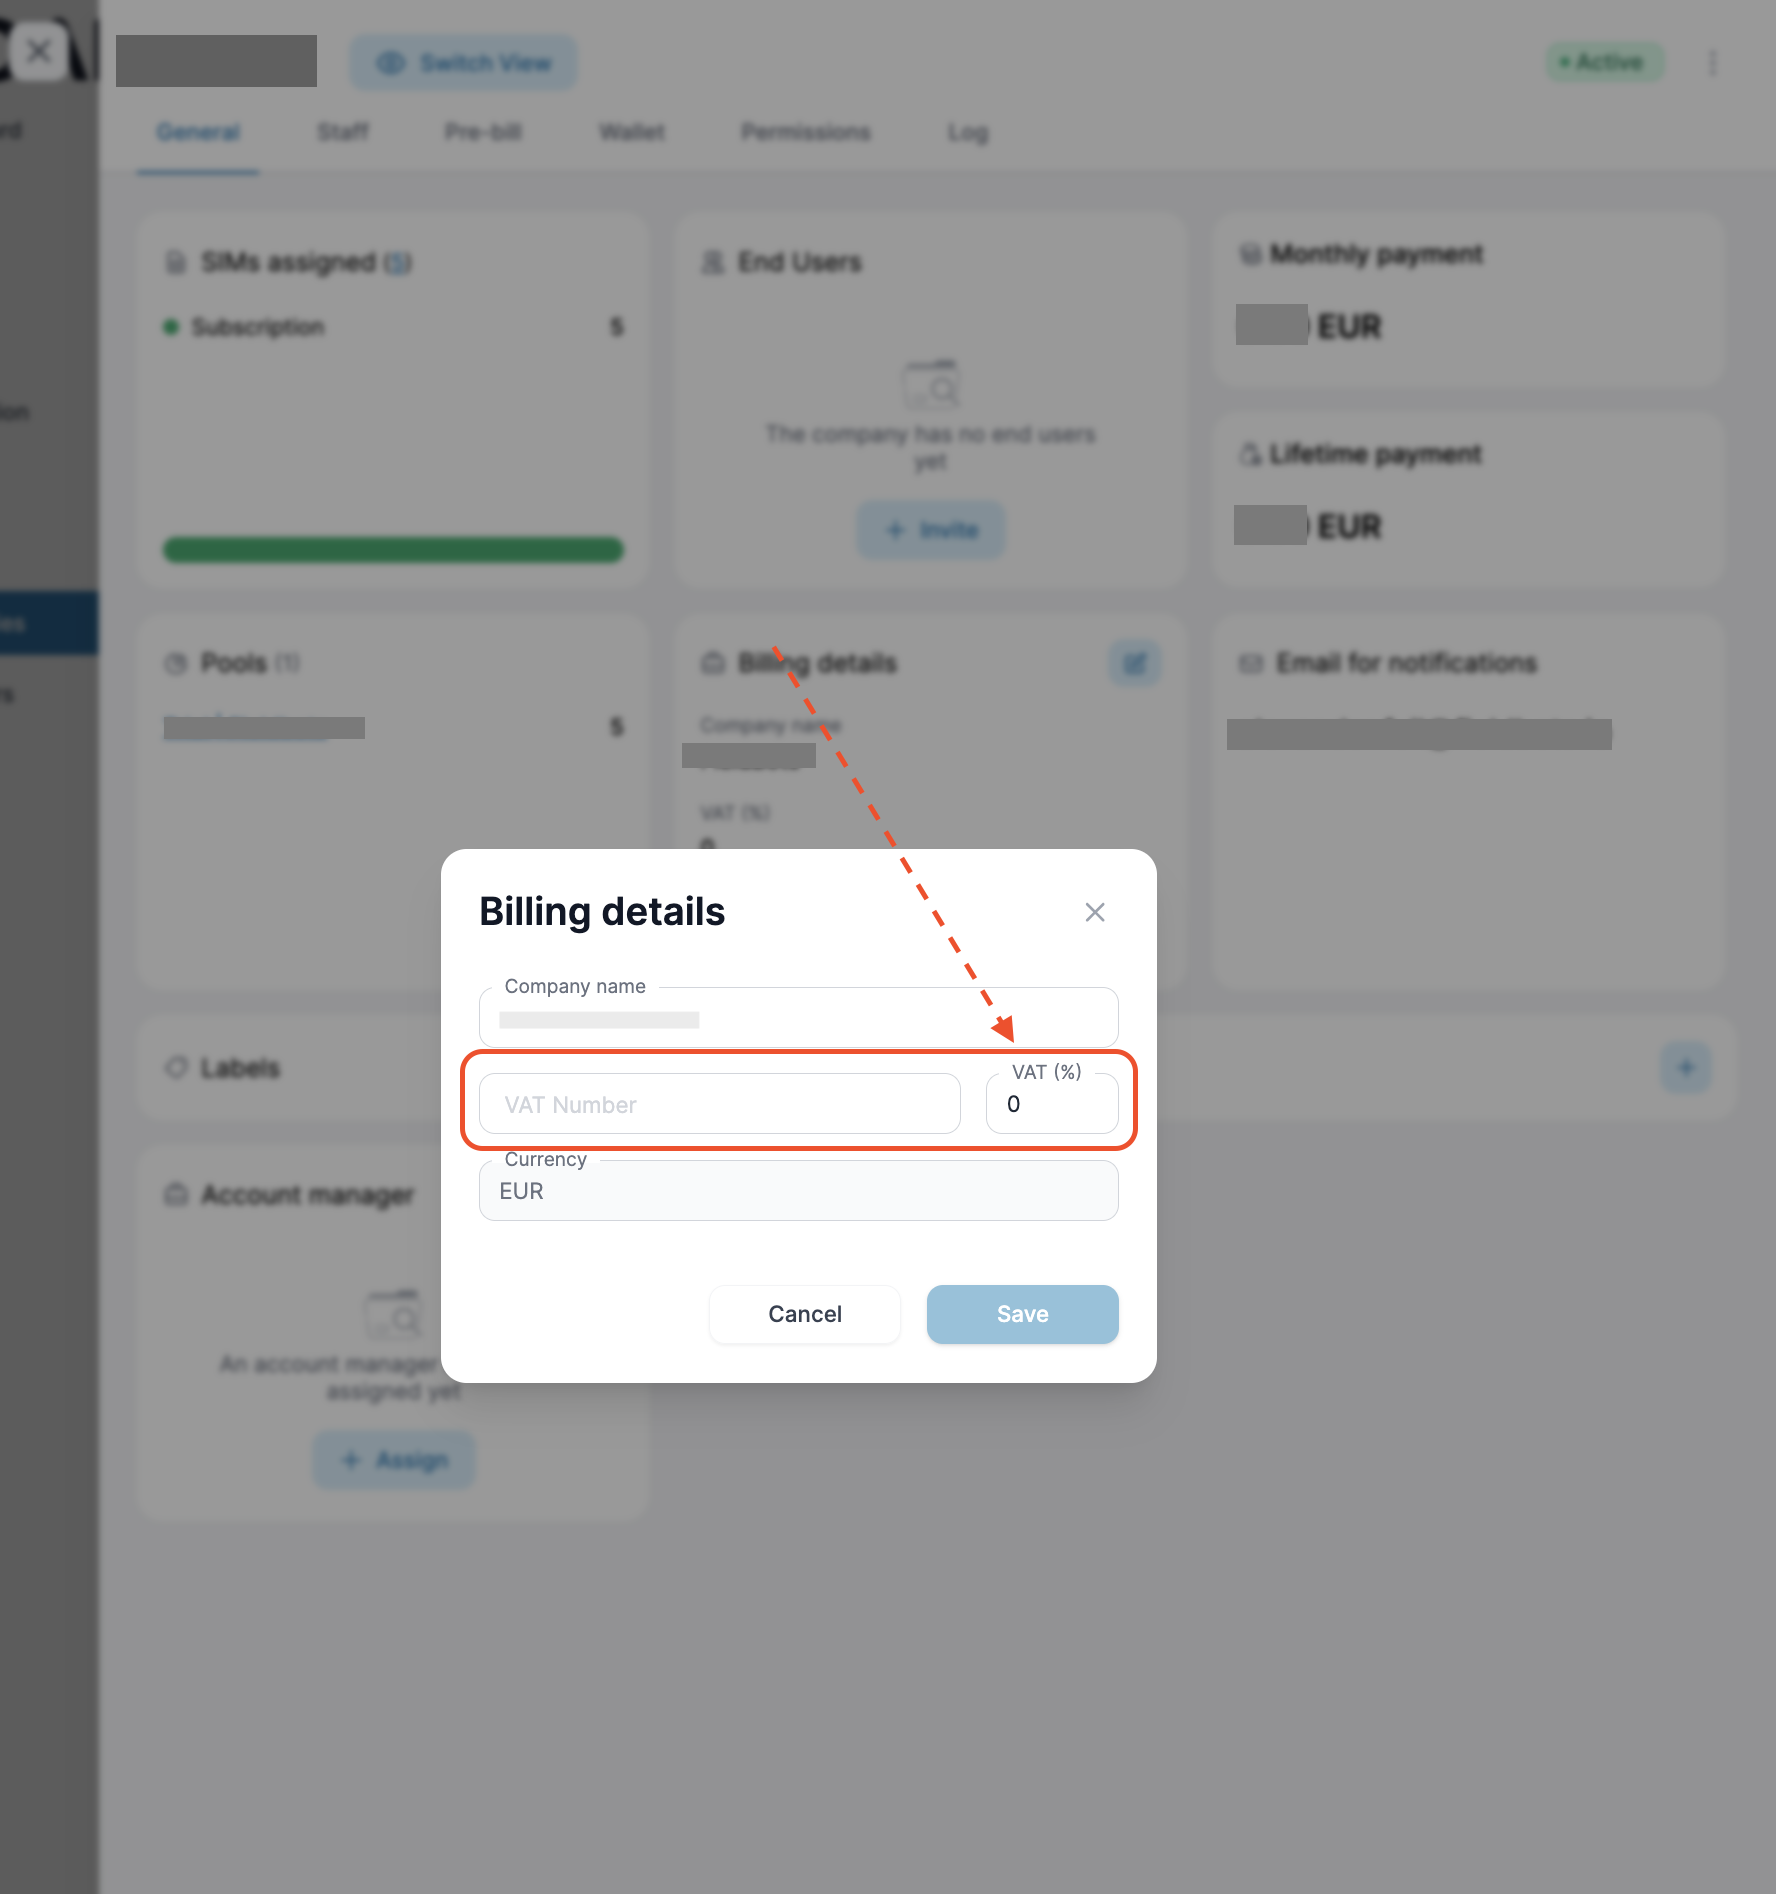
You can set a default VAT percentage to apply to all external transactions, with the flexibility to customize it for individual customers as needed.
To update a customer's VAT percentage:
- Navigate to the Companies or End Users tab in the main Menu.
- Select the relevant company/customer
- In the General tab, navigate to Billing Details and click Edit.
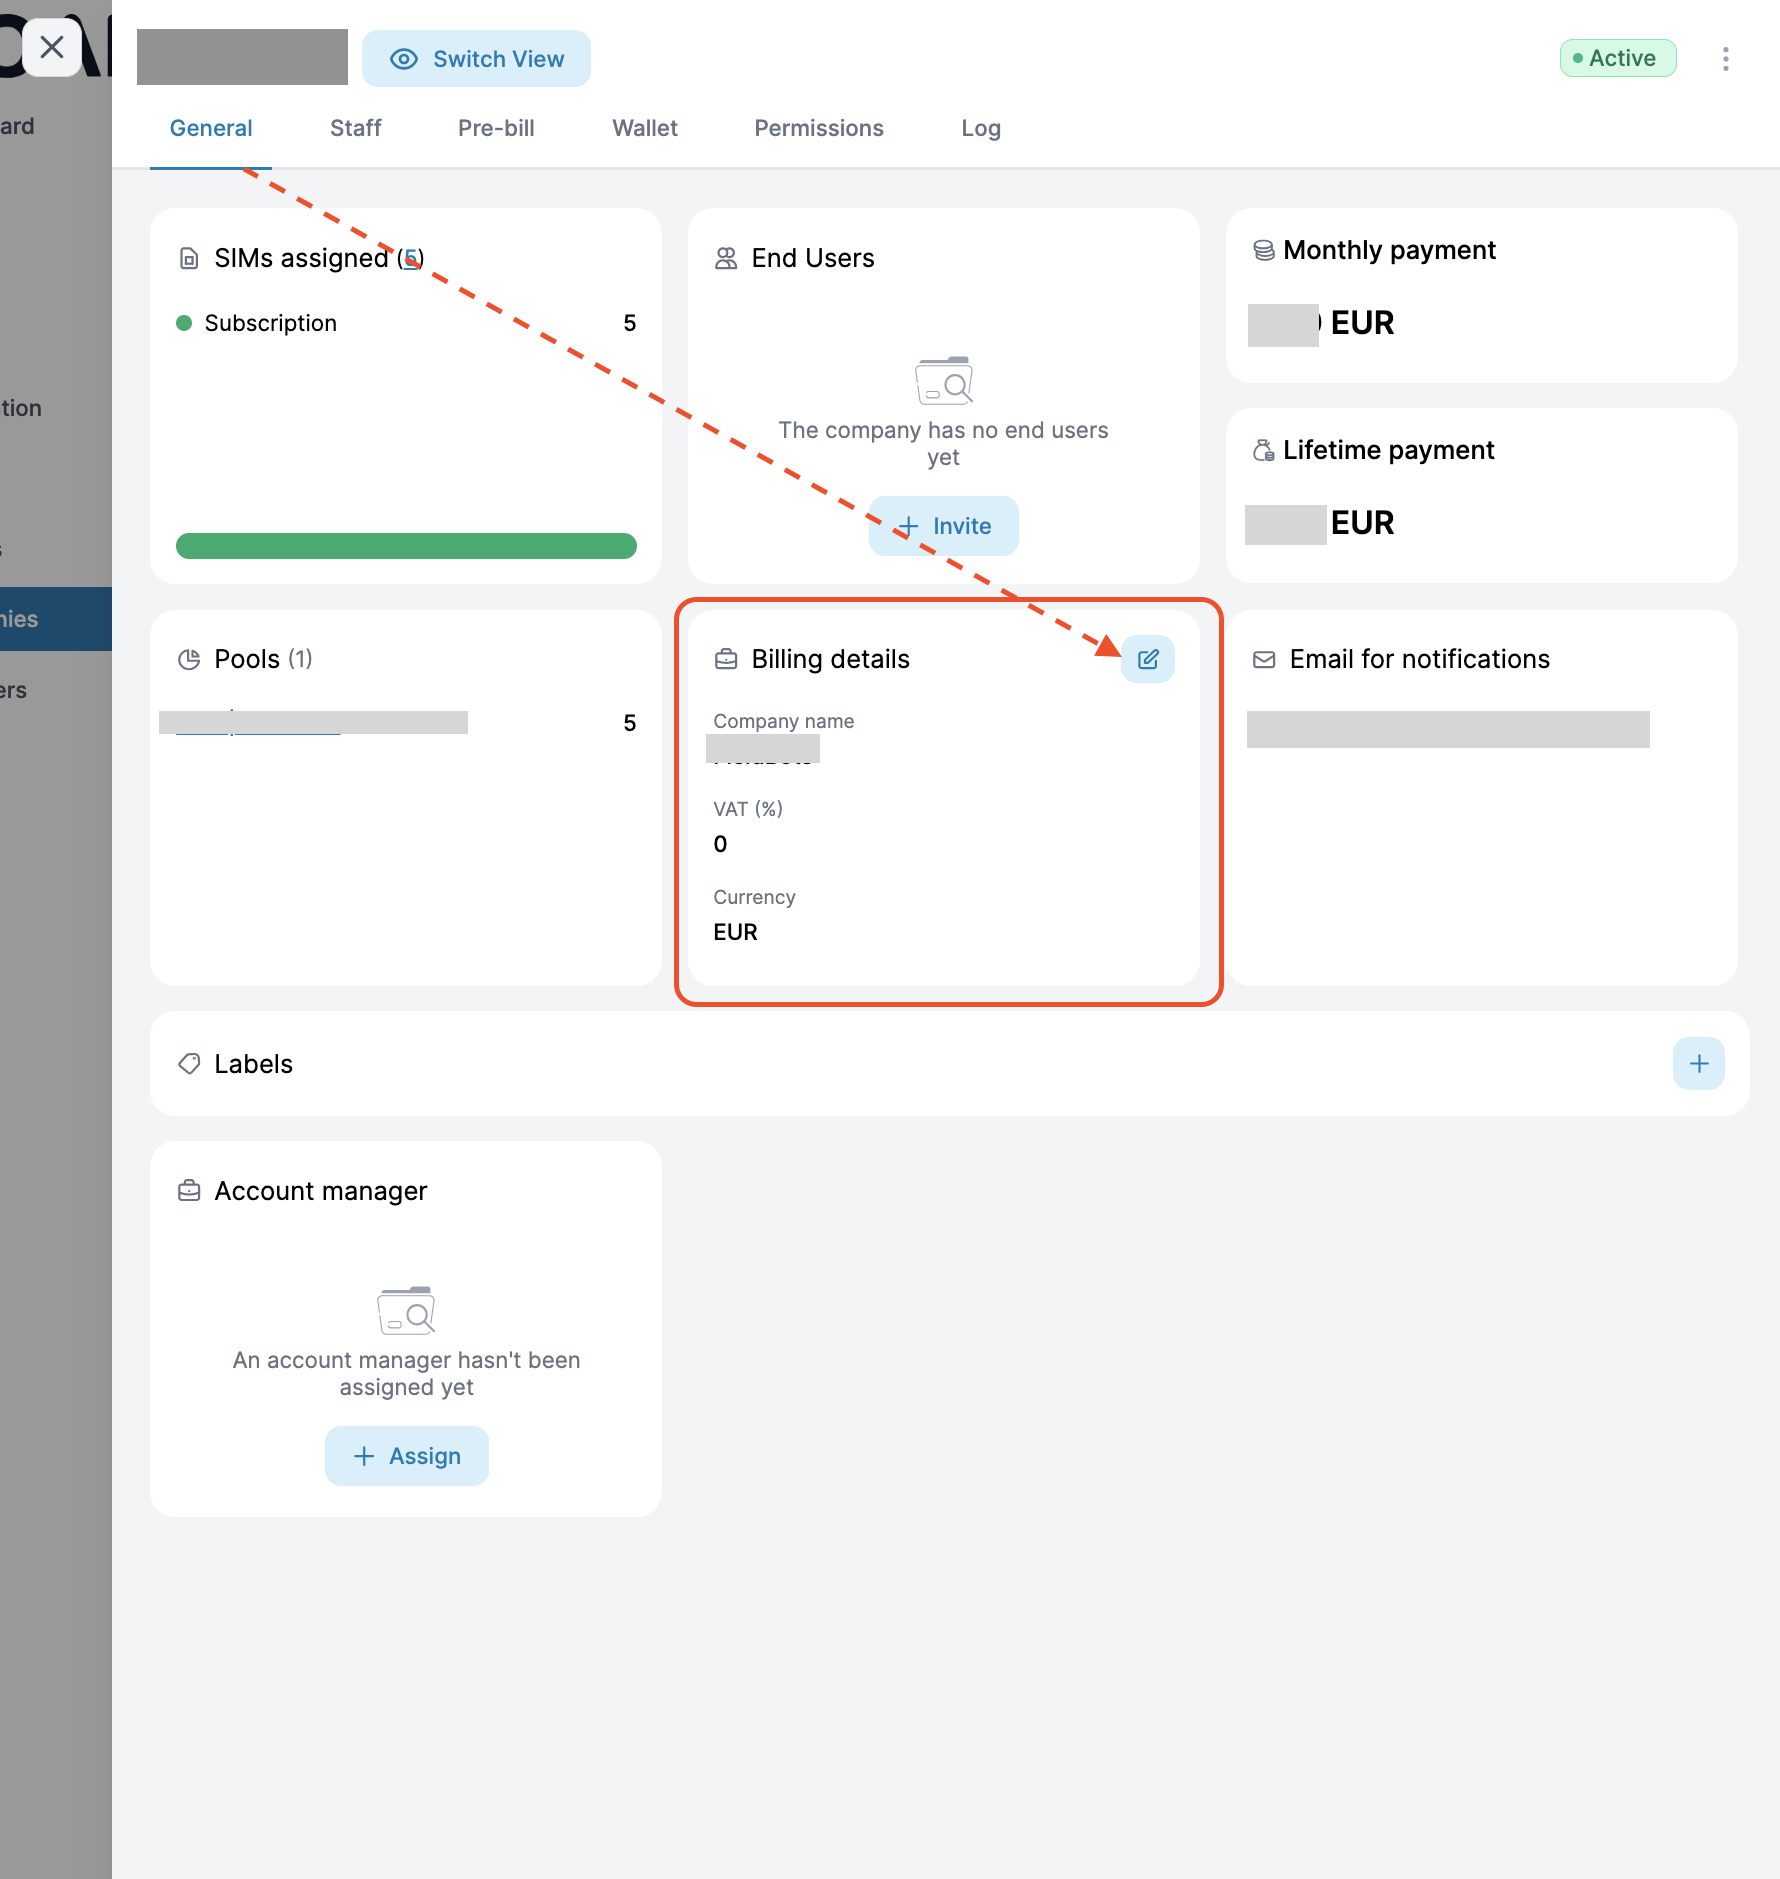
- Adjust the VAT percentage under Billing Details, or specify it when creating a new company.
Important
- VAT is calculated and added to the amount being refilled.
-
For example, when a client refills a wallet, VAT is applied based on the set percentage.
-
If VAT is set to 0%, VAT will not be collected on any transaction or refill, and the system will not apply VAT to platform prices.
- For example, If the default VAT is 0%, prices will be shown without VAT, and no VAT will be charged on transactions.
VAT Application on Platform Prices
- By default, all platform prices are displayed excluding VAT.
- Once VAT is configured in the organization settings, it is automatically applied to platform prices unless a different VAT percentage is specified for a specific company.
Custom Link(s)
Set your custom external links in the account settings and specify who can view them—just you or your company as well.
How to use:
1) Go to the account settings,
2) Find the 'Custom Menu'
3) Enter your external links if you'd like.
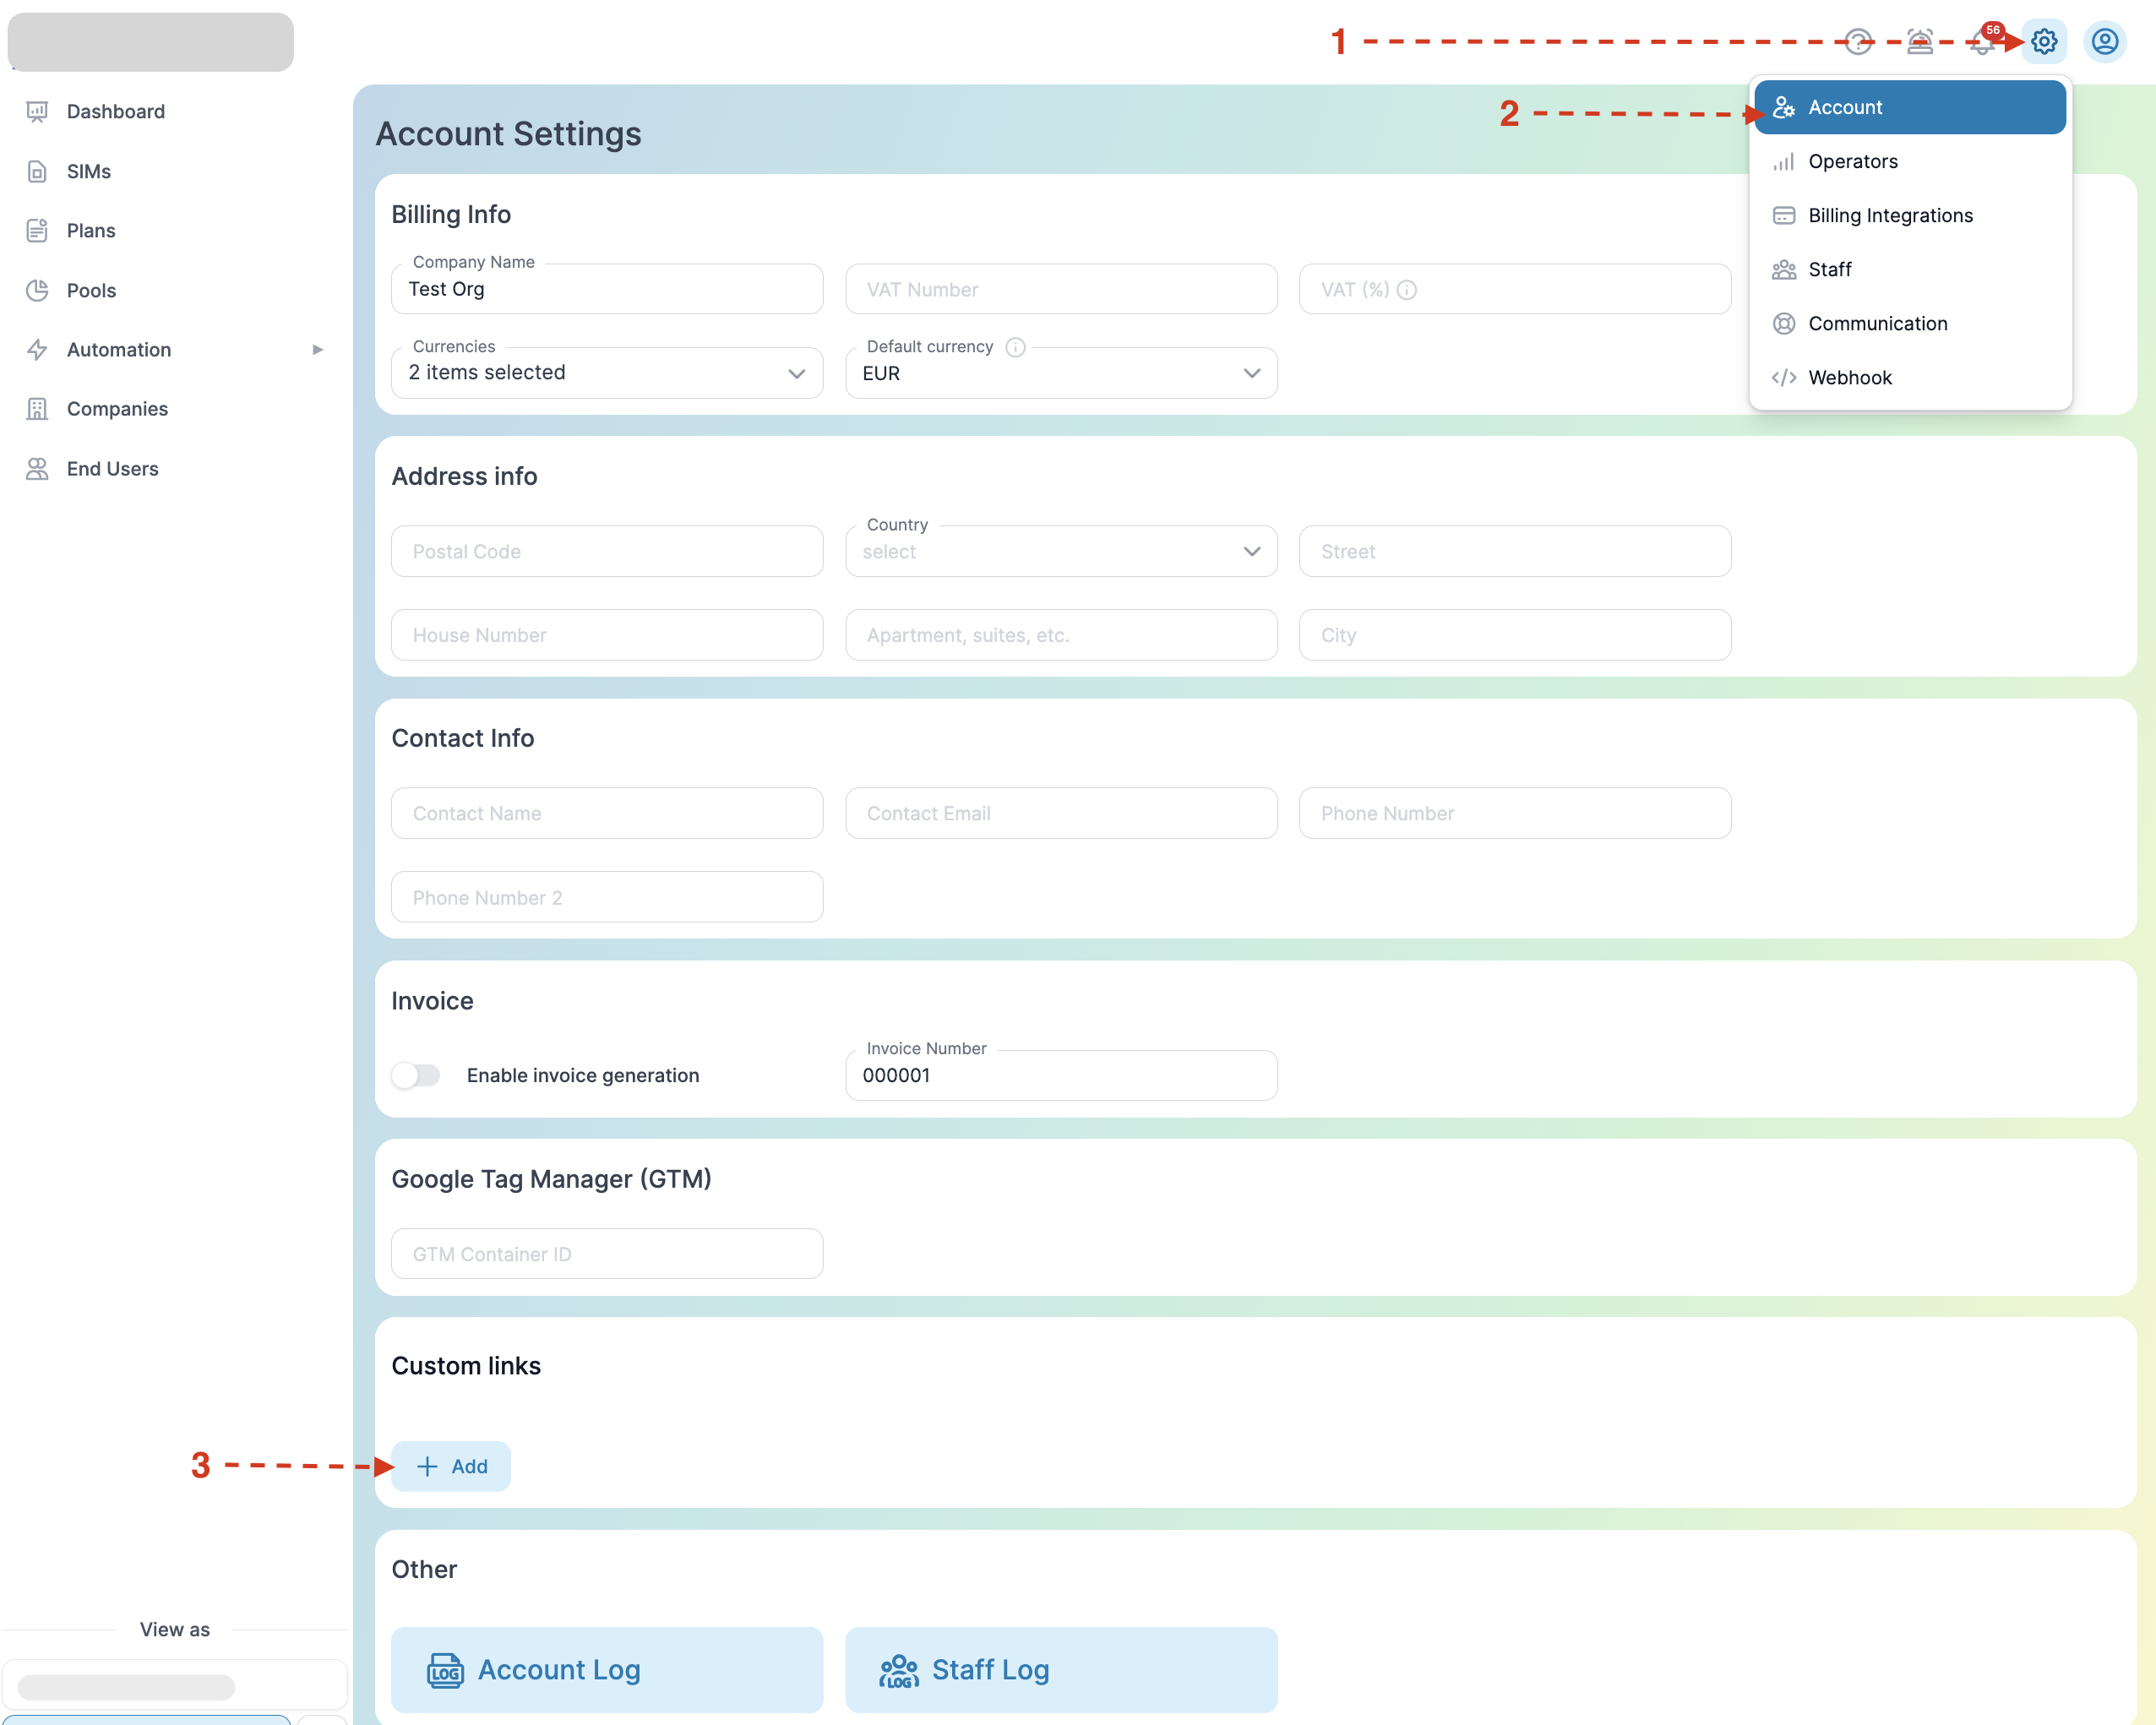
4) The links you add will appear in the top navigation menu.
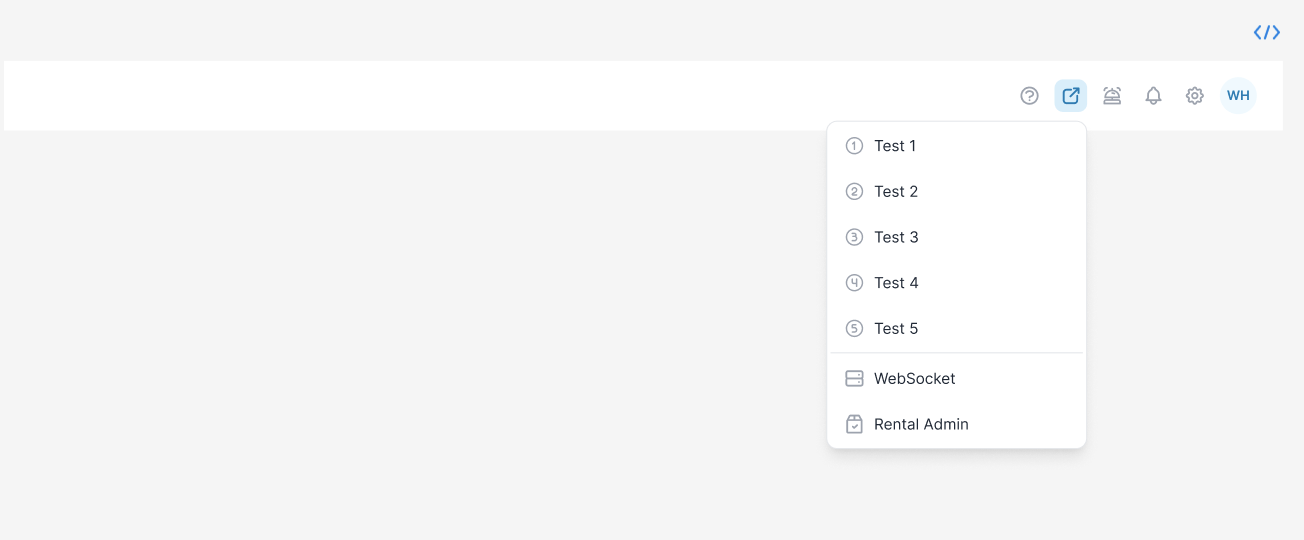
Important:
You can add up to 5 external links, which will be displayed in the header navigation.
Upload SIMs
As an organization, you can upload SIMs to the platform by following these steps:
- Go to the SIMs from the menu on the left.
- Choose either "Upload SIM Details" or click the plus (+) button.
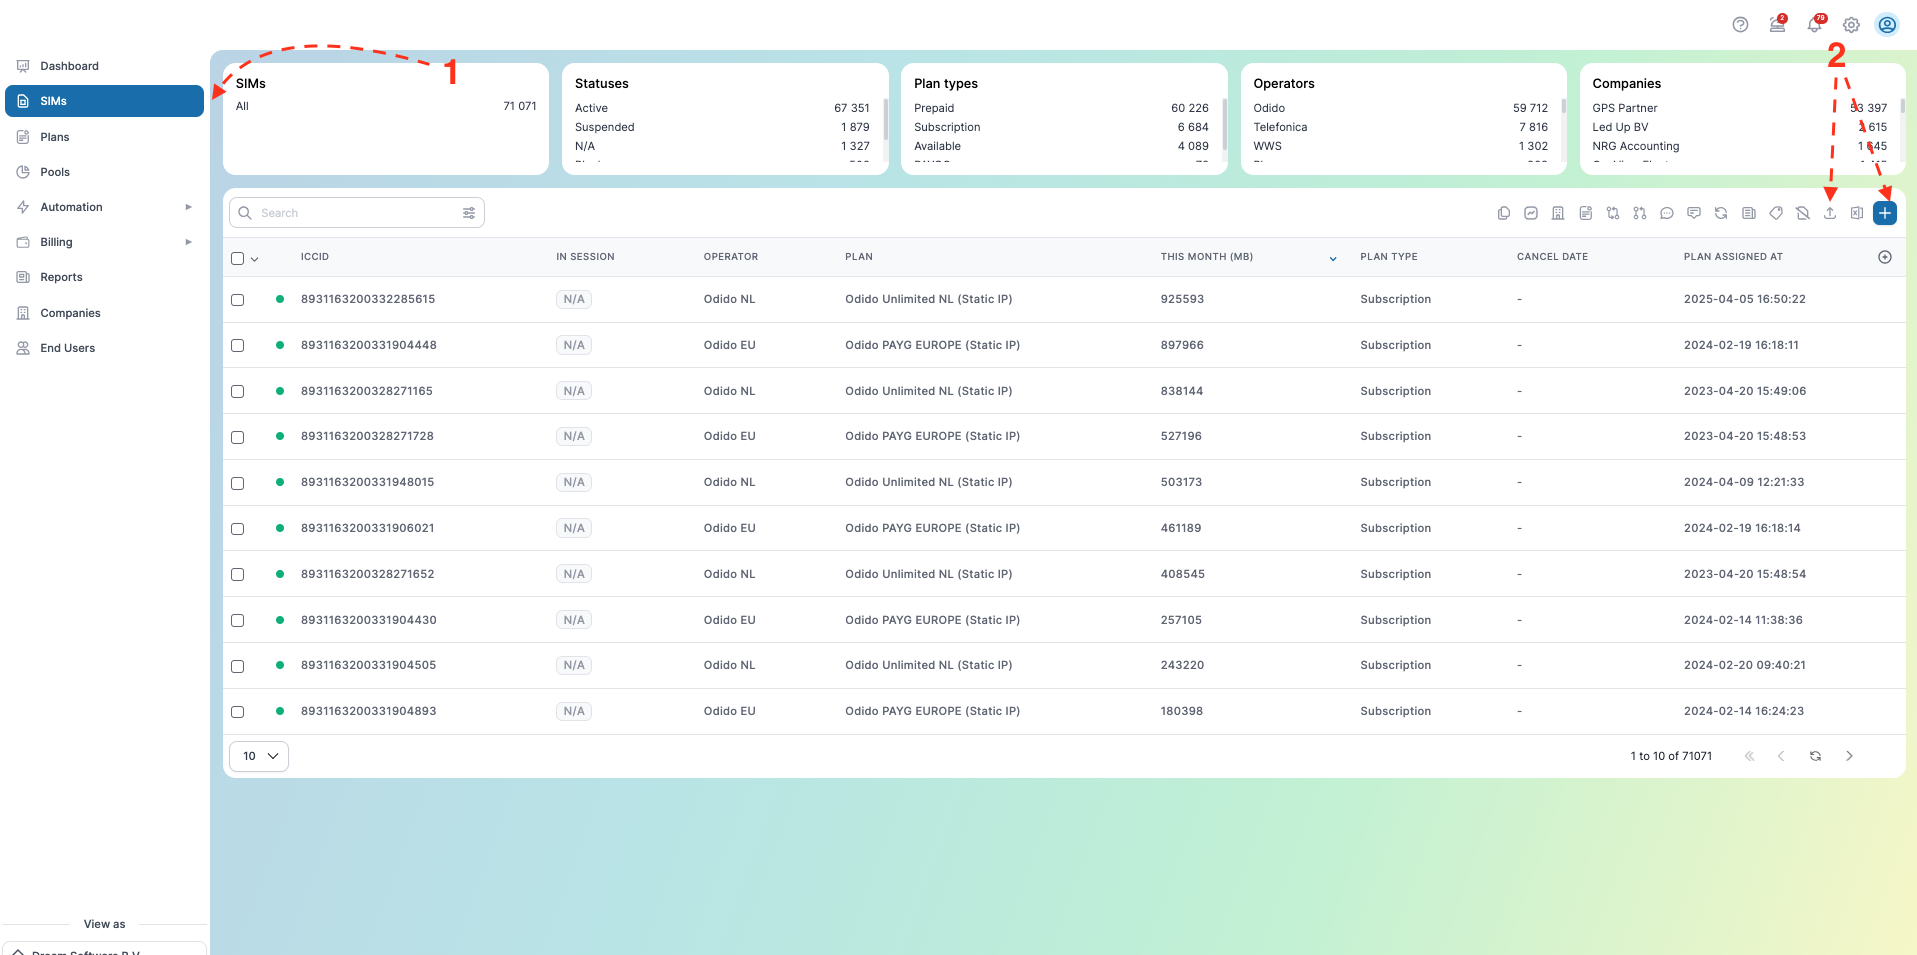
Option 1: Upload SIM Details
- A popup window will appear.
- You’ll be able to upload a
.xlsxfile and click "Confirm" to proceed. - You can also download a template file to see the required fields for each SIM.
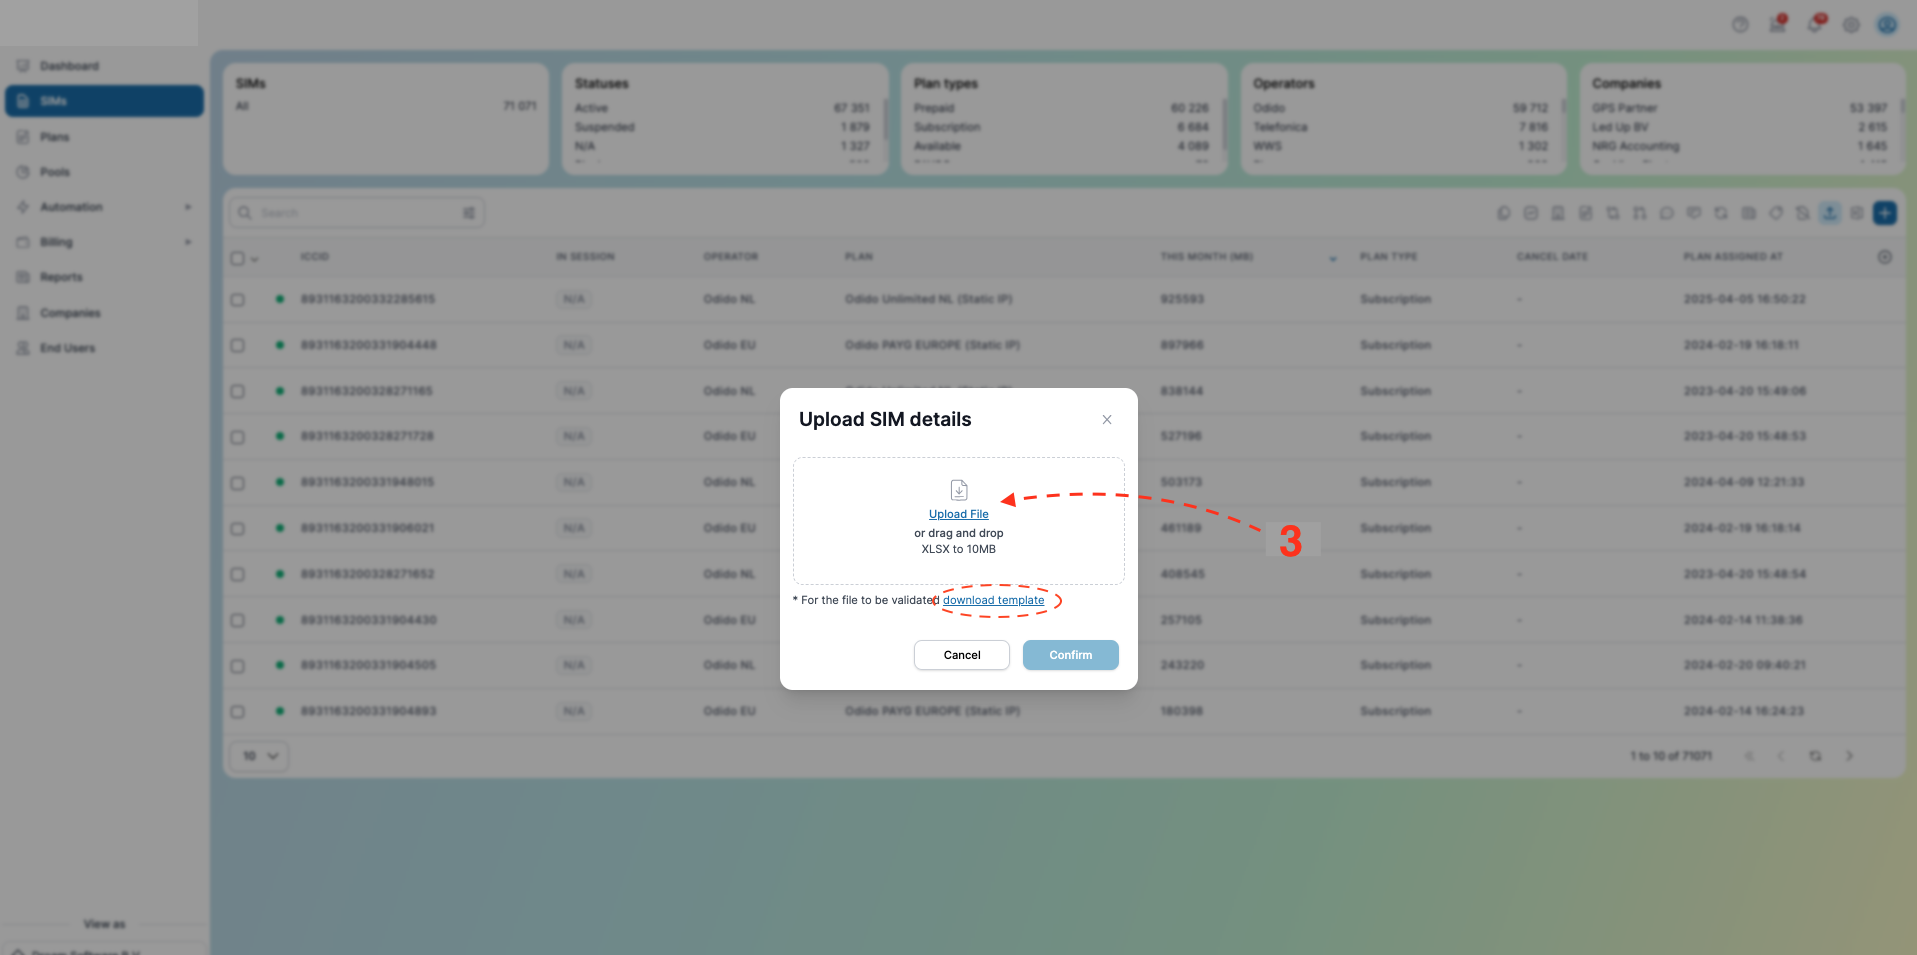
Option 2: Plus (+) Button
- A modal window will open.
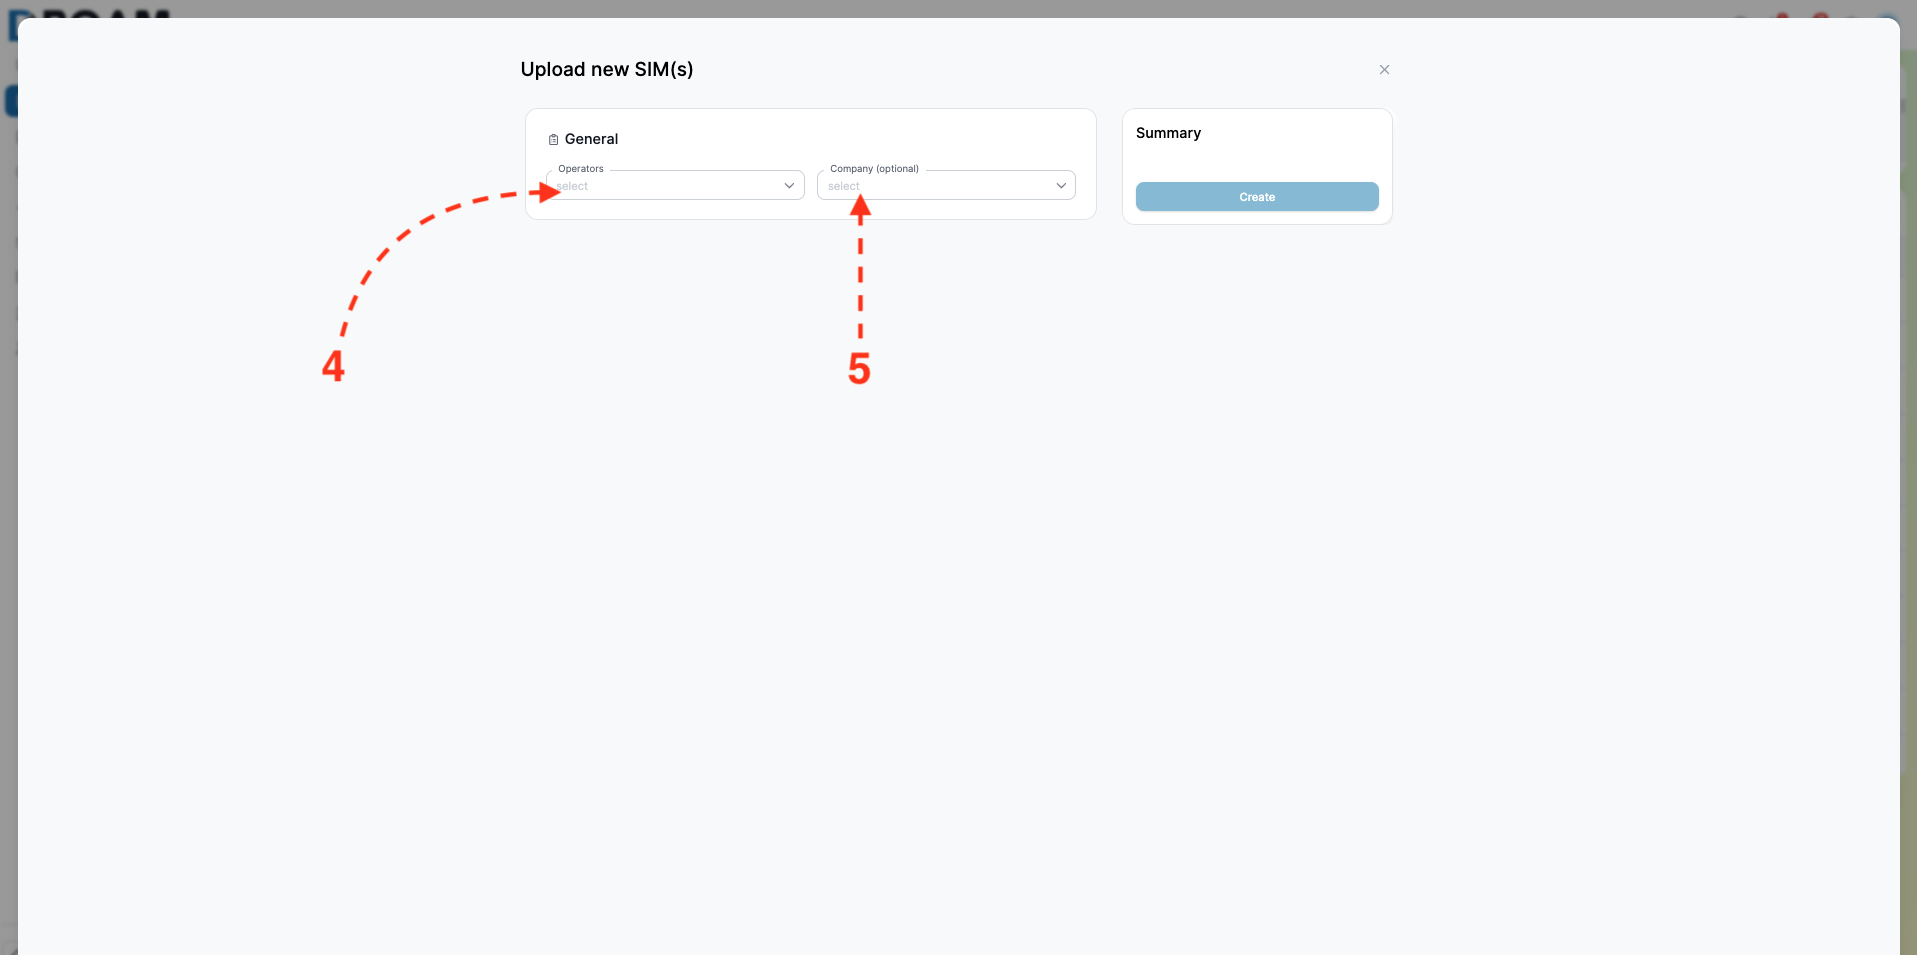
- Select the Operator (required) and the Company (optional).
- Click on "File" to upload your
.xlsxfile, then click "Confirm." - A template file is also available for download to check which fields are needed for each SIM.
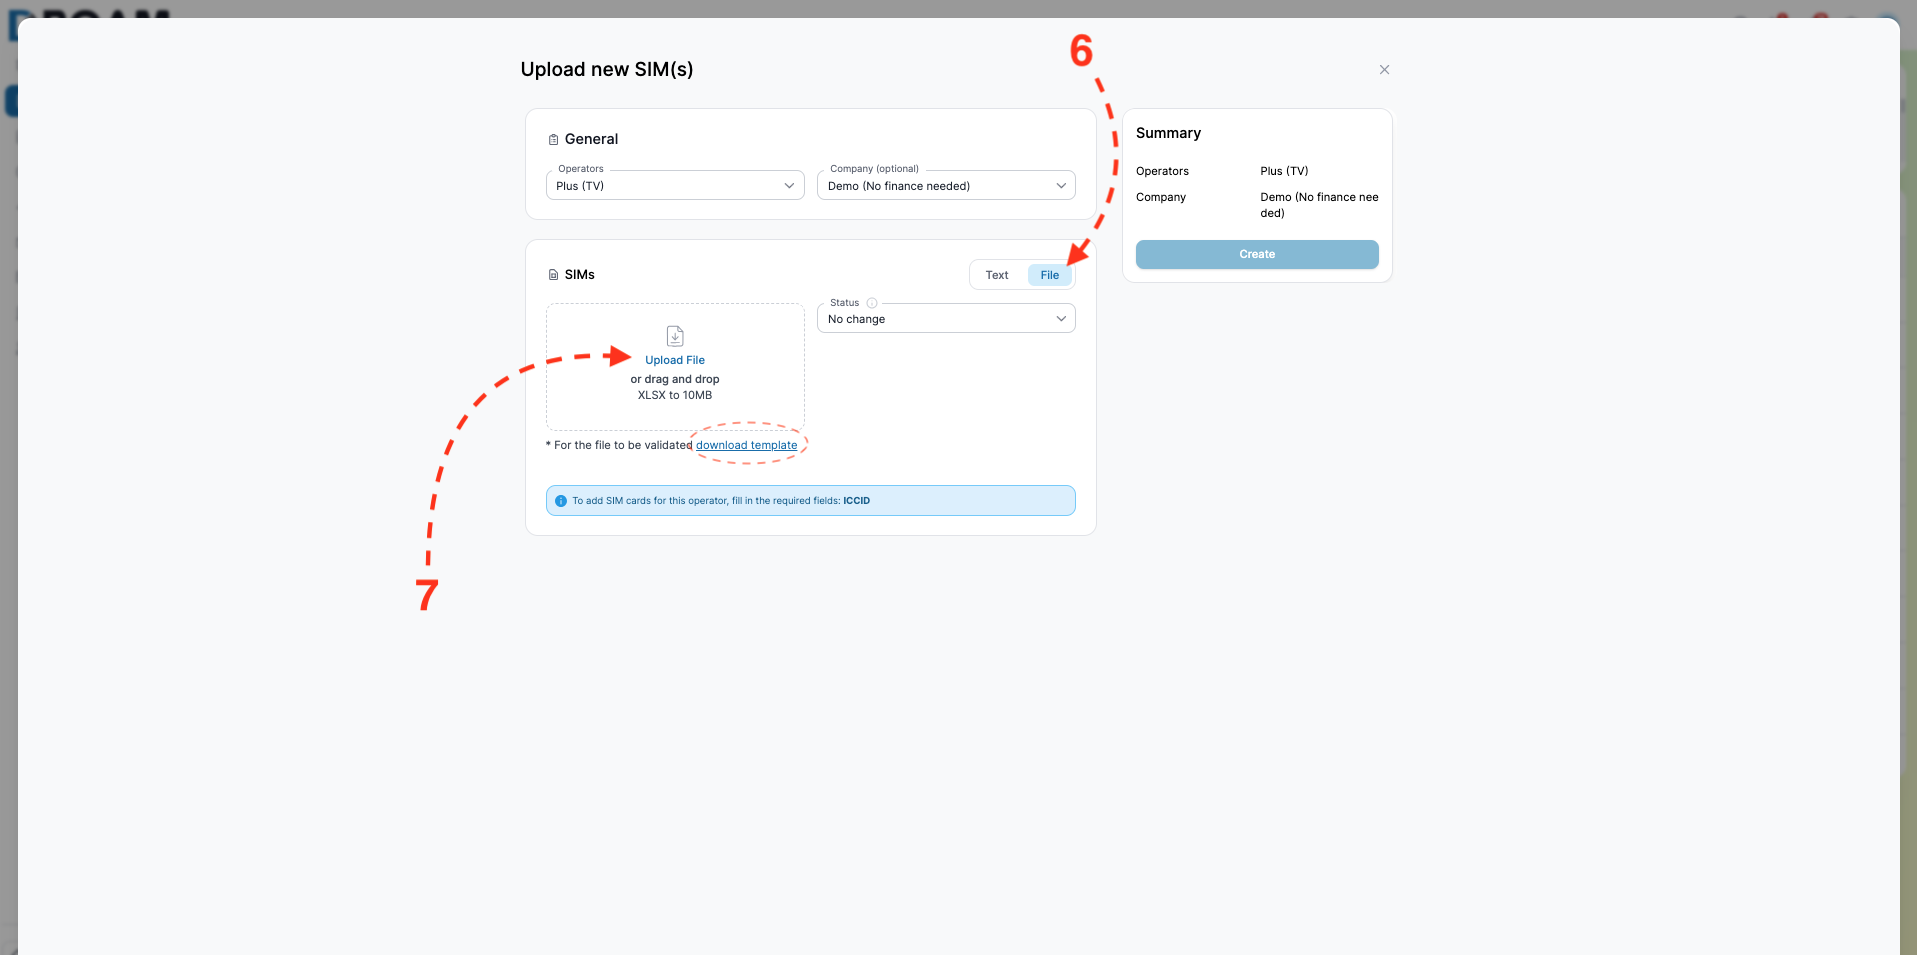
The XLSX file can contain 10,000 SIMs or more. However, we recommend starting with a test upload of around 100 SIMs to ensure everything works as expected before uploading the full list.
eSIM Purchase & Activation
1. Registered End User (purchase on the Platform)
- Go to the eSIM Store from the menu on the left.
- Use the search bar to find the country or countries you need.
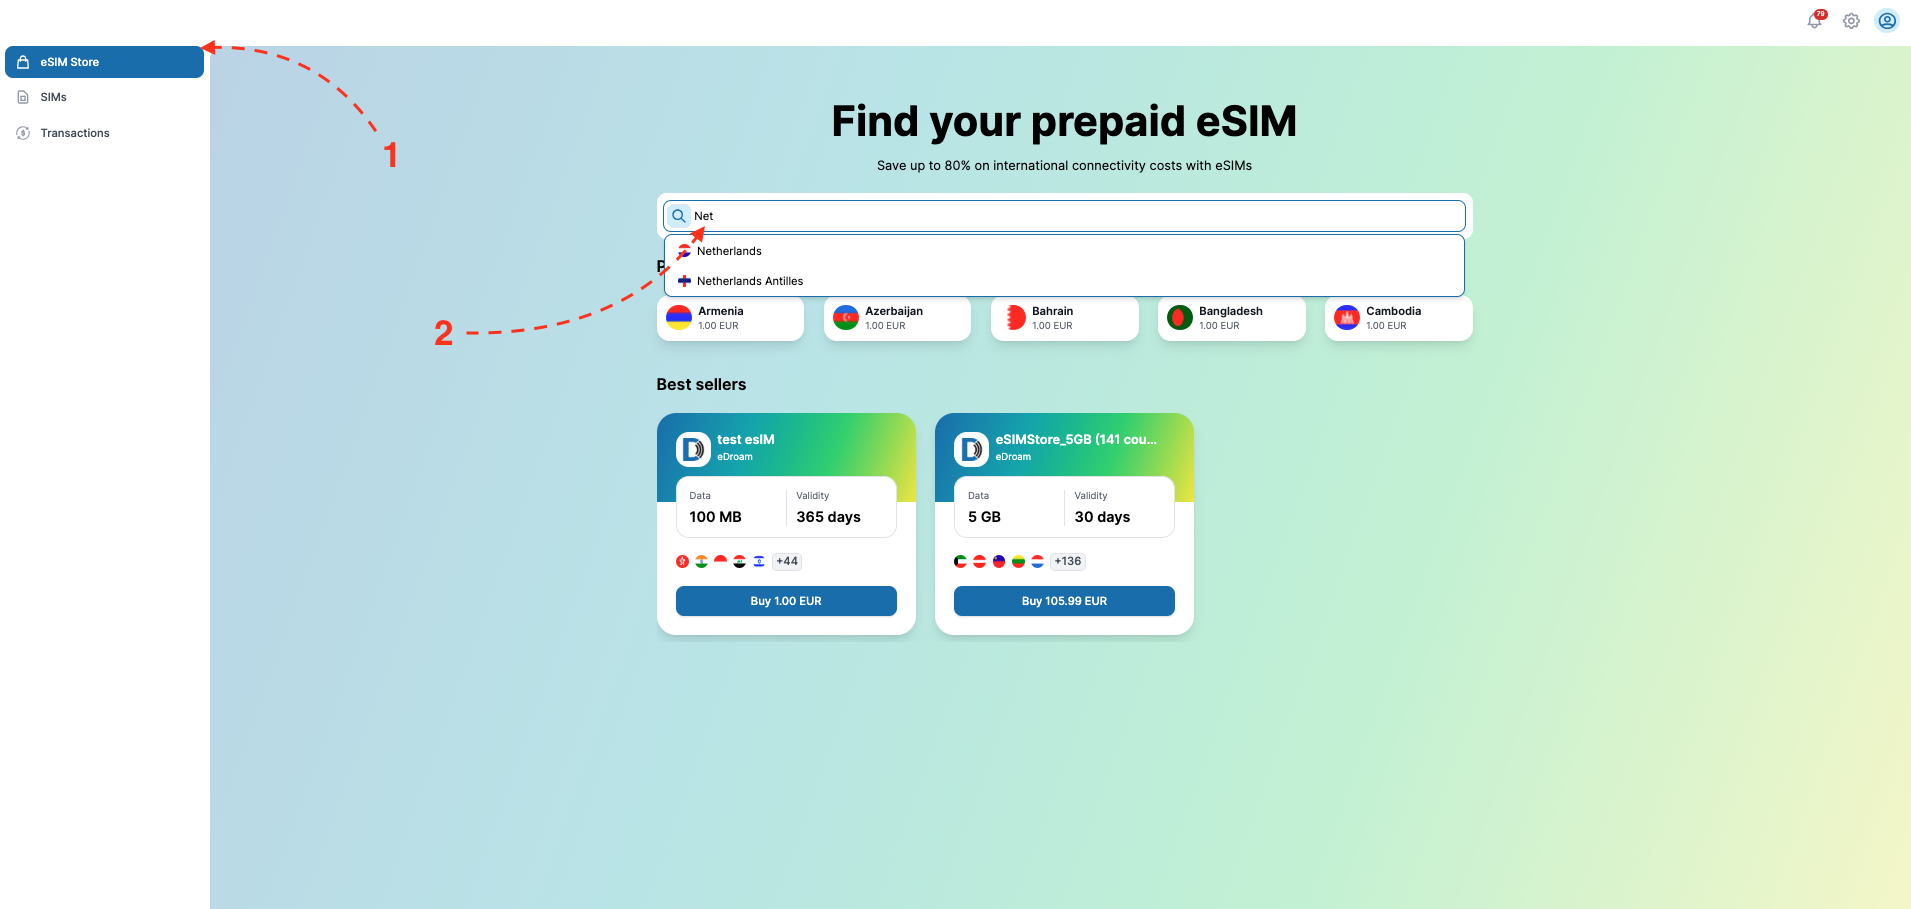
- Click on the plan/package you’d like to purchase.
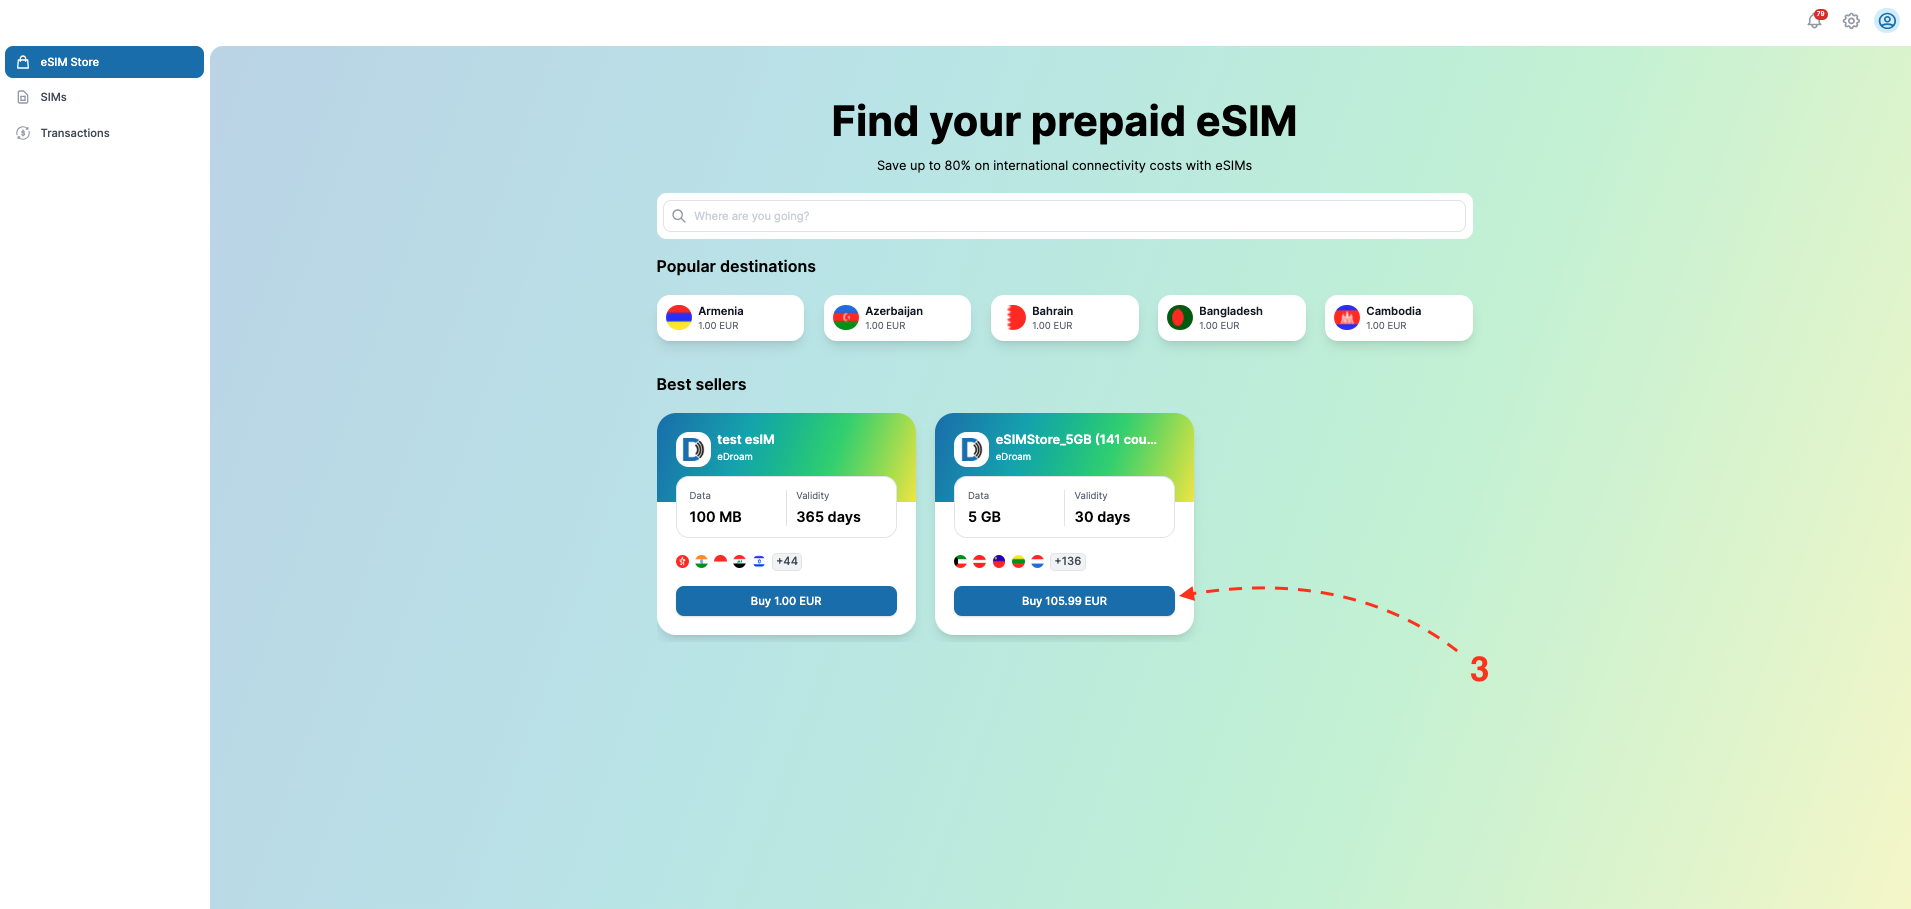
- Review the package details in the popup window. Click "Buy Now."
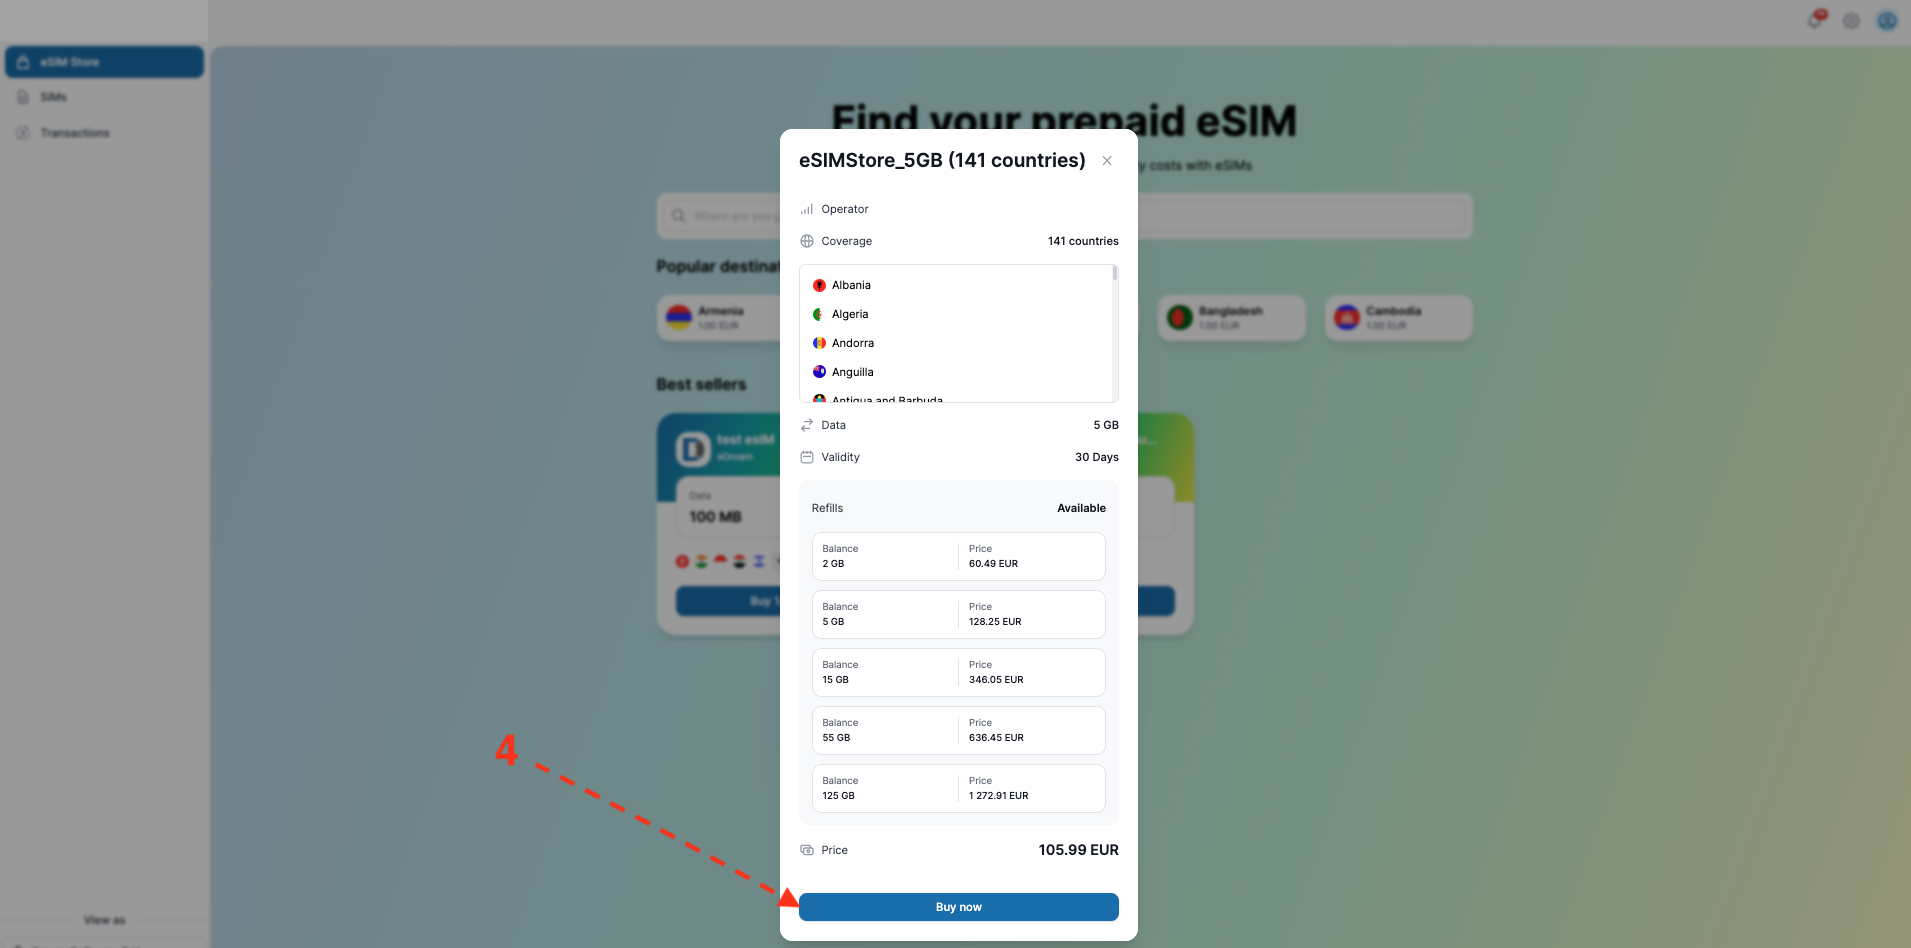
- Select your preferred payment method.
- Click "Checkout."
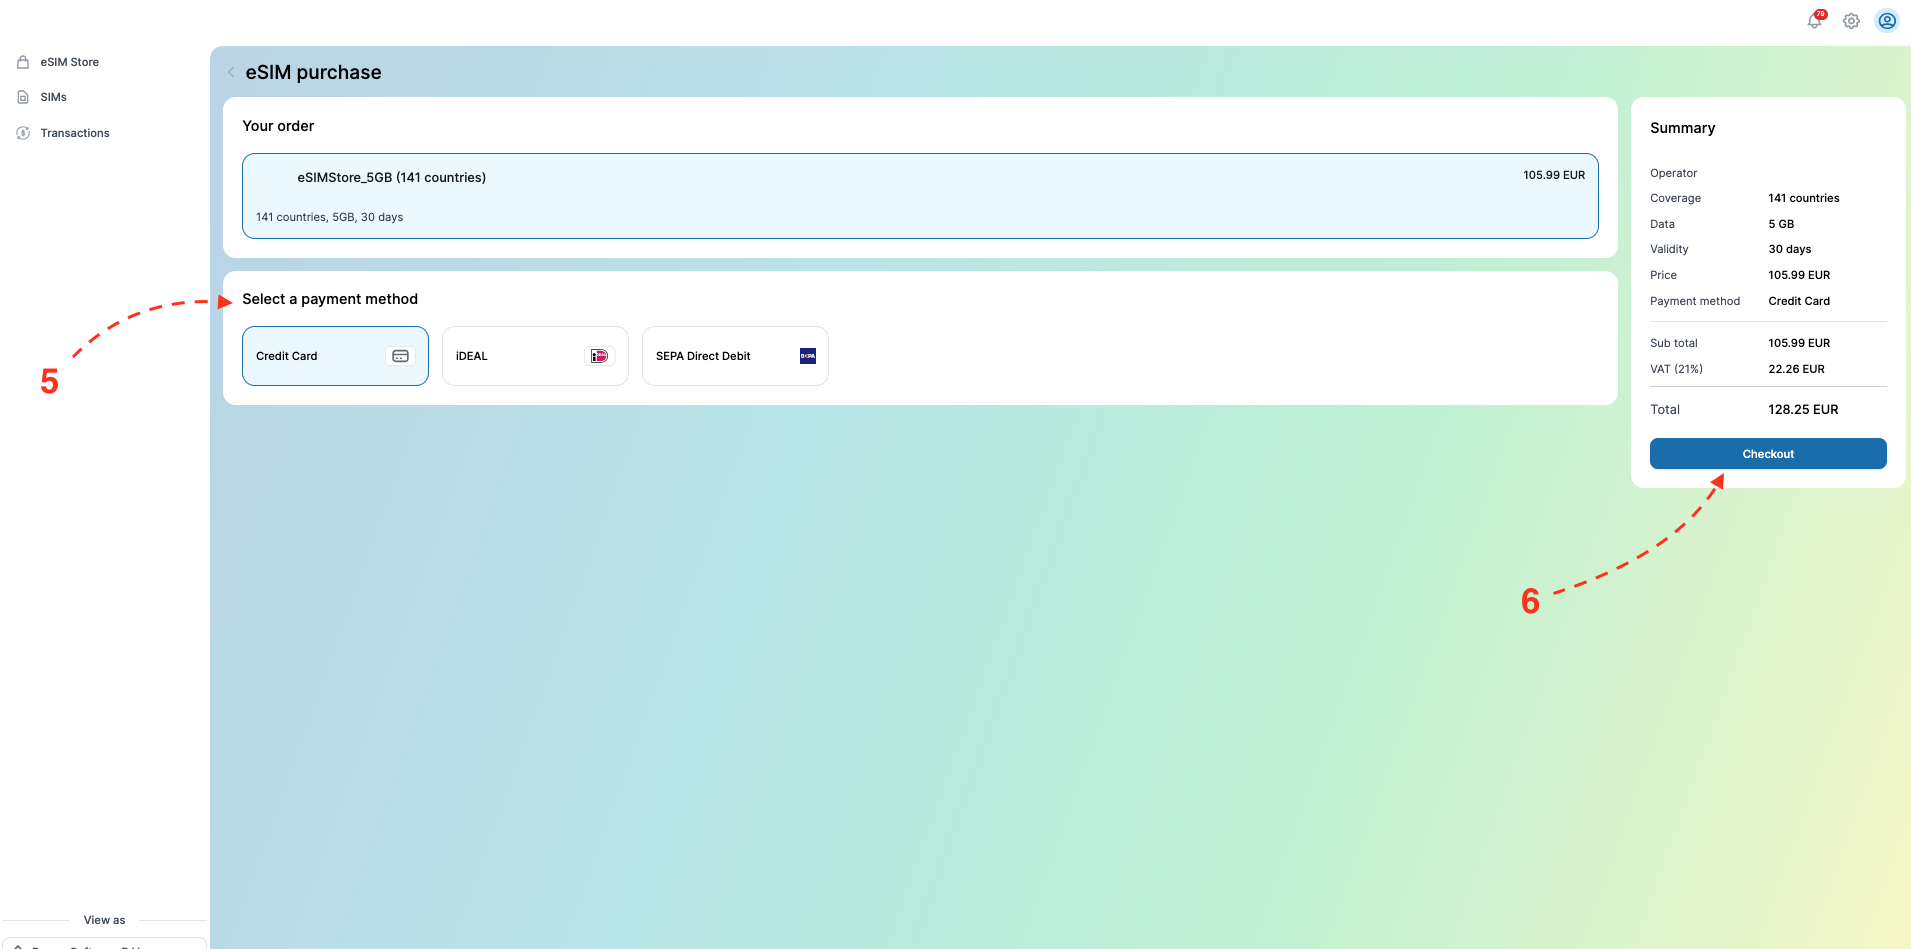
- Review the payment details in the Payment Confirmation popup. Click "Pay."
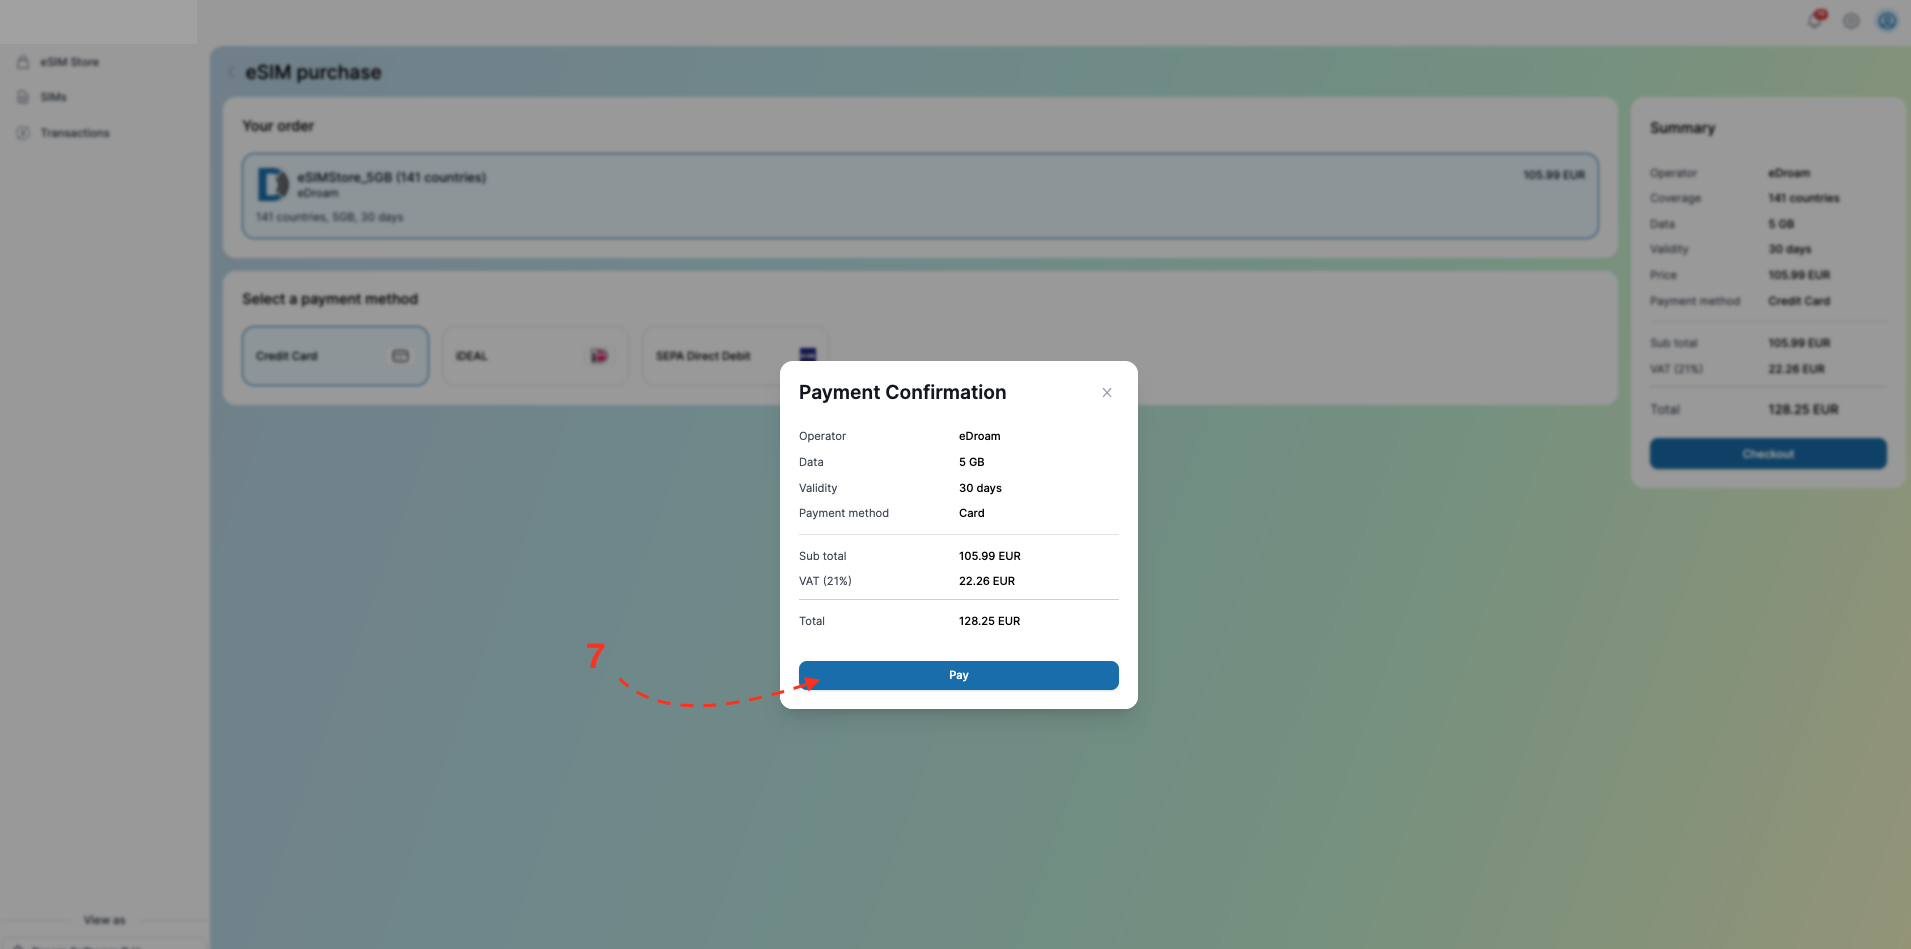
- If the payment is successful, a Thank You page will appear.
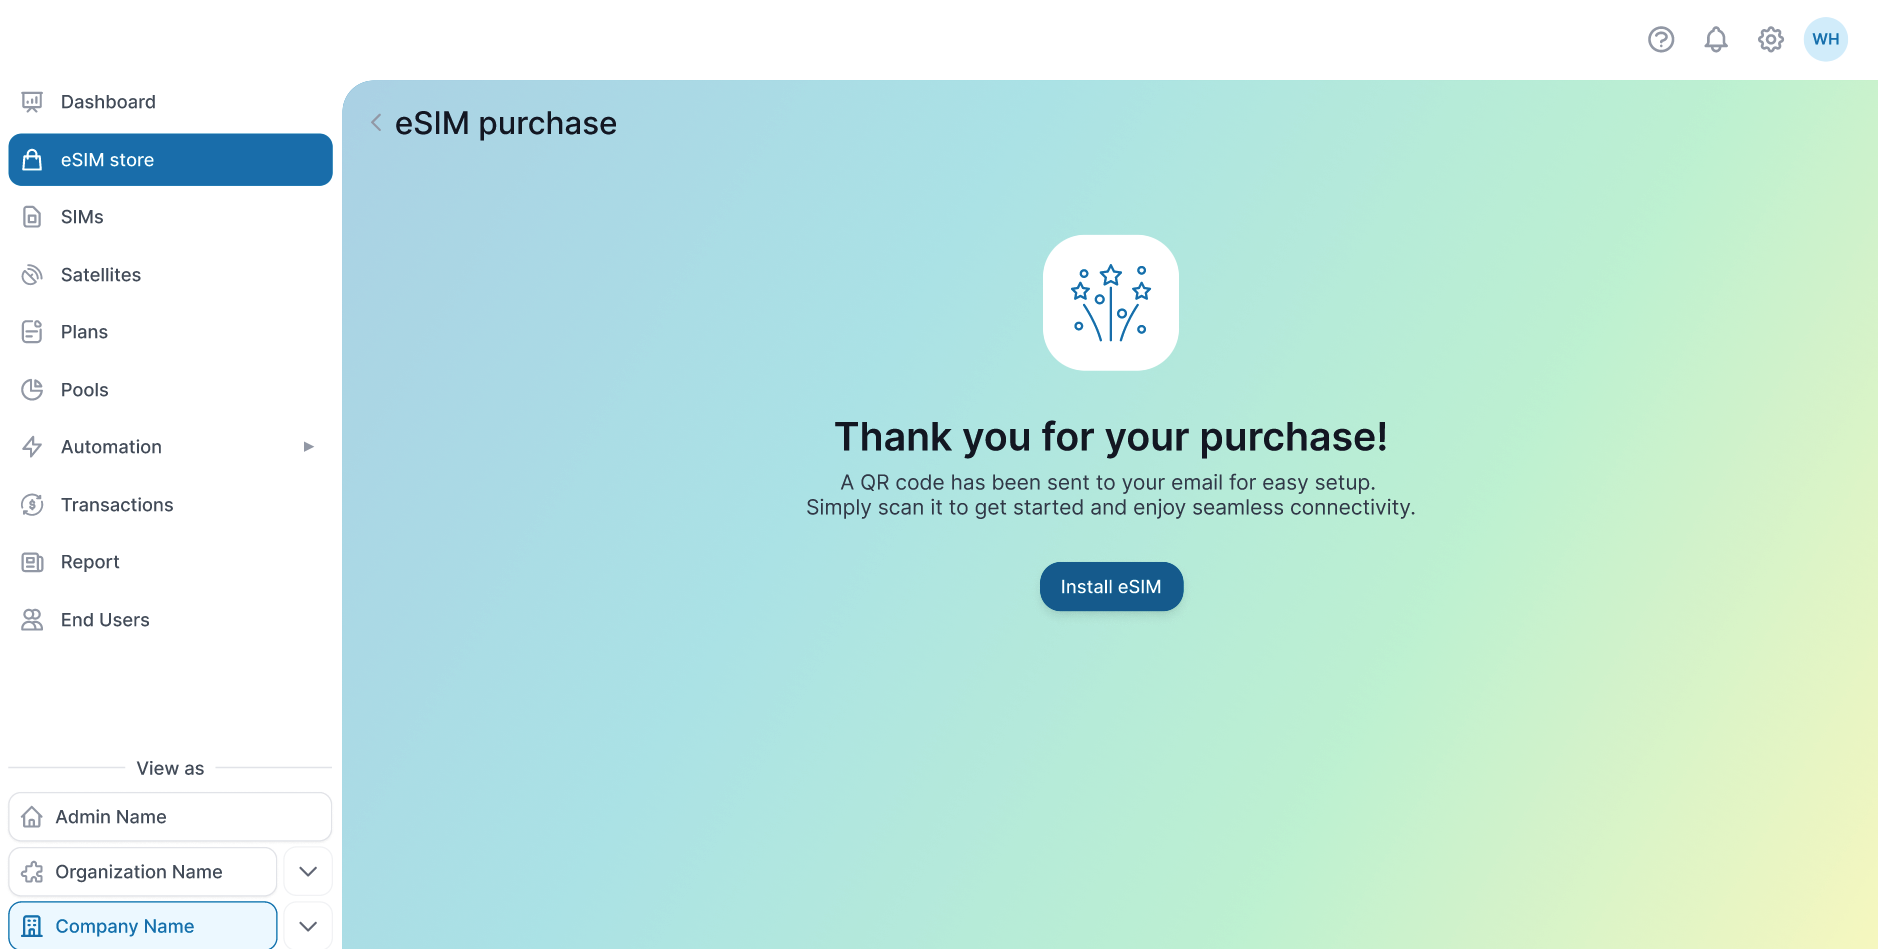
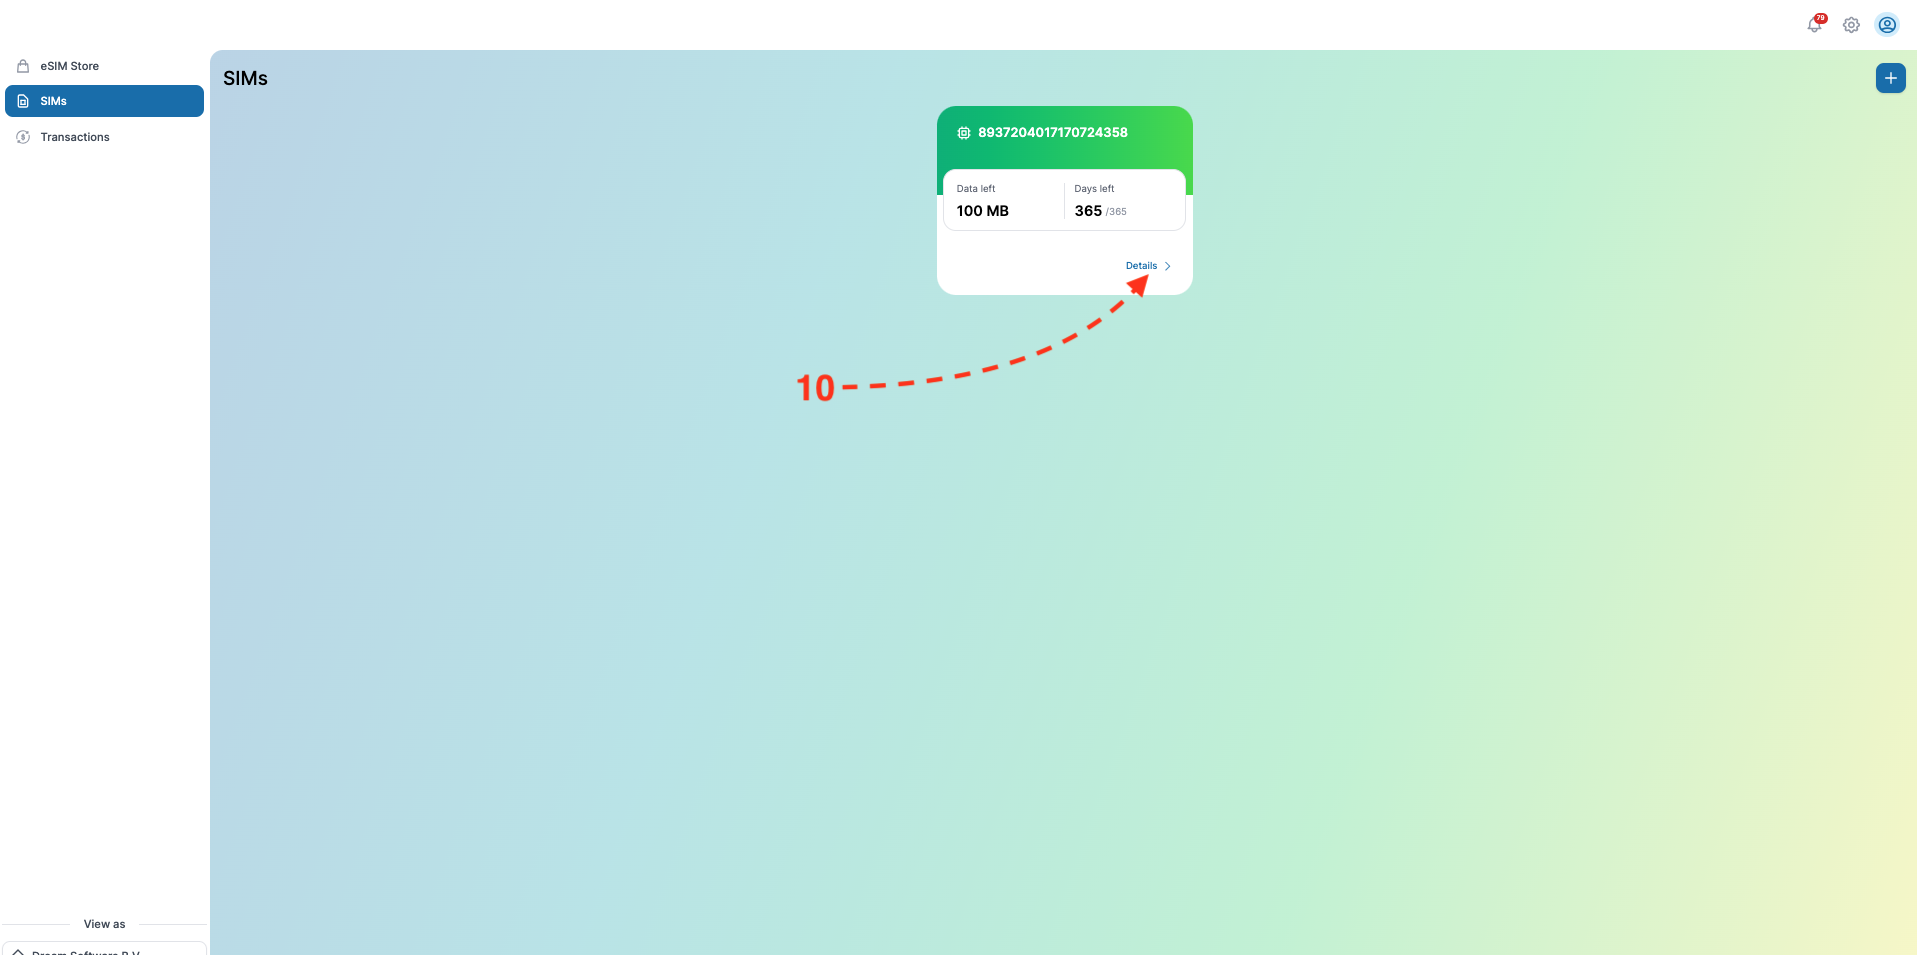
- Click “Install eSIM” on the Thank You page, or go to the SIMs section from the left-hand menu to find your eSIM.
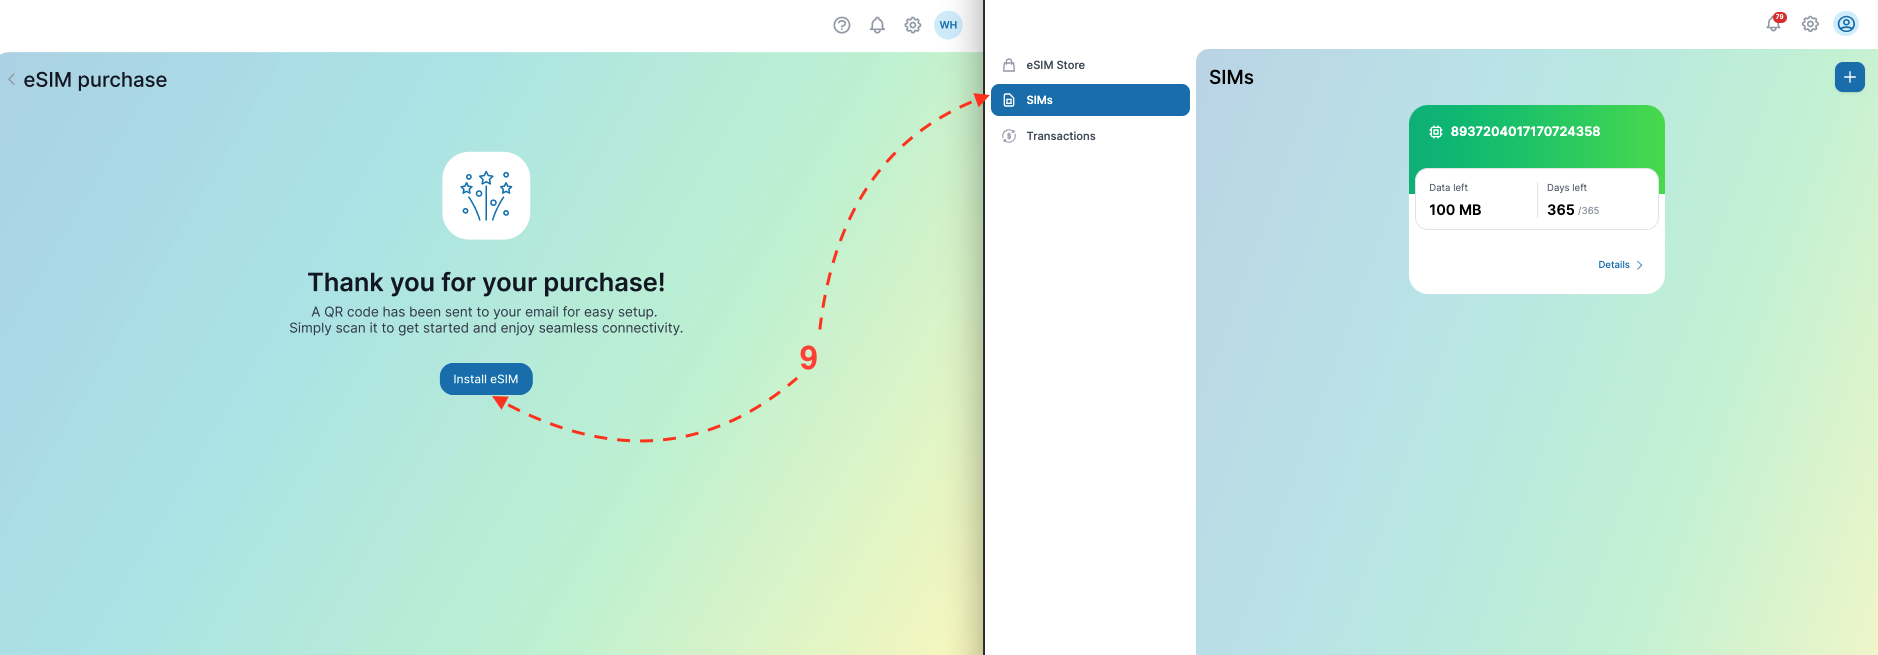
- Click "Details" next to your eSIM.
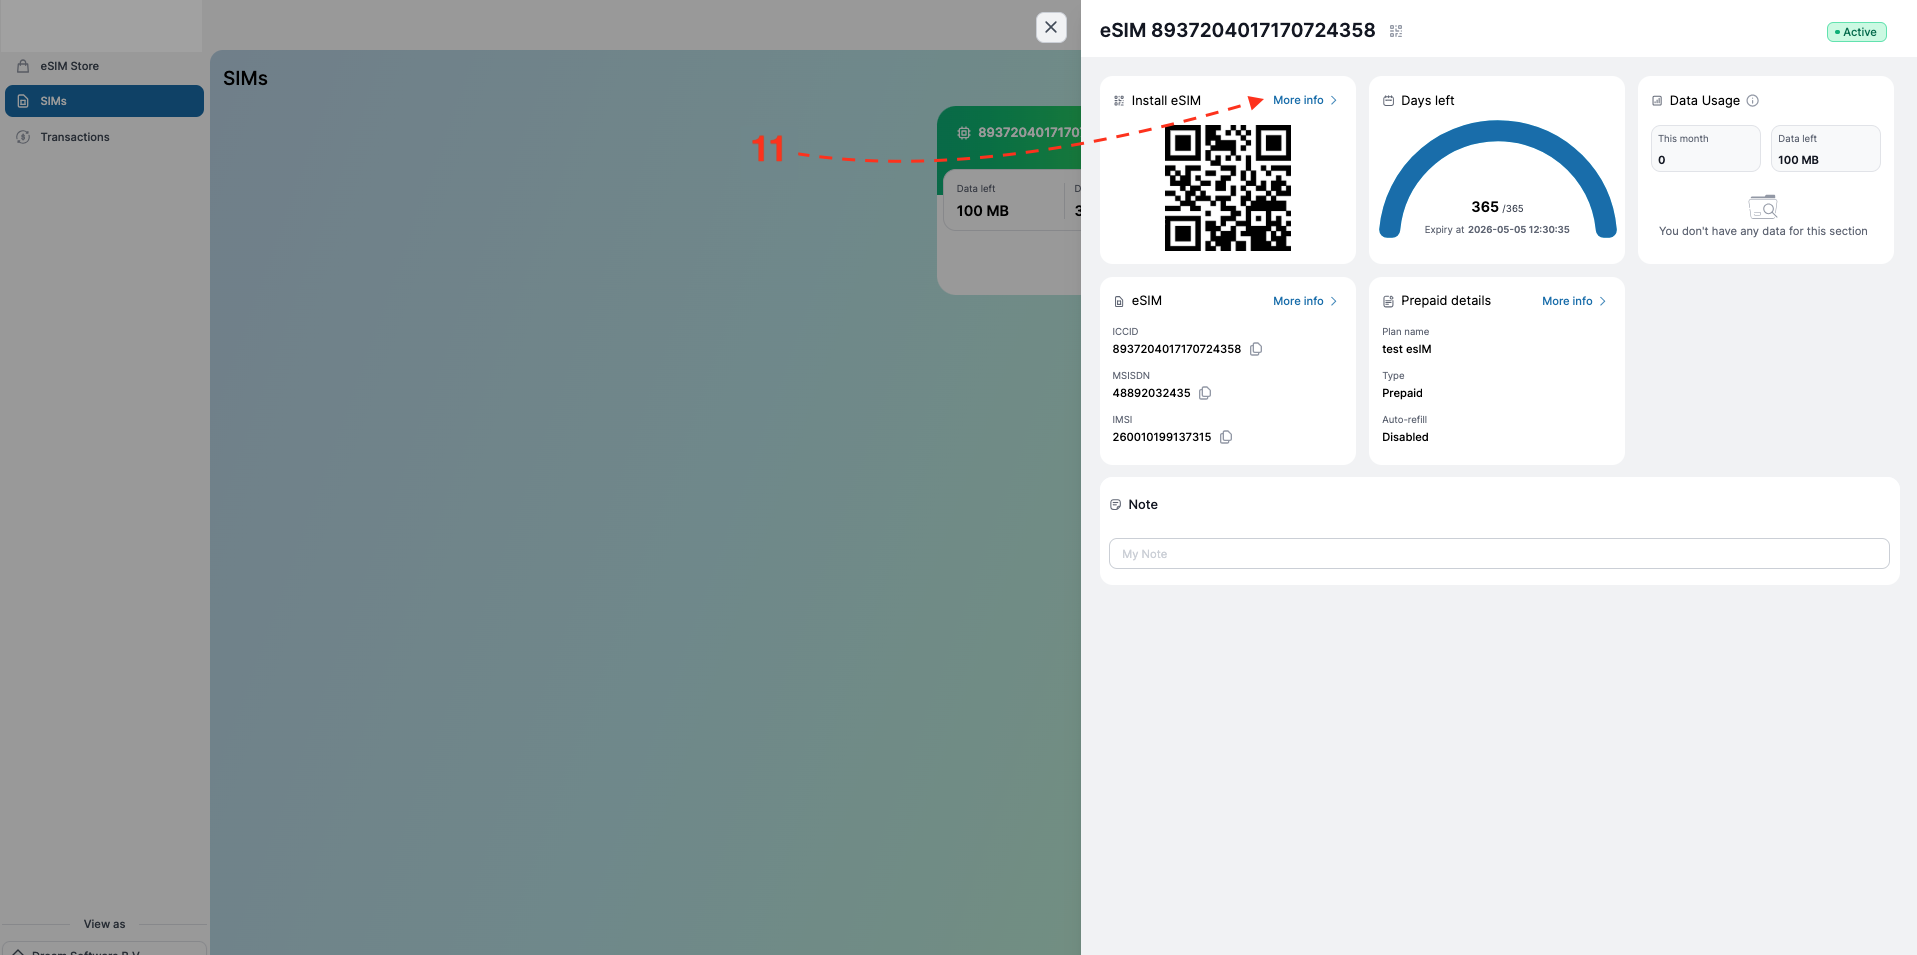
- Find the "Install eSIM" section and click "More Info."
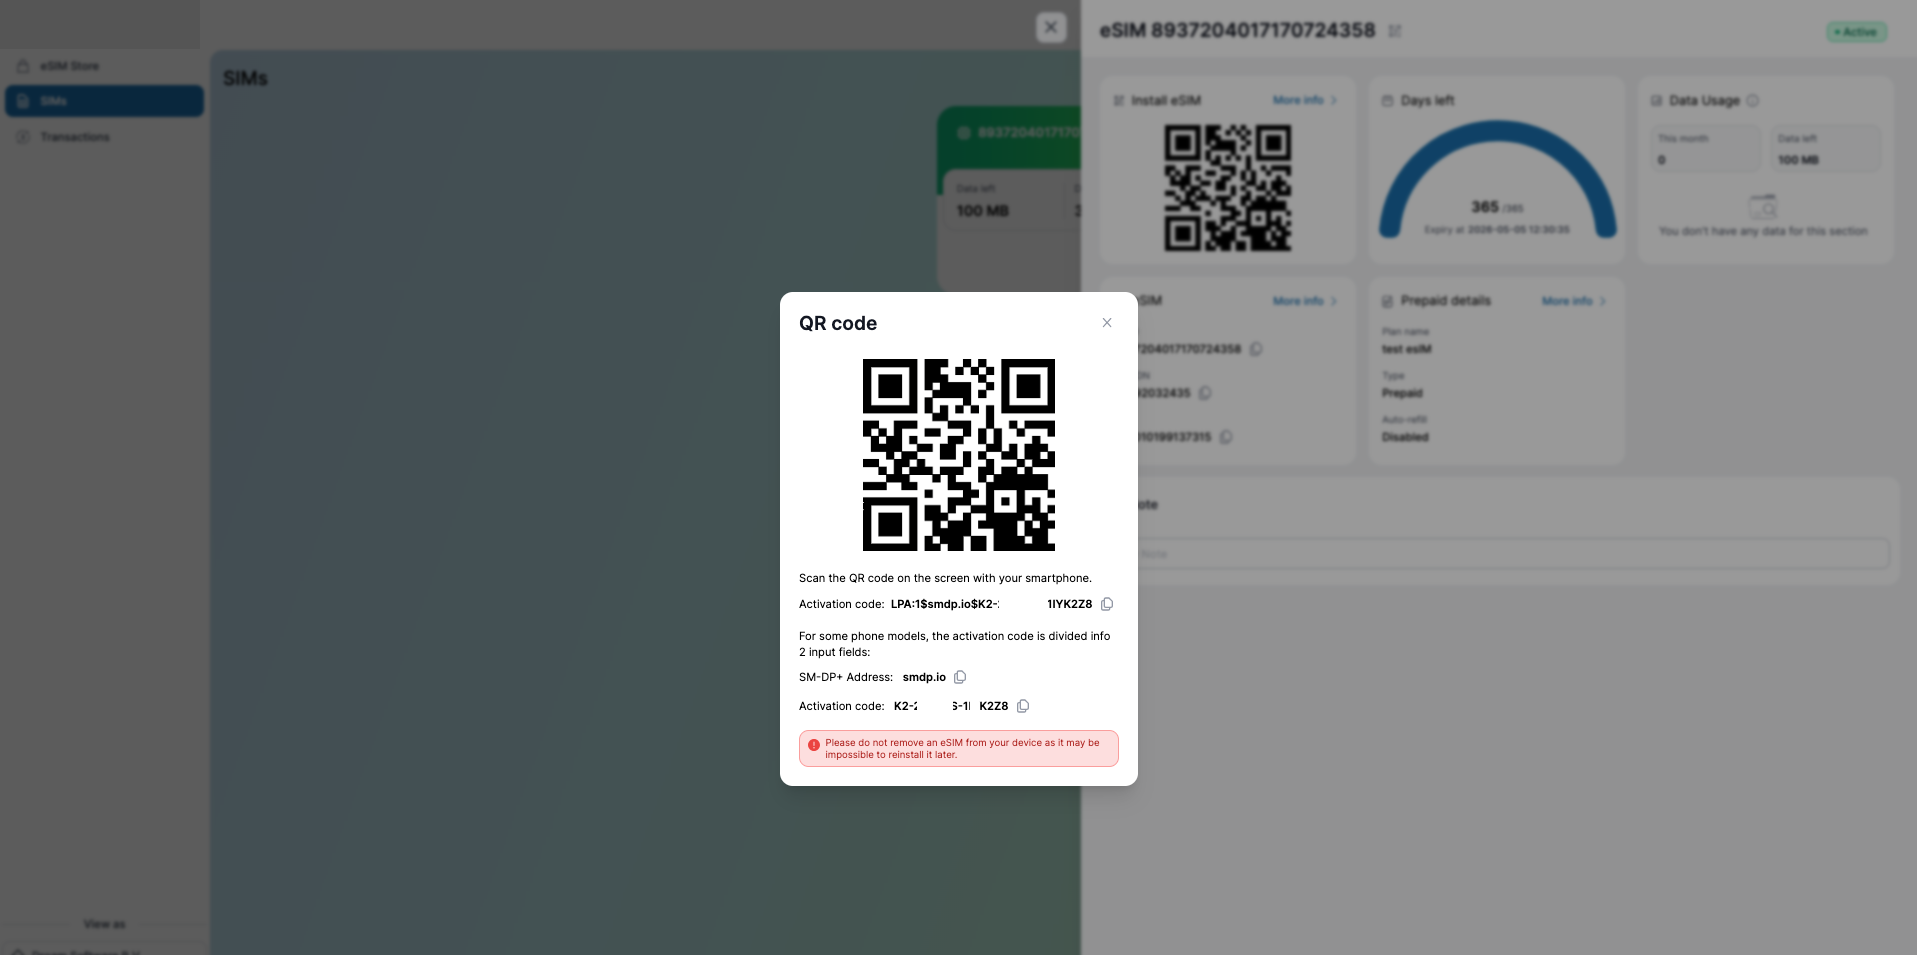
- Follow the steps shown to activate your eSIM.
NEW User (purchase on the eStore)
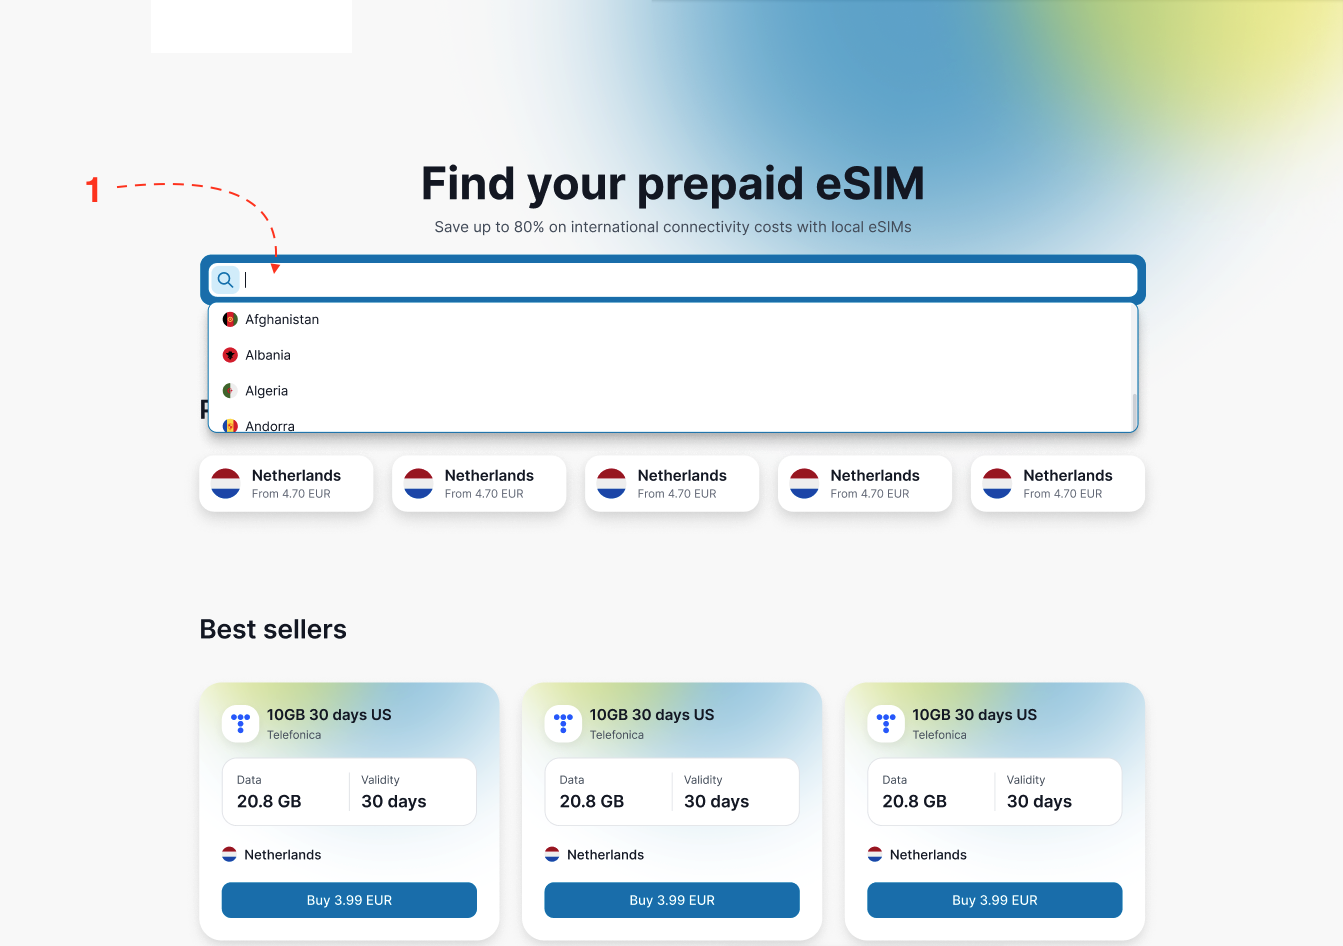
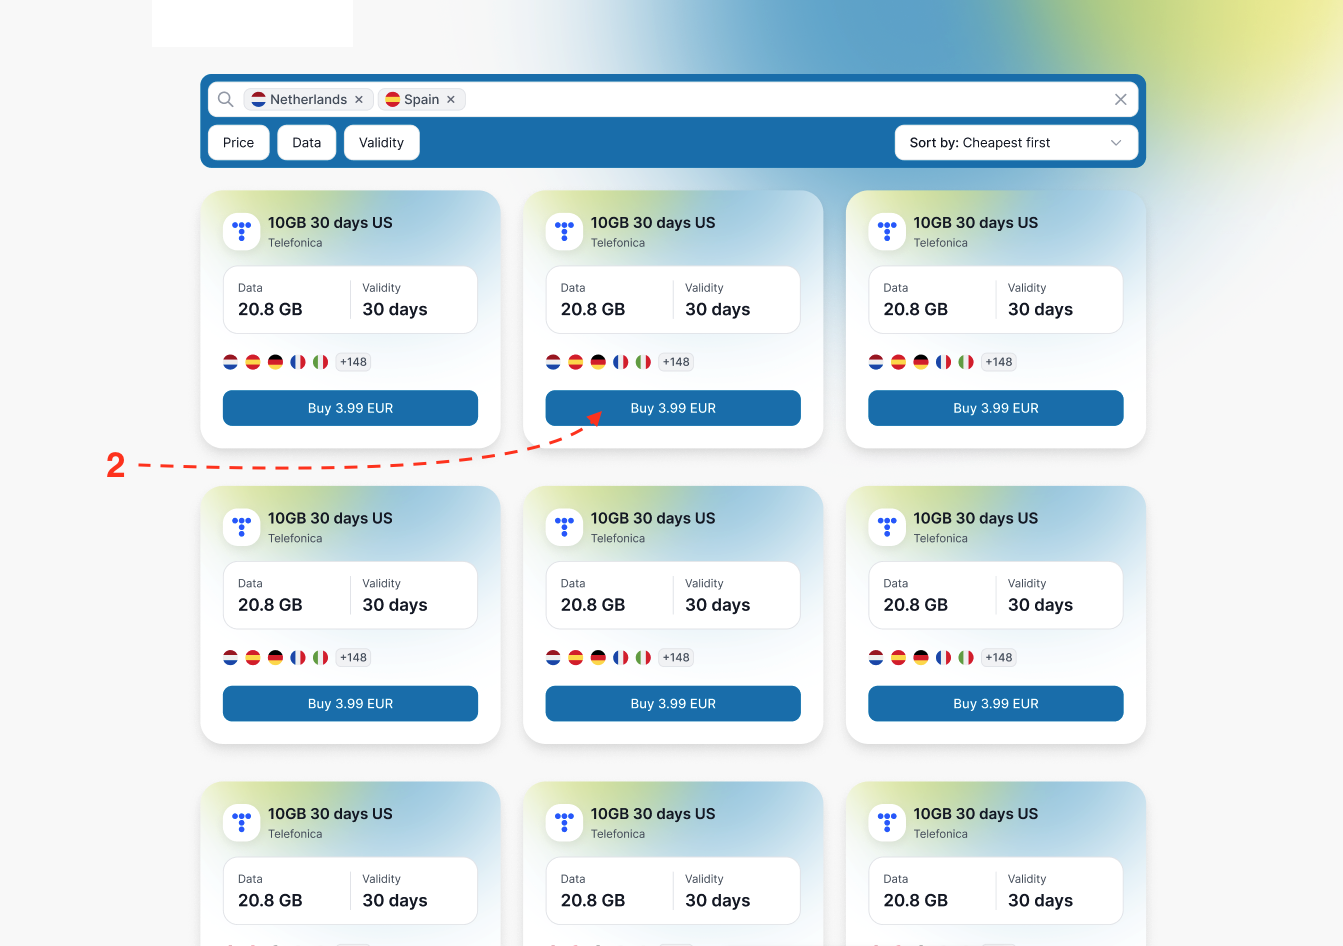
- On the main page of the eSIM Store, use the search bar to select the appropriate country or countries.
- Click on the plan you'd like to purchase.
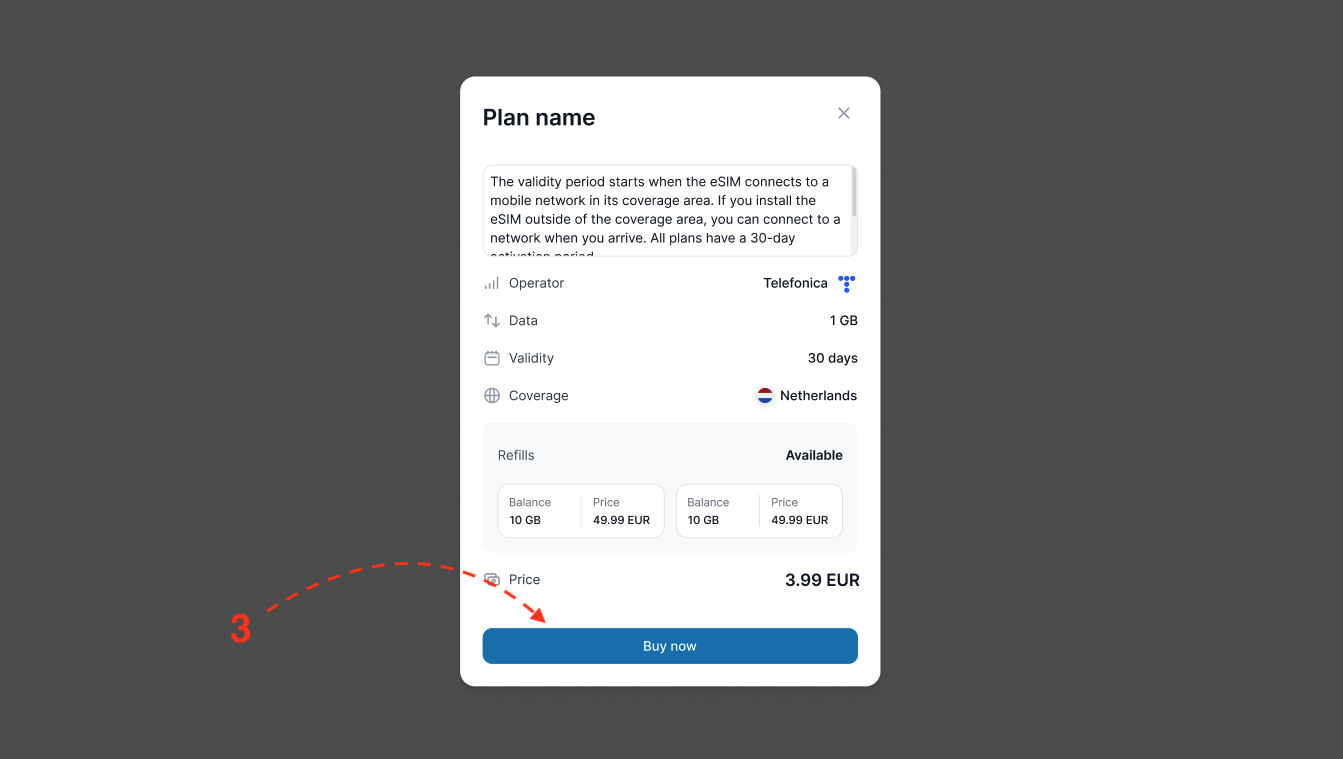
- Review the details in the popup window. Click "Buy Now."
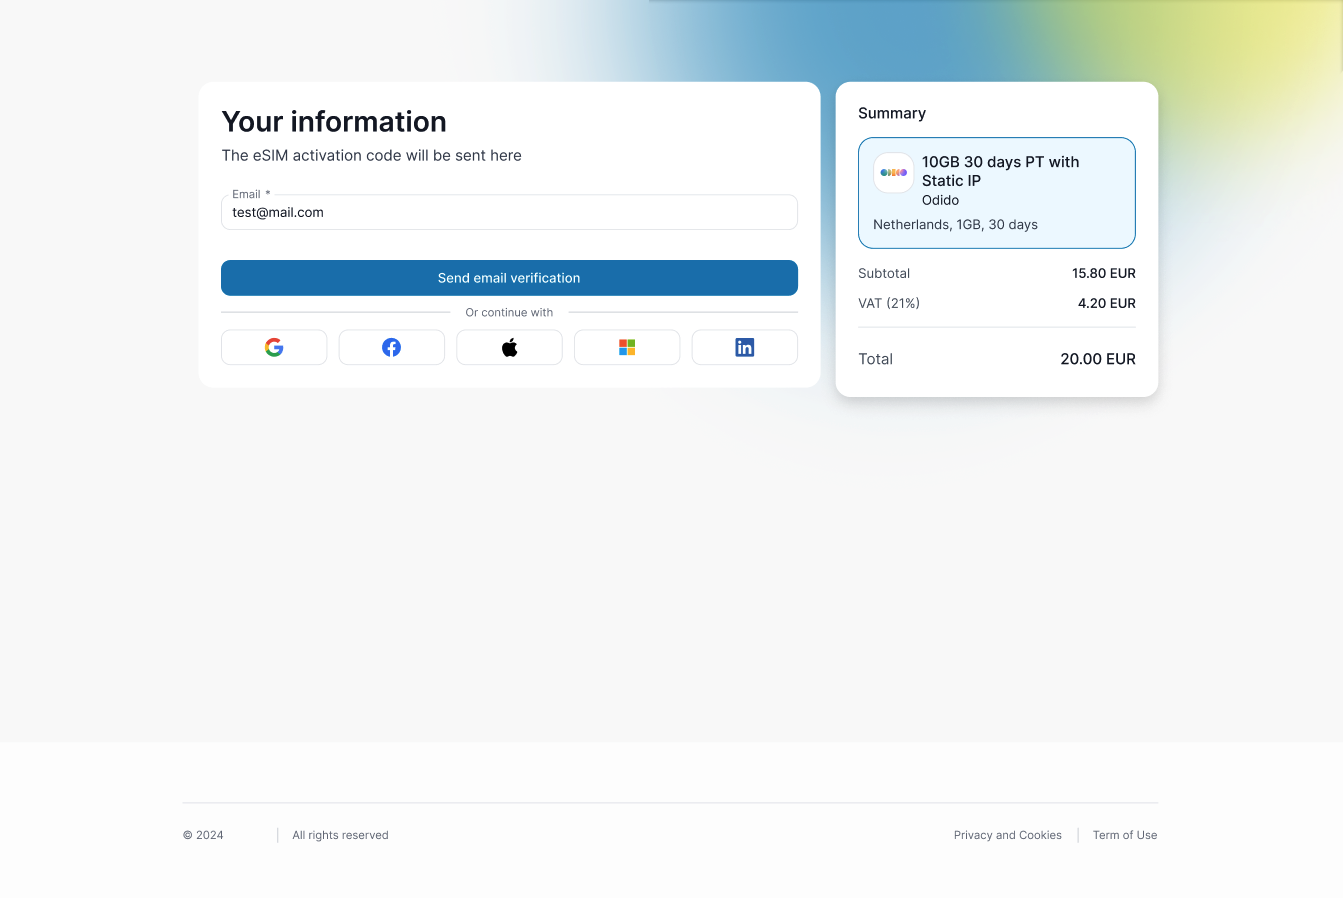
- Enter your email and click "Send Email Verification."
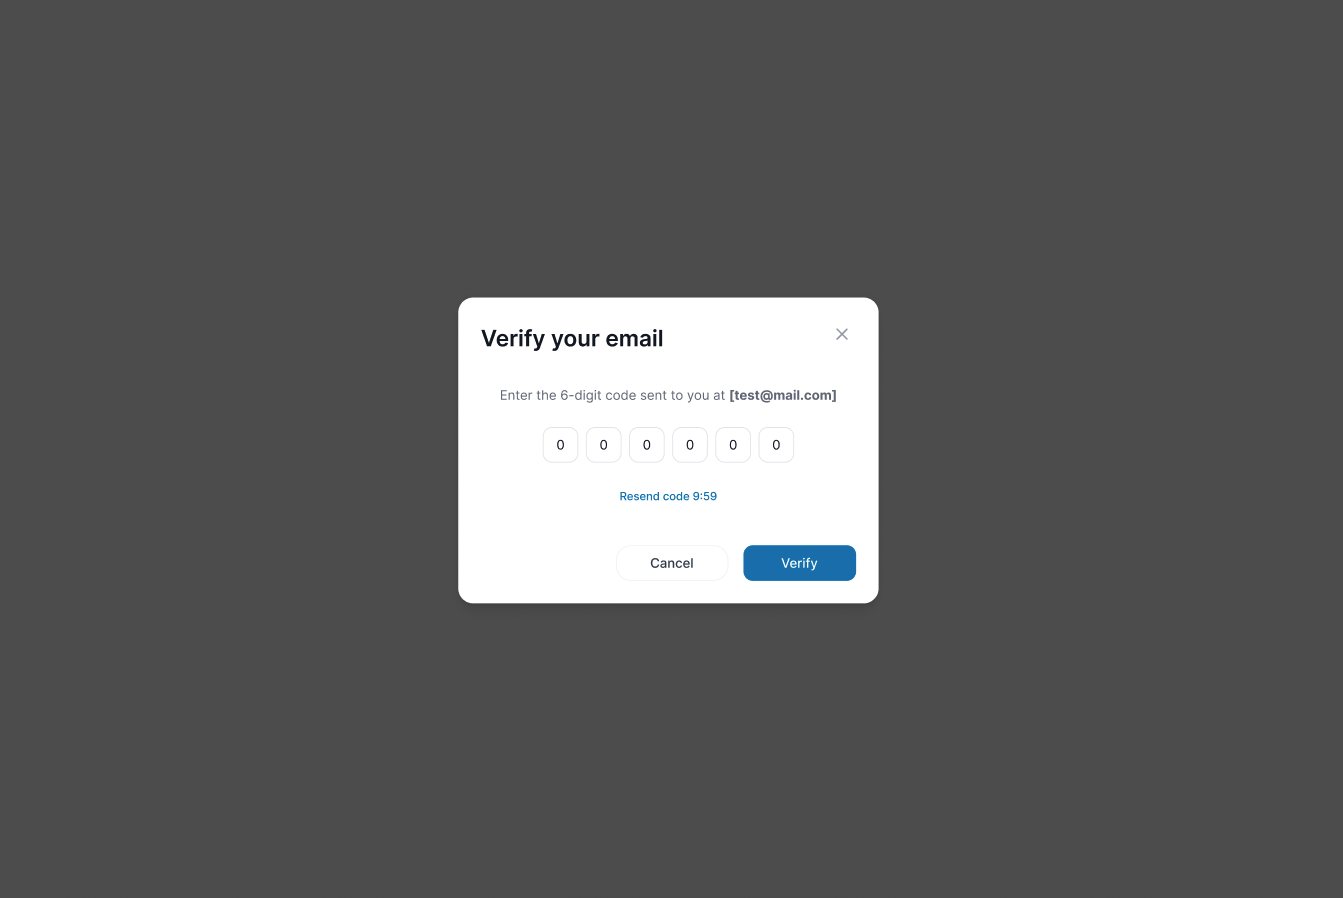
- Check your inbox for the 6-digit verification code and enter it. Then click "Verify."
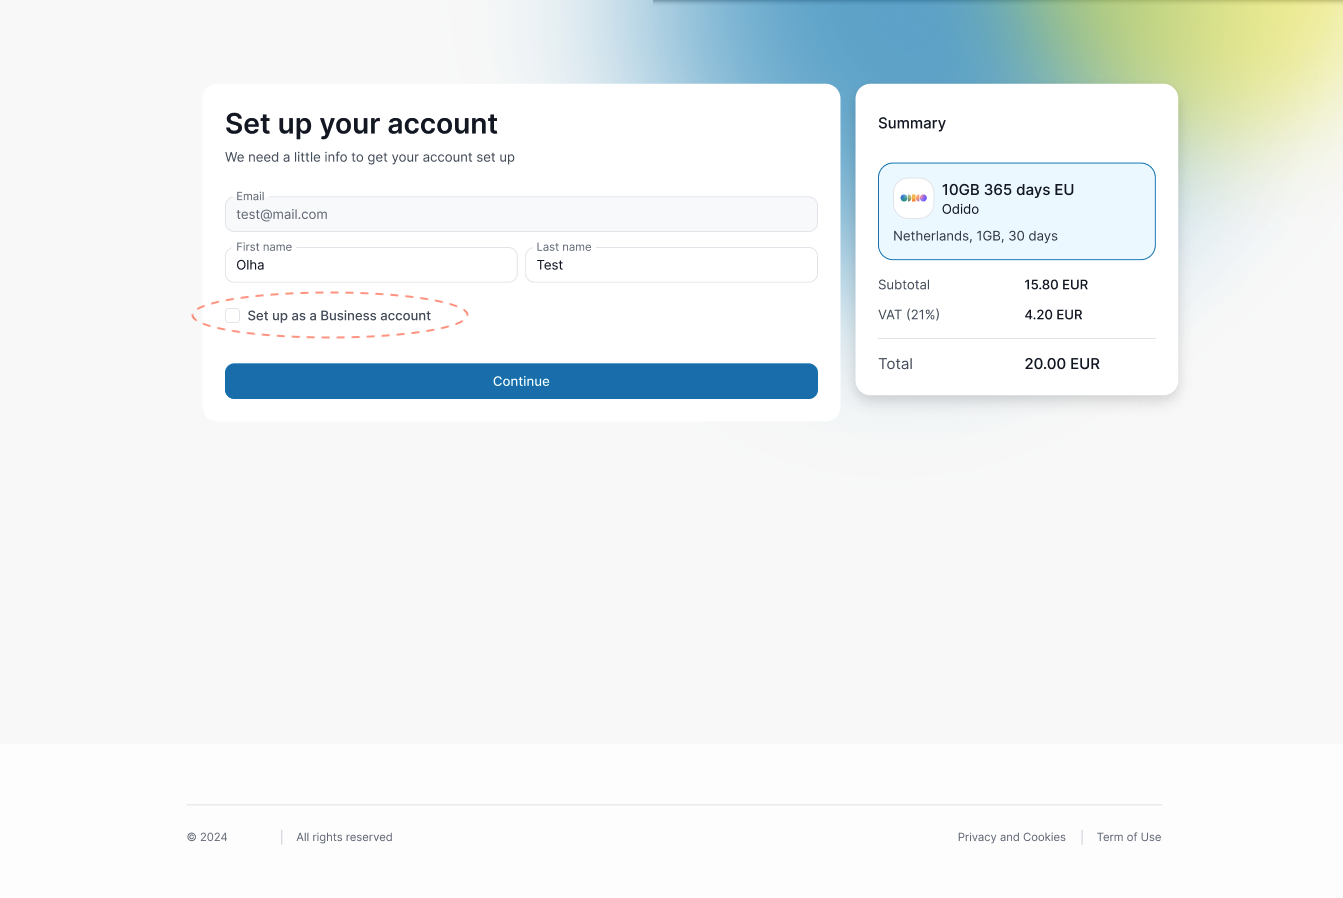
- Set up your account by entering your first and last name. and click "Continue."
- If you're creating a business account, check the box "Set up a business account."
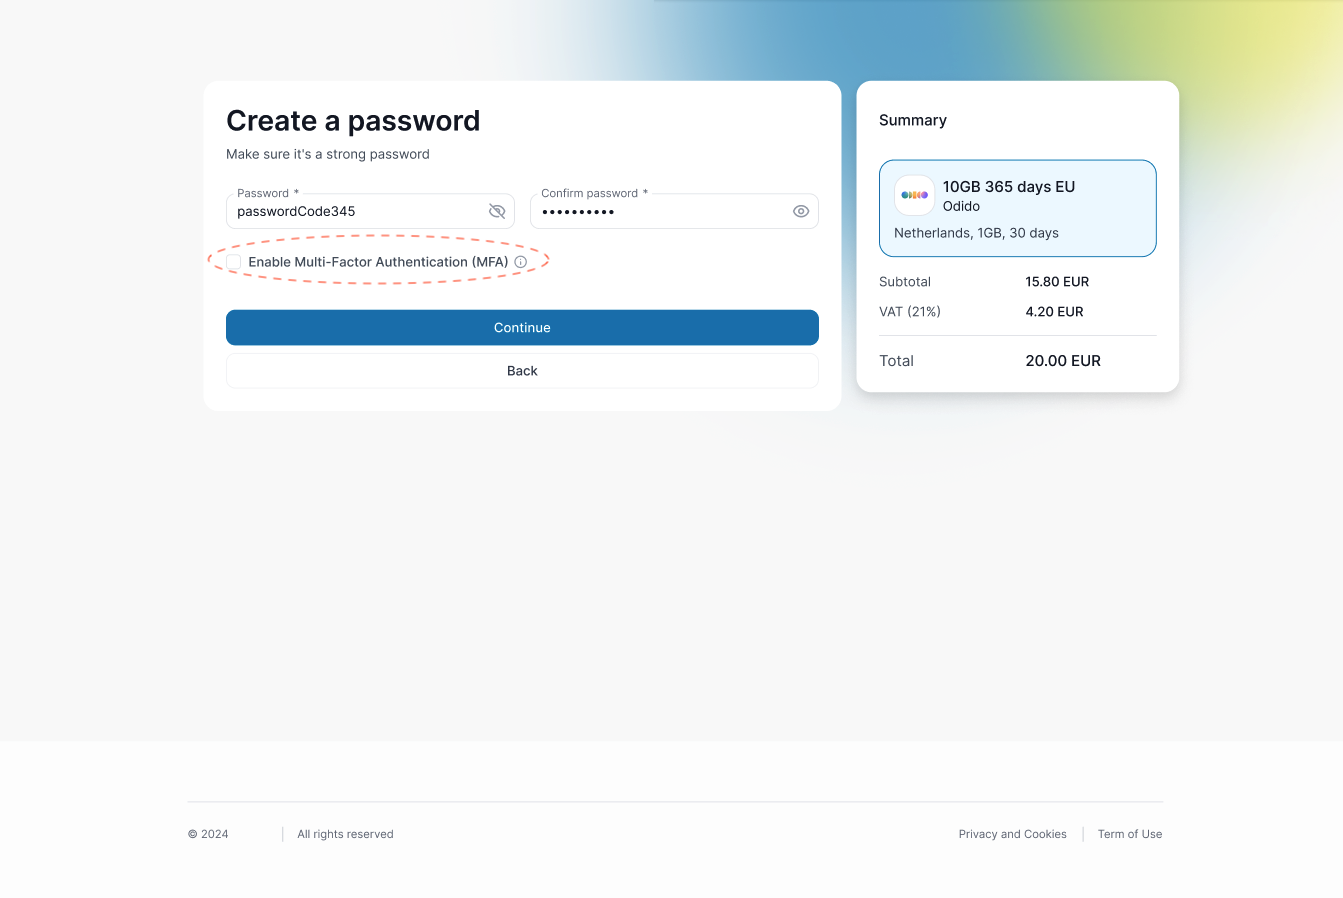
- Create a password. Then click "Continue."
- To increase security, you can enable Multi-Factor Authentication (MFA) by checking the corresponding box.
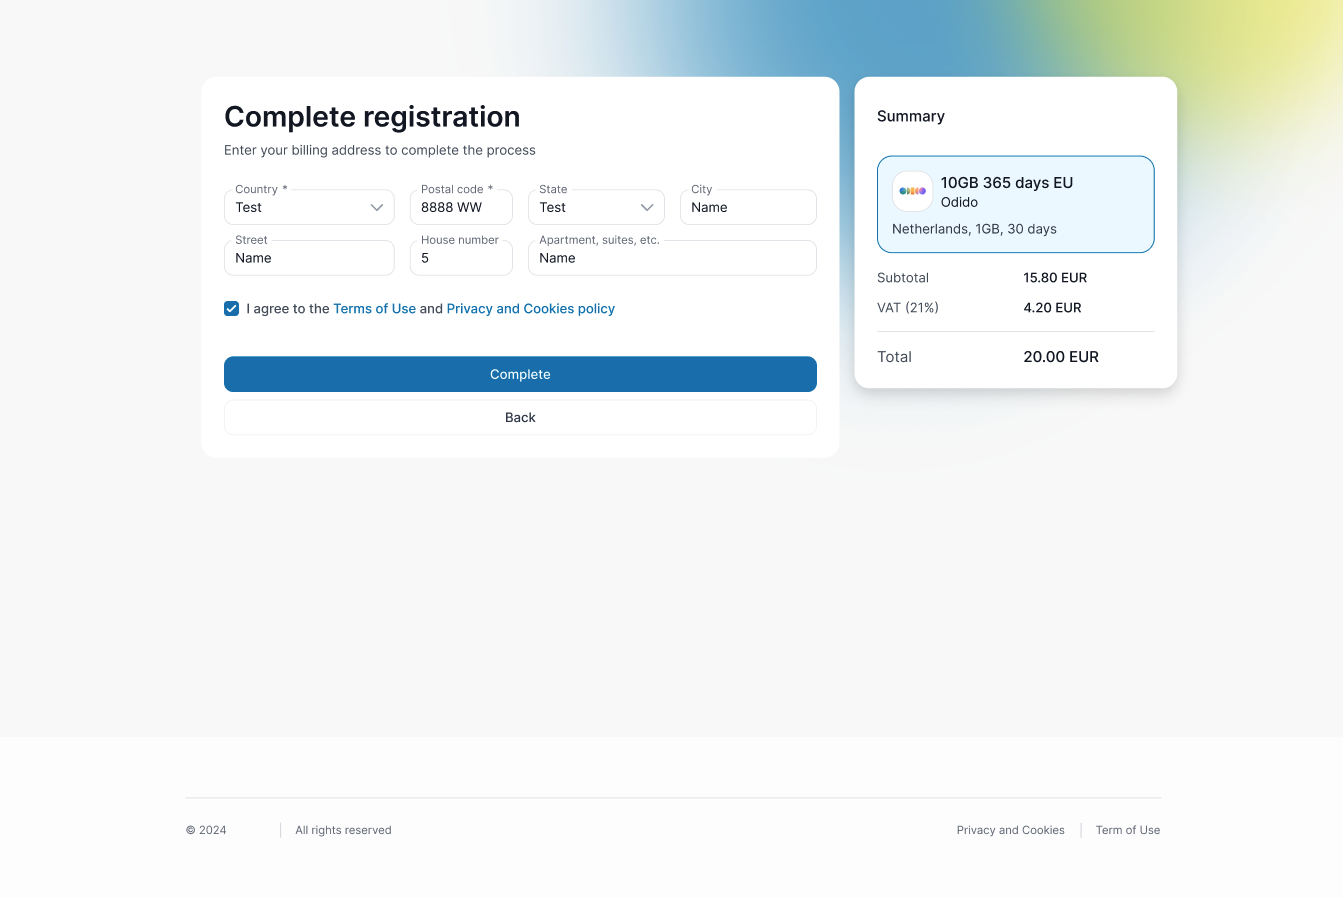
- Enter your billing address and click "Complete."
- Please make sure to check the box confirming that you agree to the Terms of Use and the Privacy & Cookies Policy.
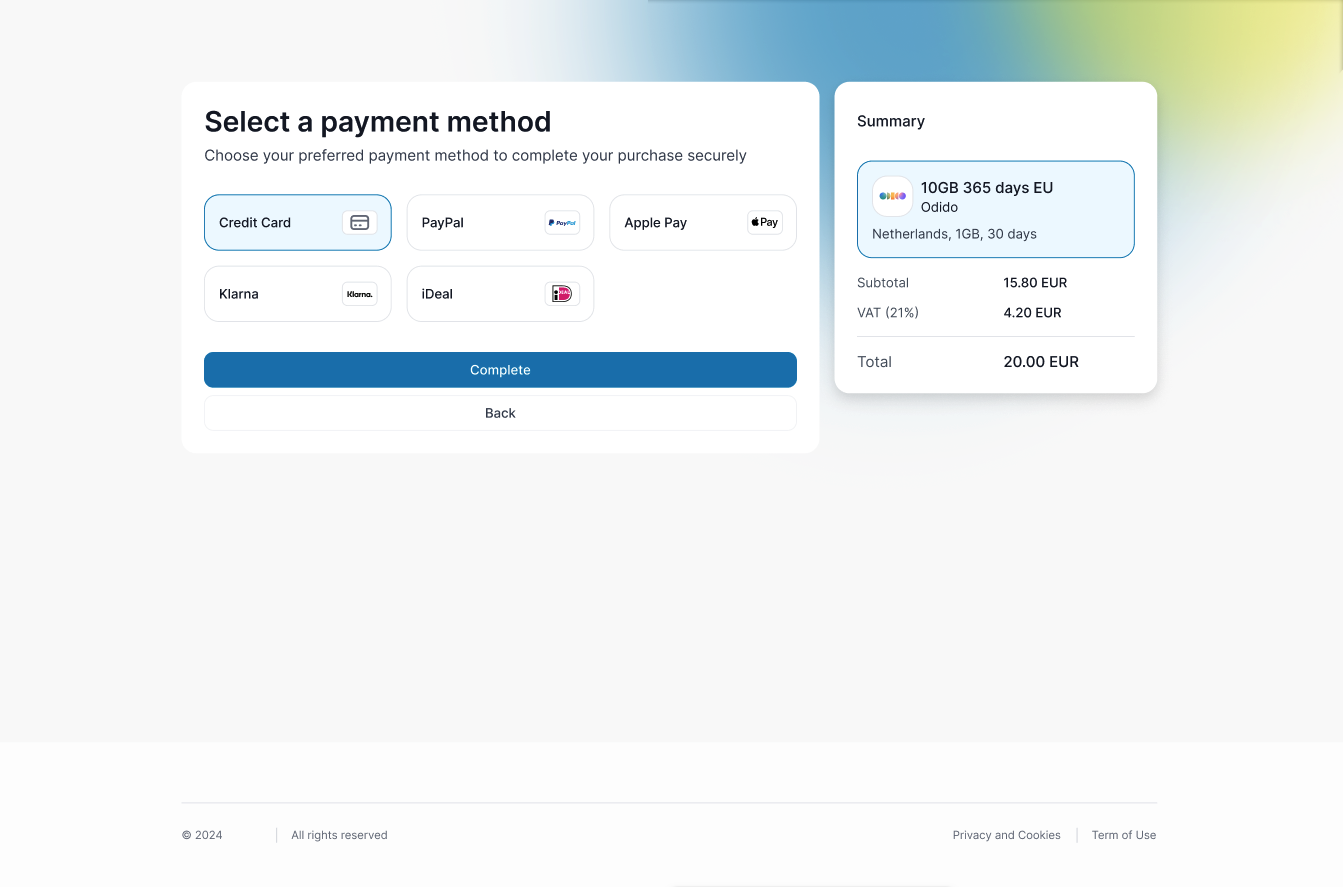
- Select your preferred payment method. Click "Complete."
- Proceed with the payment. (For example: Stripe)
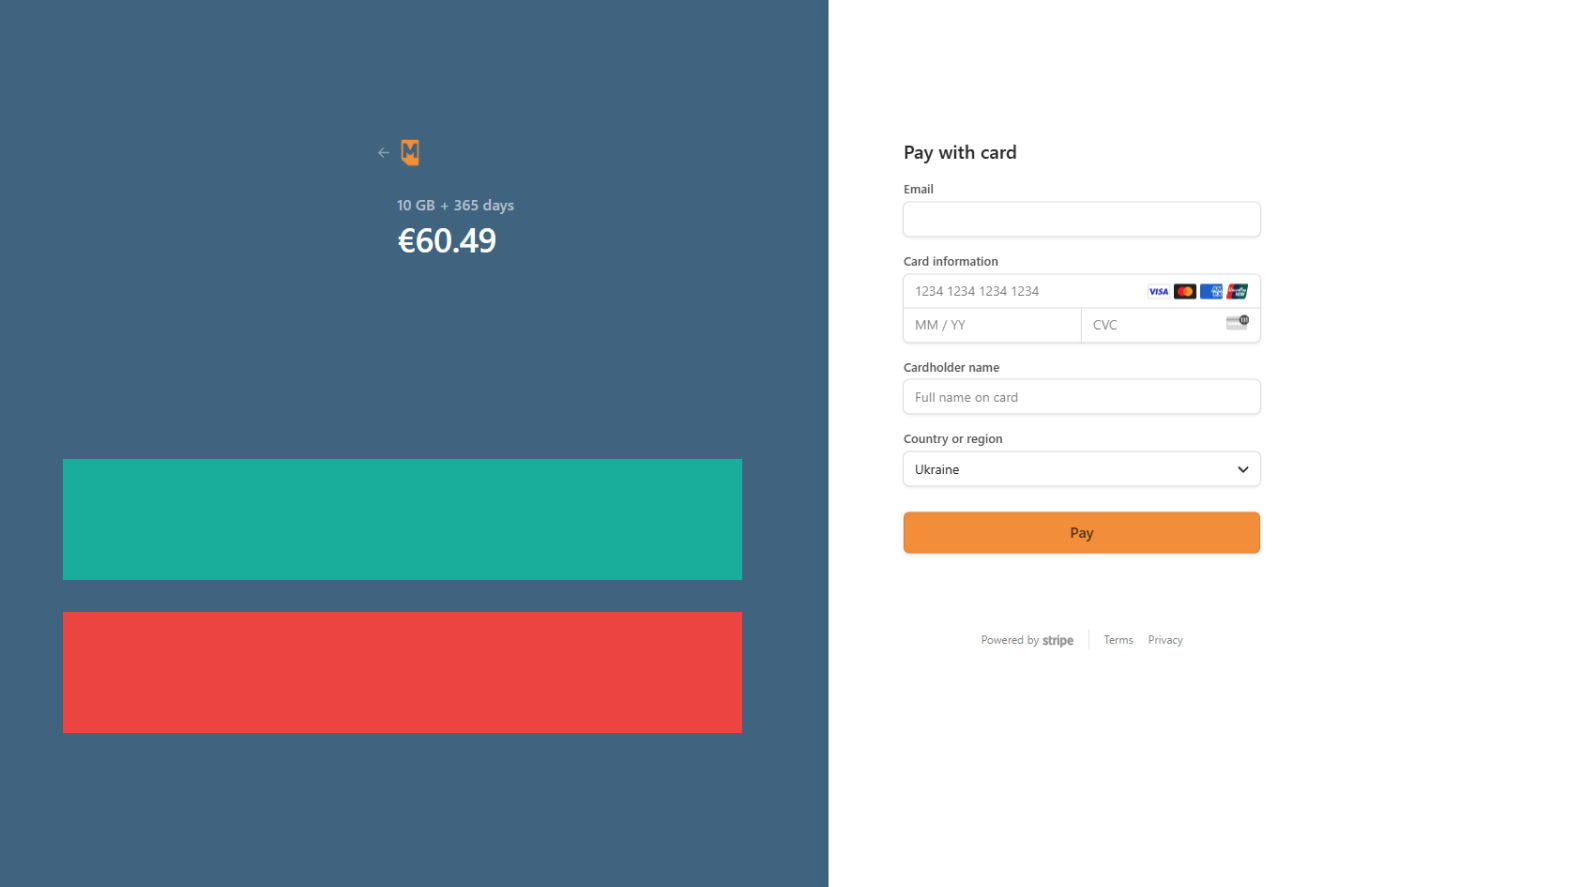
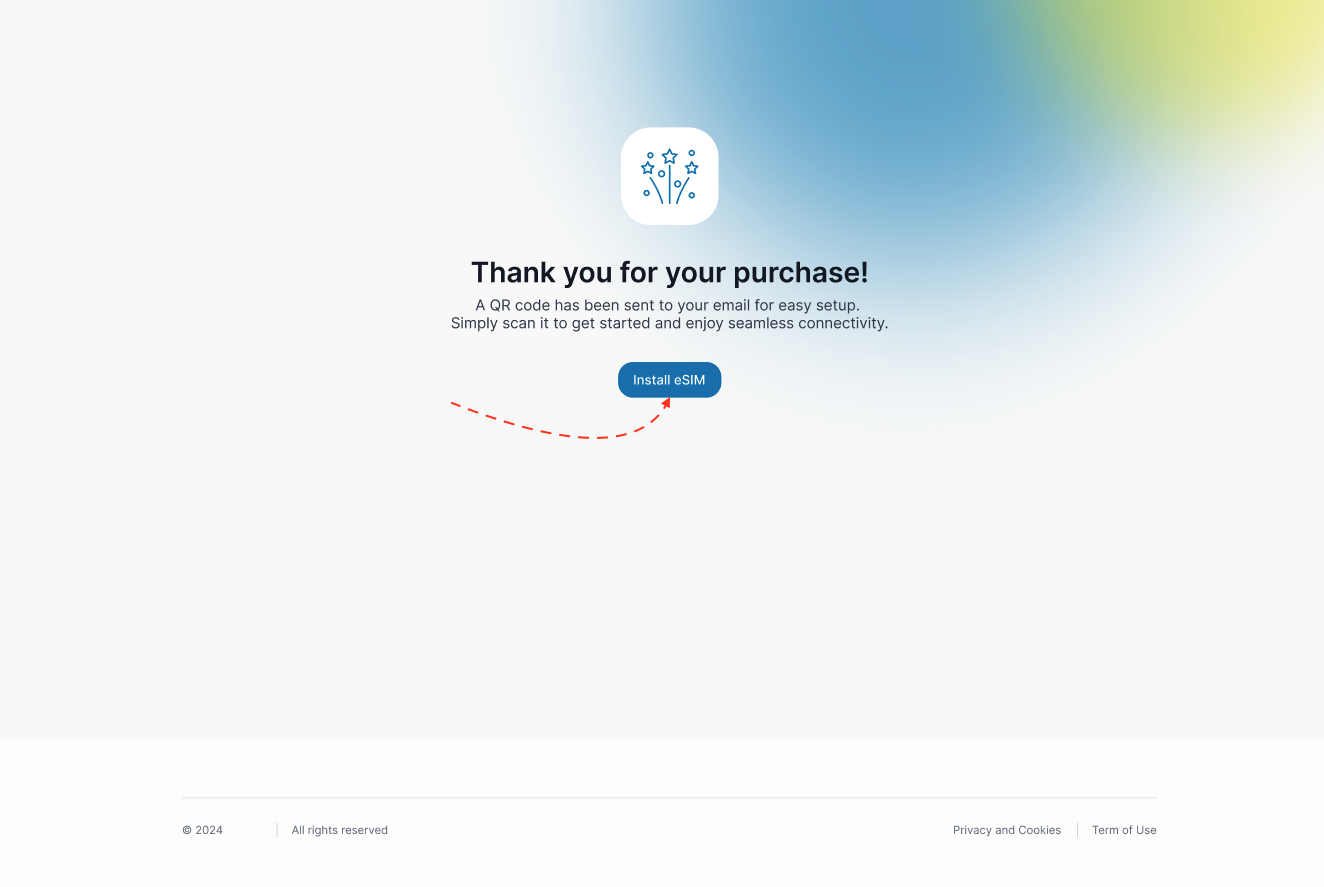
- If the payment is successful, a Thank You page will appear.
- On the Thank You page, click "Install eSIM" to begin the activation process.
eSIM Store Activation
To enable the eSIM Store, please follow these steps:
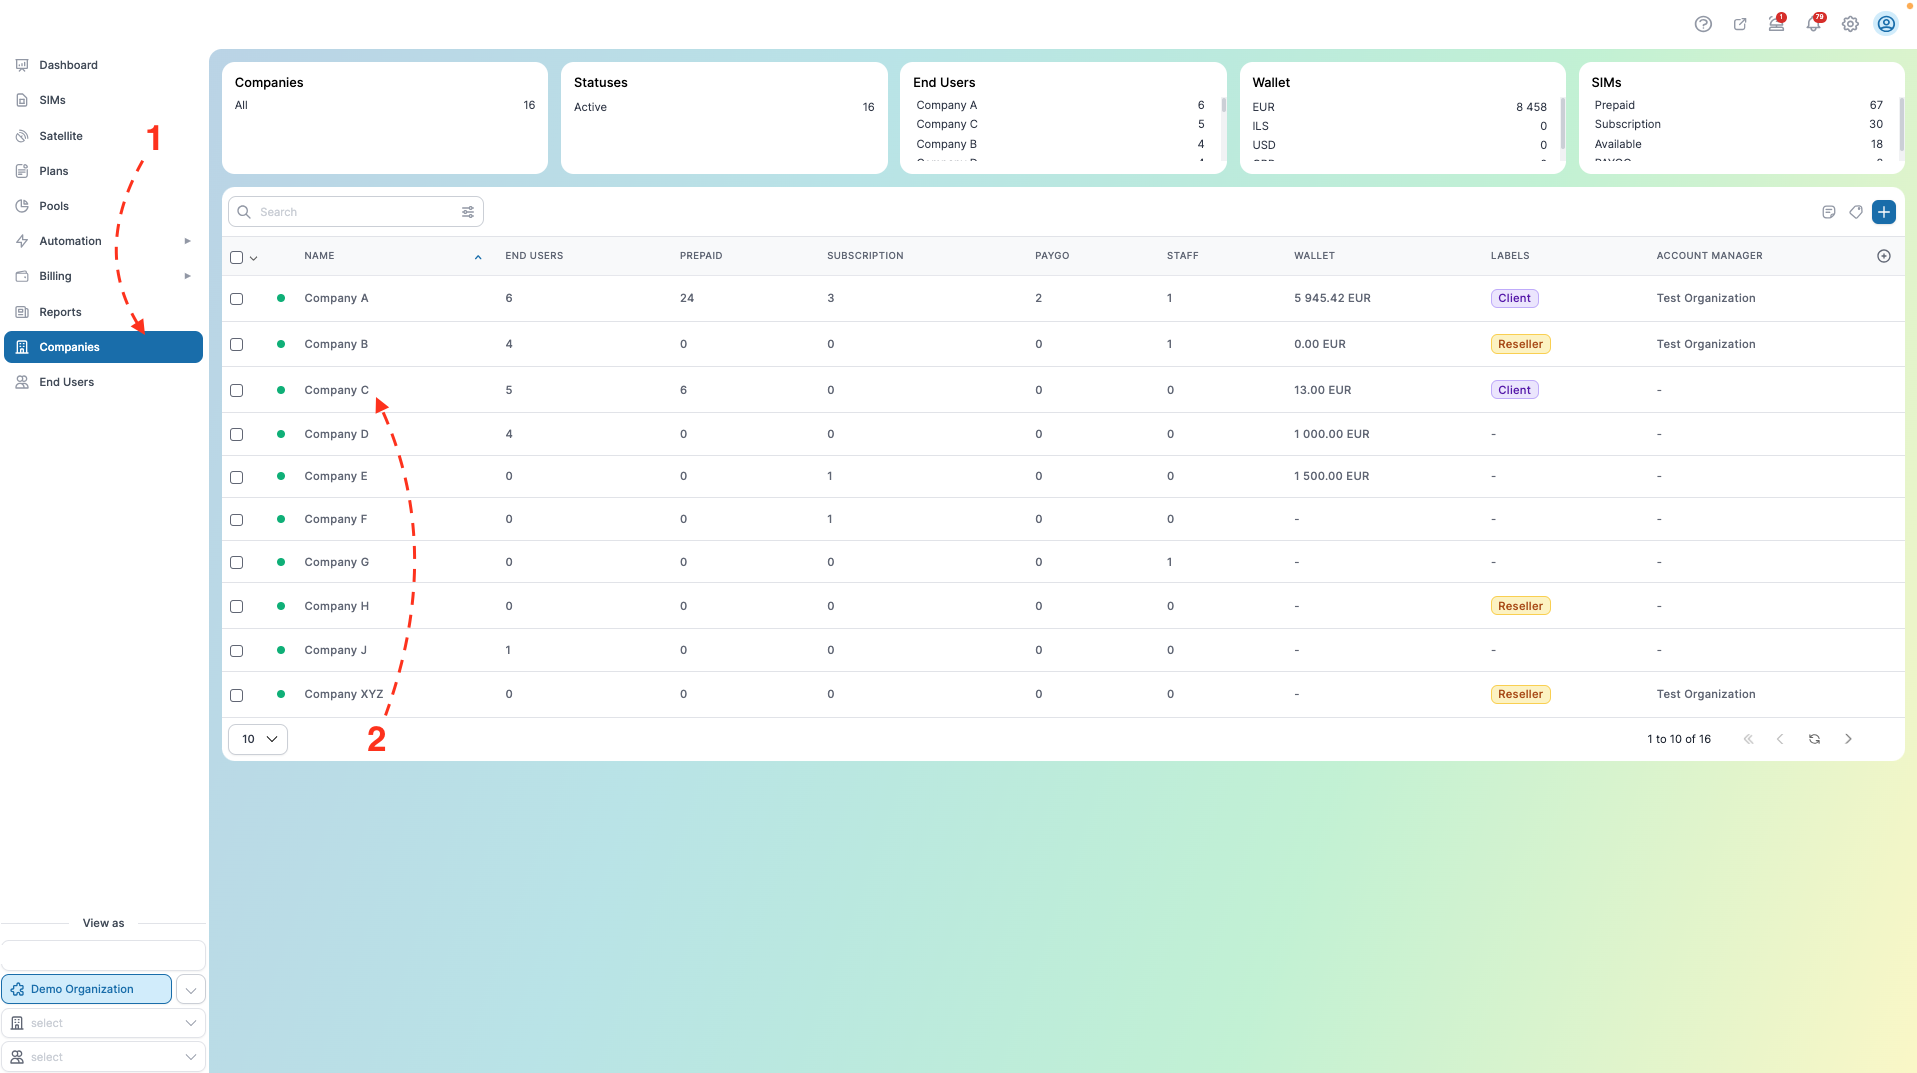
- Ensure that the eSIM Store is available for the company you wish to enable it for. To do this, Navigate to the Companies section.
- Click on the desired company.
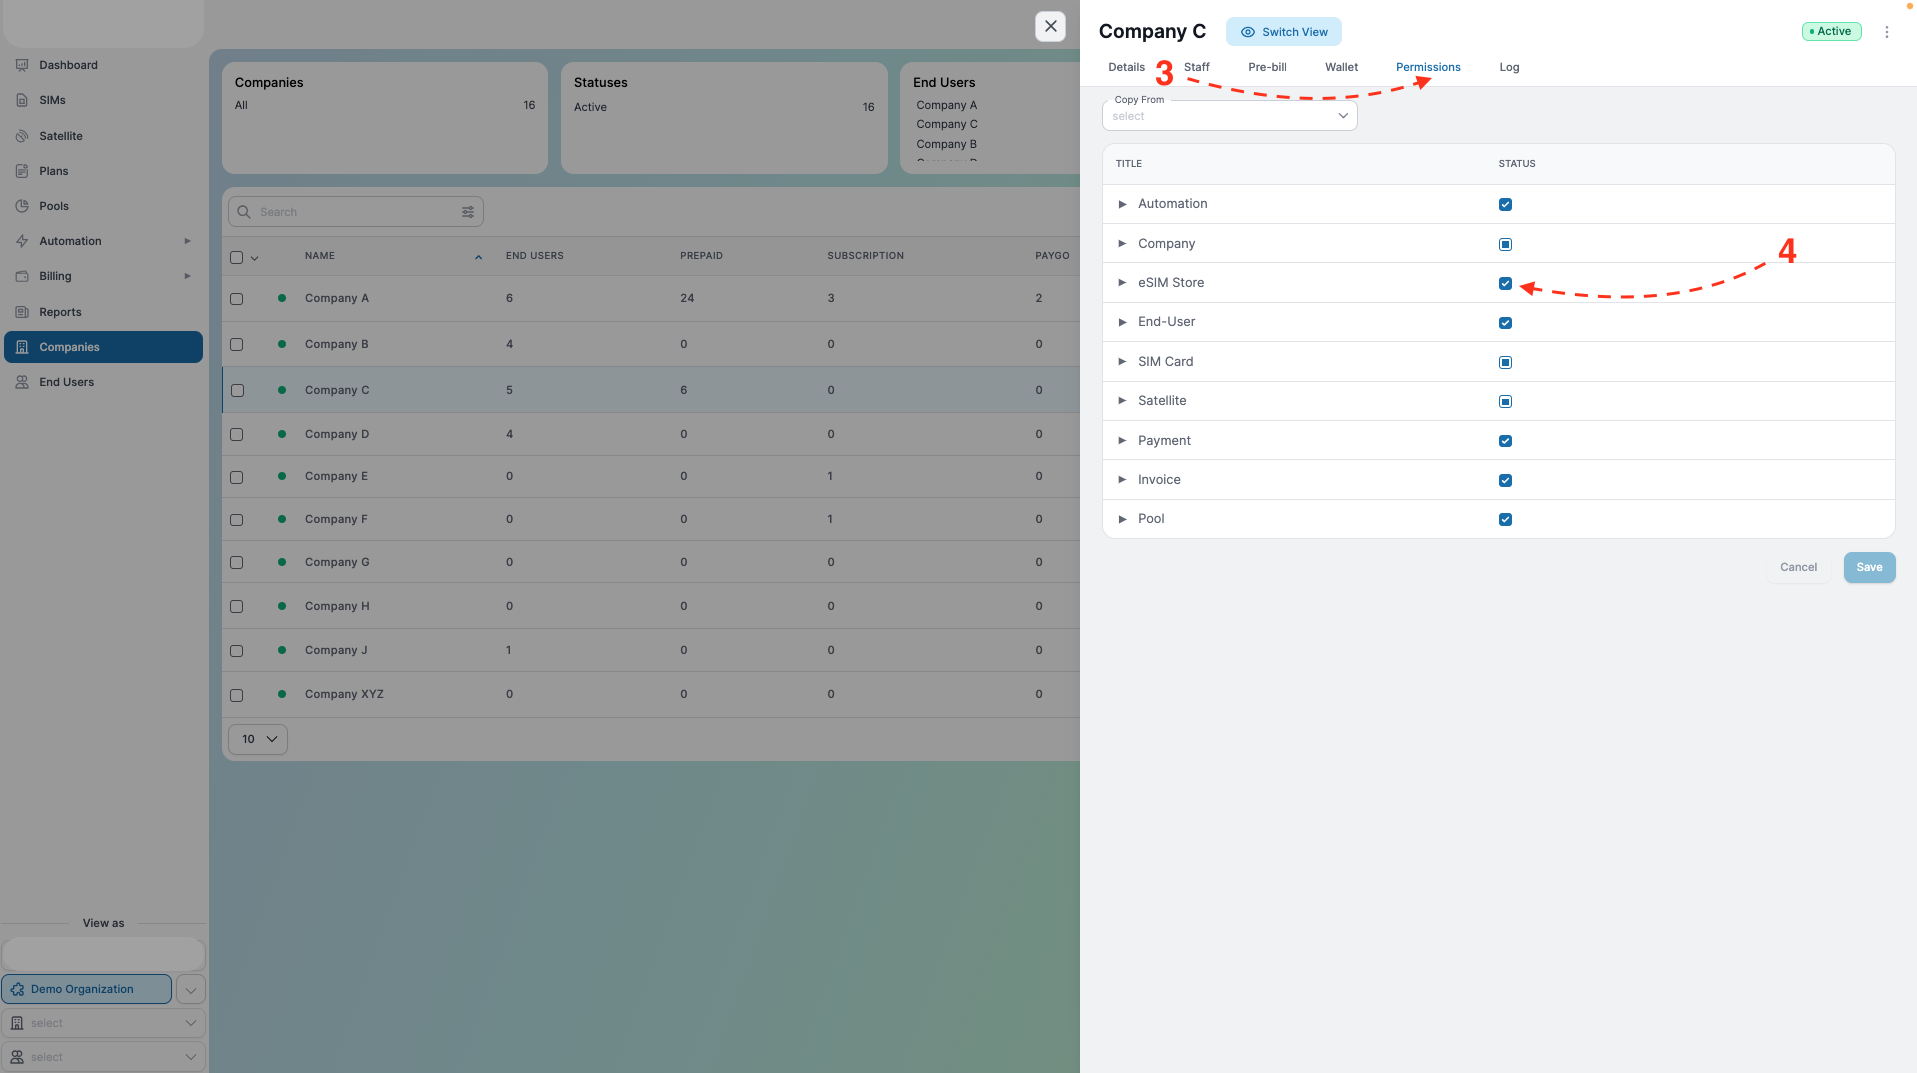
- Go to the Permissions tab.
- Check the box next to the eSIM Store.
- Next, proceed to the “Plans” menu.
- Filter by the company you need.
- Filter by the desired operator.
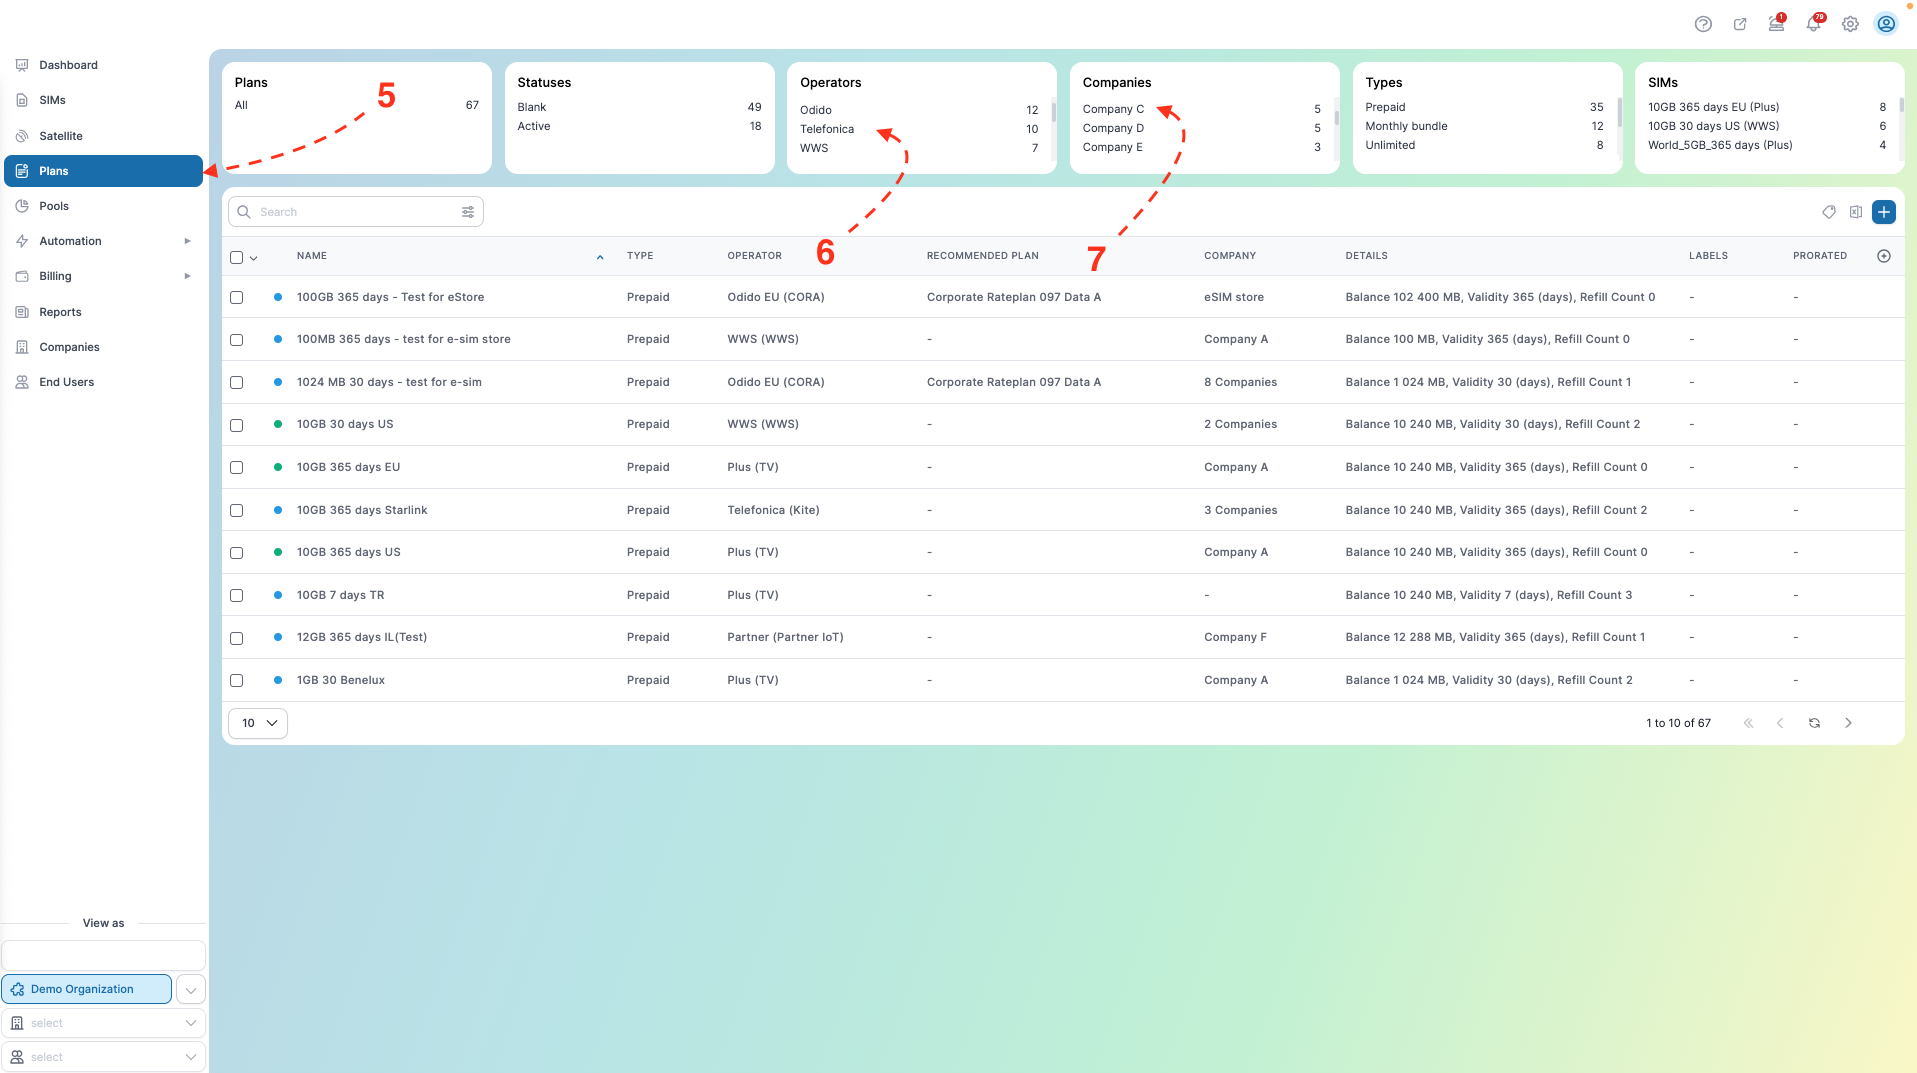
- Select the plan you wish to enable for the eSIM Store.
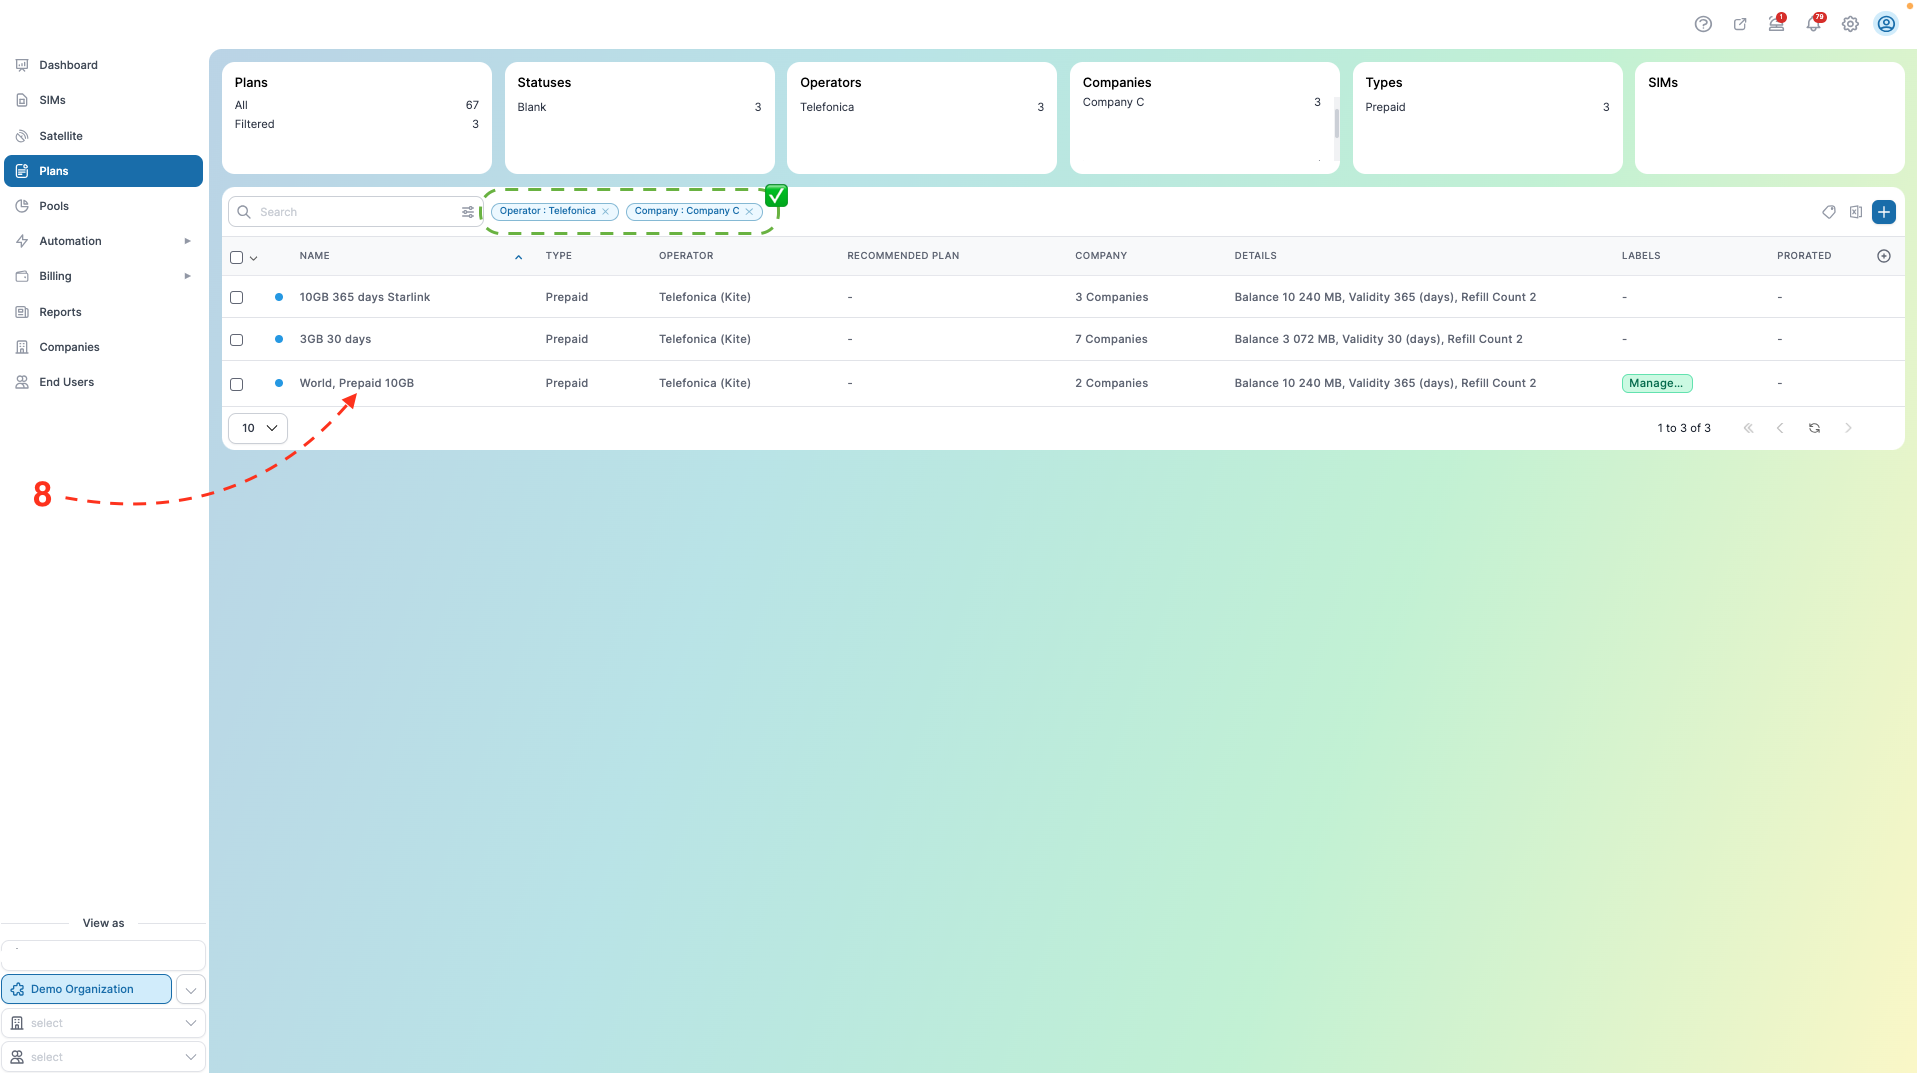
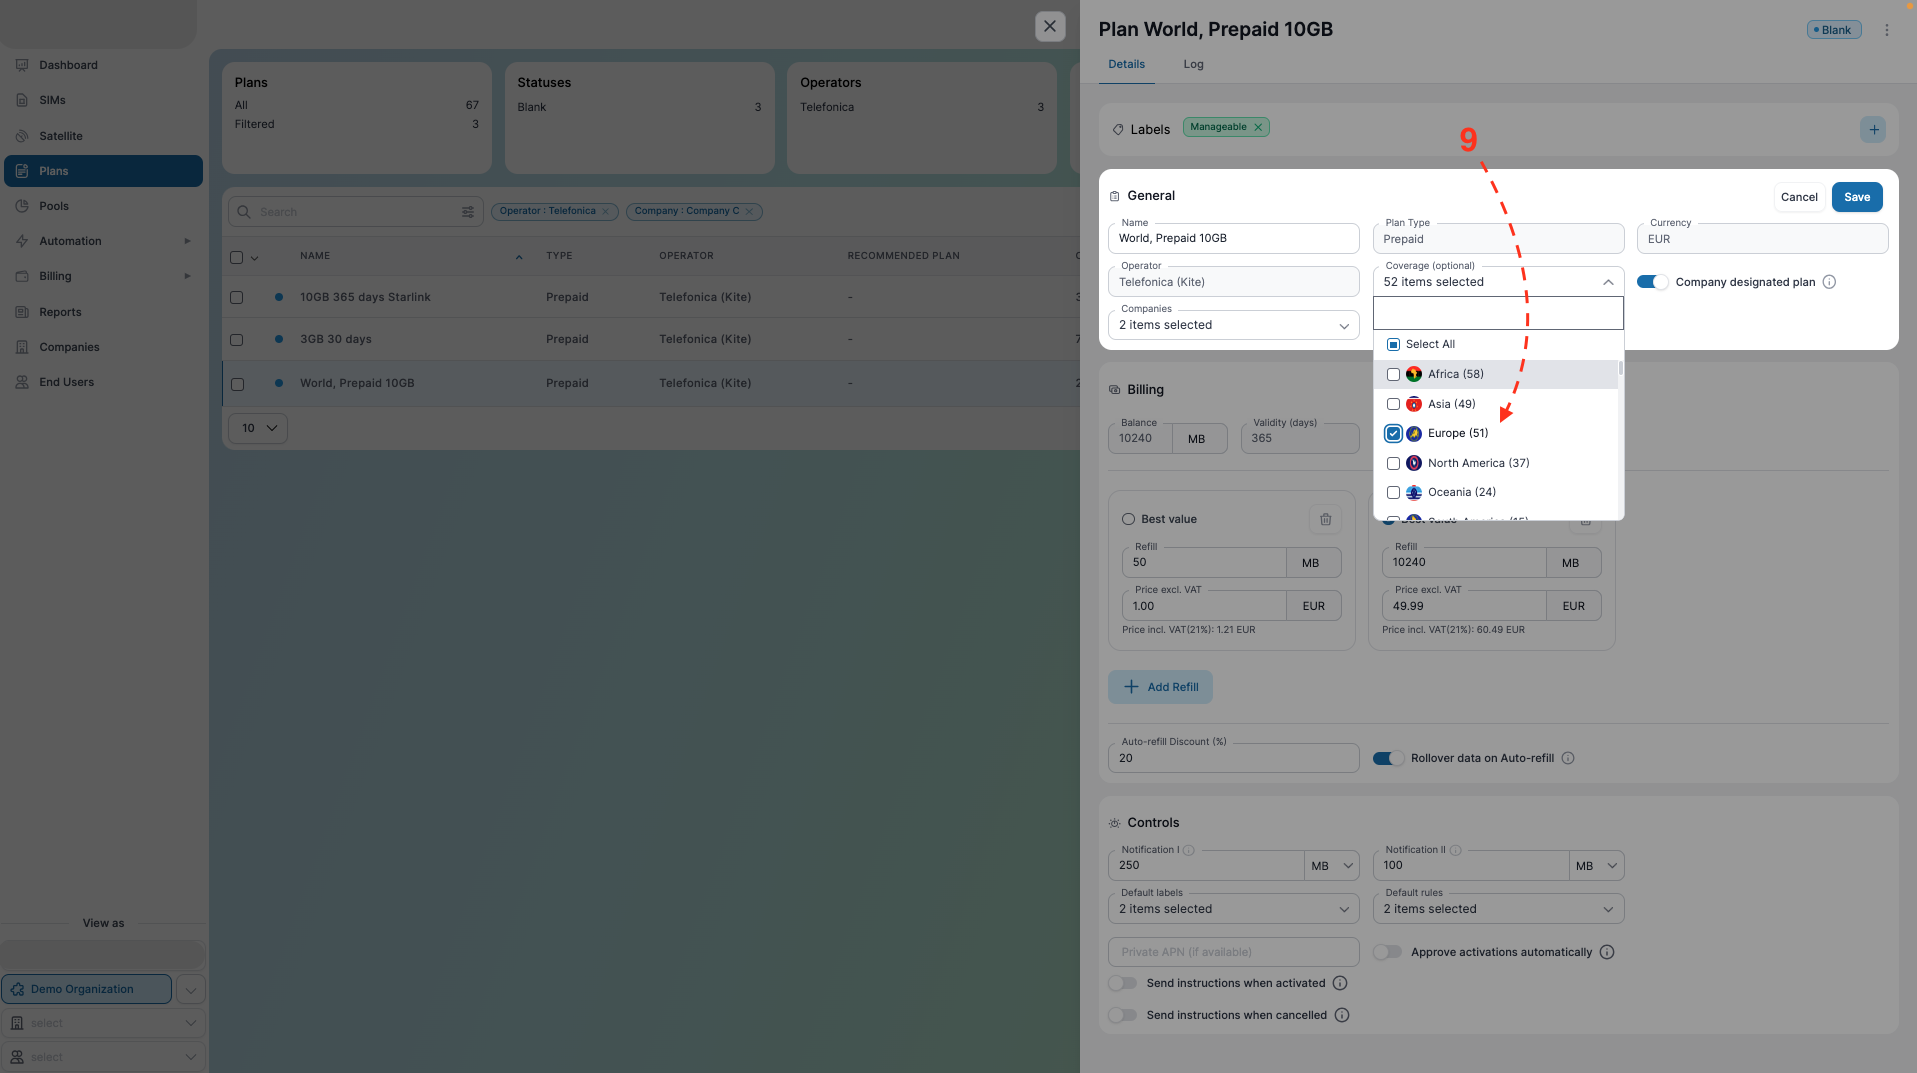
- Choose the appropriate Coverage.
- Select the Rate Plan.
- Click the Save button.
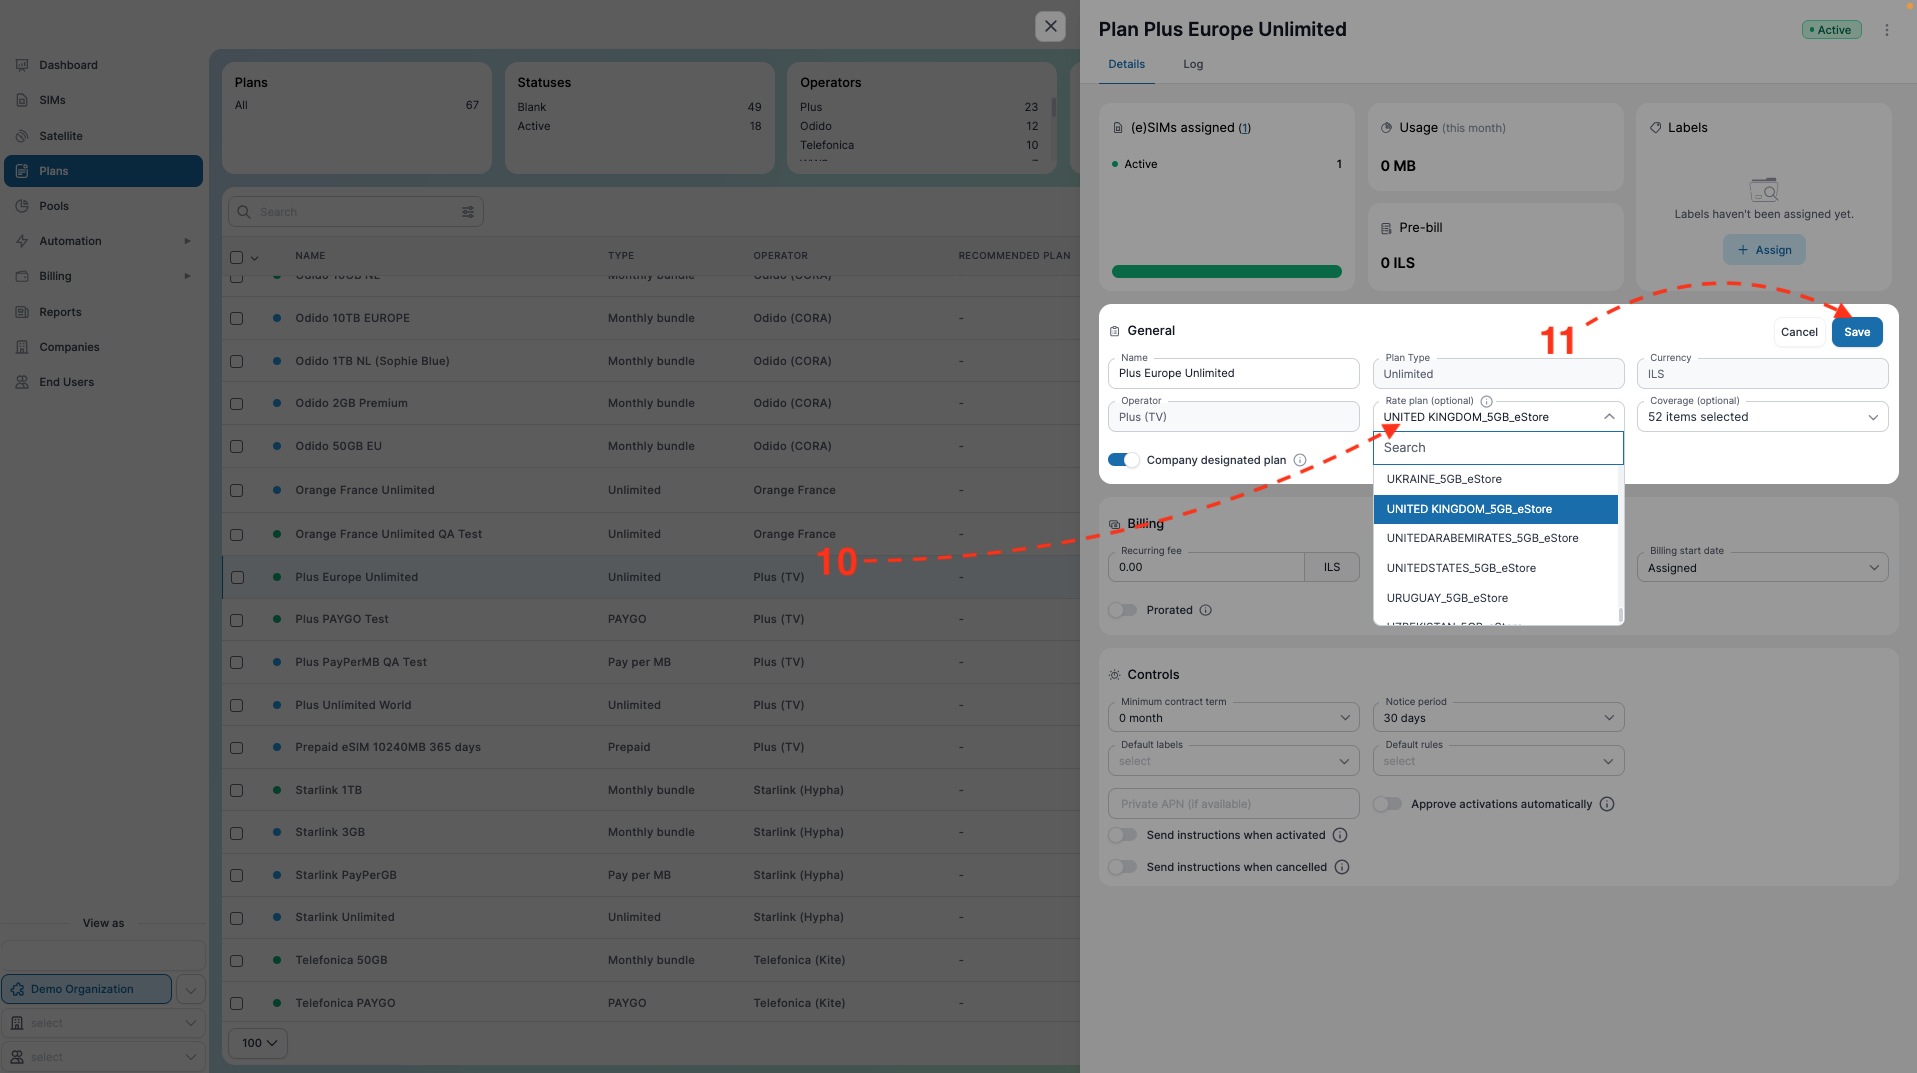
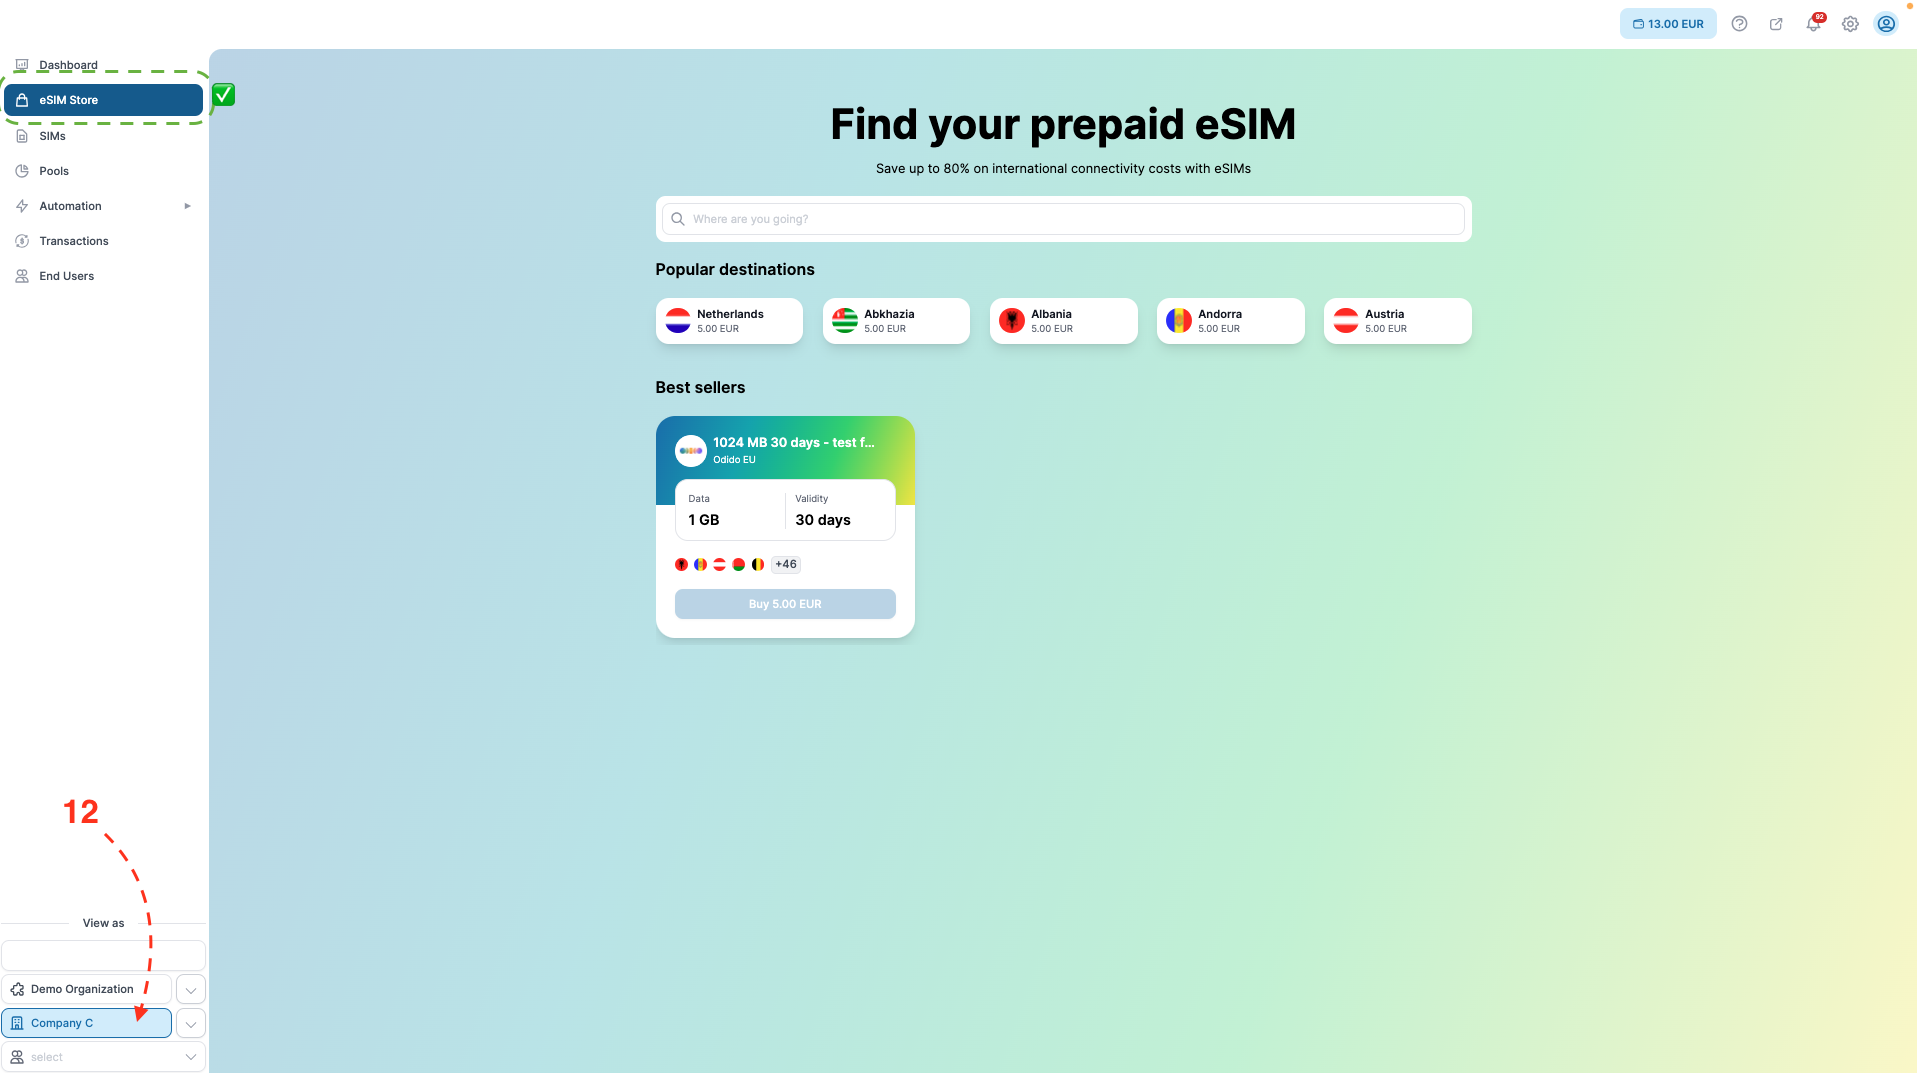
To confirm that the eSIM Store is enabled for the company:
- Go to the company level for which the eSIM Store has been activated and ensure it appears in the menu.
Enjoy using the eSIM Store!